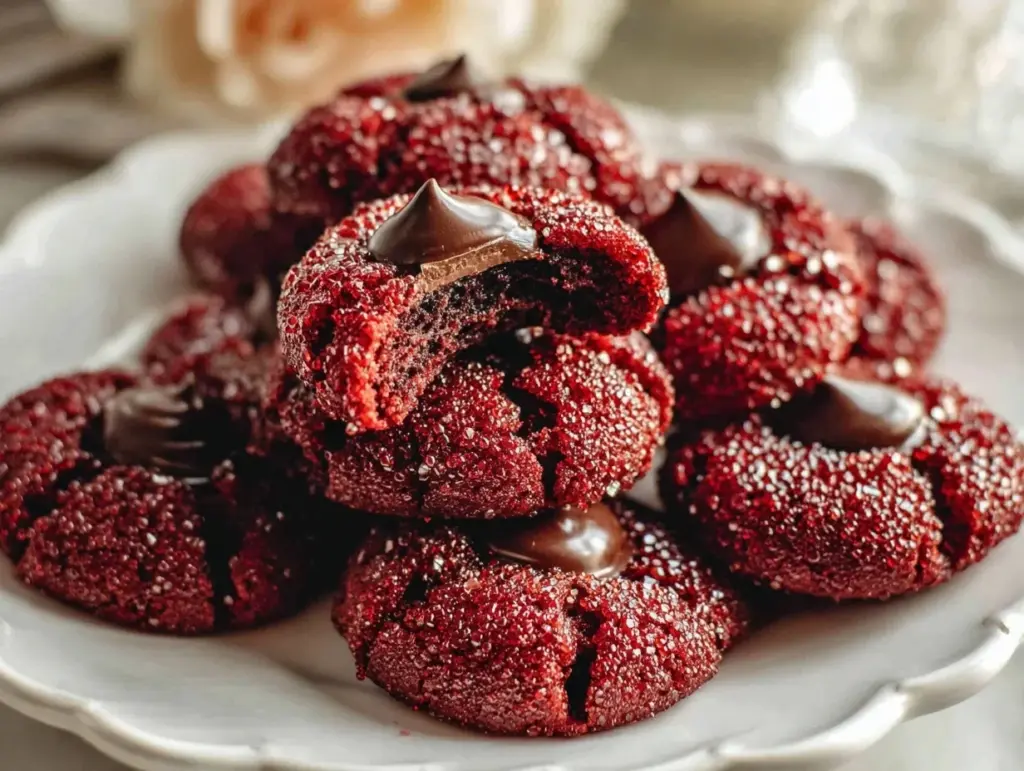
Let me paint you a picture: the scent of cocoa and vanilla swirling together in my kitchen, with a pop of buttery sweetness that just makes your mouth water before the timer even dings. That’s exactly what happens every time I bake these Red Velvet Blossoms Cookies with Hershey’s Kiss Center. The first time I pulled these beauties from the oven, I was instantly hooked—the deep crimson color, that signature crackled top, and, of course, the shiny Hershey’s Kiss nestled right in the center. It’s the kind of moment where you pause, take a deep breath, and just smile because you know you’re onto something truly special.
I have a confession: years ago, when I was knee-high to a grasshopper, my grandma would bake classic blossom cookies for every holiday. But the day I tried red velvet blossoms, it was like I discovered a whole new world of cookie magic. There’s something about the mix of cocoa and tangy cream cheese that feels like pure, nostalgic comfort—dangerously easy, yet so impressive on a cookie platter. Honestly, I wish I’d stumbled on this combo ages ago!
My family couldn’t stop sneaking them off the cooling rack (and I can’t really blame them). Even my neighbor, who “doesn’t do sweets,” asked for the recipe after just one bite. I’ve made these for potlucks, wrapped them up for gifting, and even snuck a few into lunchboxes as a sweet treat for my kids. Whether you want to brighten up your Pinterest cookie board or just need a cozy weekend bake, these cookies have you covered.
In the name of “research,” I’ve tested the Red Velvet Blossoms Cookies recipe more times than I’d care to admit. It’s now a staple for family gatherings and those moments when you want a cookie that feels like a warm hug. Trust me—you’re going to want to bookmark this one.
Why You’ll Love This Recipe
You know what? When it comes to cookies, the little details make all the difference. This Red Velvet Blossoms Cookies Recipe isn’t just a pretty face—it’s been tweaked, tested, and devoured enough times to earn its place as a go-to treat. Here’s why you’ll fall head over heels for these:
- Quick & Easy: Comes together in under 30 minutes (seriously, including bake time), so you can whip up a batch even on busy weeknights or when those last-minute cravings hit.
- Simple Ingredients: No fancy grocery trips required—you probably already have most of what you need in your pantry and fridge. The Red Velvet Blossoms Cookies recipe relies on classic baking staples, making life a little easier.
- Perfect for Every Occasion: These are a hit at holiday parties, birthday celebrations, or just as a sweet surprise in lunchboxes. They look adorable on any dessert table—hello, Pinterest!
- Crowd-Pleaser: Kids love the Hershey’s Kiss center (honestly, who wouldn’t?), and adults appreciate the rich red velvet flavor. Every batch gets rave reviews, no matter the age group.
- Unbelievably Delicious: The combination of cocoa, vanilla, and cream cheese gives you that classic red velvet flavor, while the chewy cookie base and melty chocolate center are pure bliss.
So, what makes these cookies stand out? First off, blending just a touch of cream cheese into the batter gives them a soft, tender crumb—way better than the average blossom. A little cornstarch in the dough keeps them pillowy and prevents them from spreading too much. And using real Hershey’s Kisses (the classics!) means you get that iconic center every time. No off-brand candies here; trust me, I’ve tried, and nothing beats the real deal.
This isn’t just another red velvet cookie recipe—it’s the one you reach for when you want your cookies to be the talk of the party. It’s comfort food, but a little fancier, and with way less fuss. Whether you’re impressing guests or just treating yourself to something special, these Red Velvet Blossoms Cookies bring a little joy to every bite. Honestly, I close my eyes every time I take that first bite. You might, too.
What Ingredients You Will Need
This recipe uses simple, wholesome ingredients to create bold flavor and that classic red velvet cookie texture. Most are pantry staples, but I’ll share a few brand favorites and substitution tips to make sure your Red Velvet Blossoms Cookies turn out just right.
- For the Cookie Dough:
- All-purpose flour (200g) – standard works best, but you can use gluten-free blends if needed.
- Cocoa powder (unsweetened, 2 tbsp/15g) – I prefer Hershey’s or Ghirardelli for a richer taste.
- Cornstarch (1 tbsp/8g) – keeps cookies soft and tender.
- Baking soda (½ tsp/2g)
- Salt (¼ tsp/1g)
- Unsalted butter (½ cup/113g, softened) – can use plant-based butter for dairy-free option.
- Cream cheese (2 oz/56g, softened) – brings that signature tang; use full-fat for best results.
- Granulated sugar (¾ cup/150g)
- Brown sugar (¼ cup/50g, packed) – adds chewiness and depth.
- Large egg (room temperature)
- Vanilla extract (1 tsp/5ml) – I love Nielsen-Massey for flavor, but any pure vanilla works.
- Red food coloring (liquid or gel, 1-2 tbsp/15-30ml) – use more for a vibrant red; I recommend AmeriColor or Wilton gel for the brightest result.
- For Rolling:
- Granulated sugar (for coating, about ¼ cup/50g)
- For the Centers:
- Hershey’s Kisses (milk chocolate, about 24 pieces) – unwrap ahead of time for easy assembly.
Ingredient Tips:
- If you’re avoiding artificial colors, swap the red food coloring for natural beet powder—it won’t be quite as vivid but still gives a lovely hue.
- For a gluten-free option, use a 1:1 gluten-free flour blend (like King Arthur or Bob’s Red Mill).
- Dairy-free? Go for plant-based butter and almond-based cream cheese.
- Feeling festive? Try the Hershey’s Hugs or dark chocolate kisses for the center.
These ingredients work together for that perfect chewy, cocoa-kissed cookie with a melt-in-your-mouth center. Honestly, you can’t go wrong—even if you make a swap or two.
Equipment Needed
- Mixing bowls – At least two: one for dry ingredients, one for wet.
- Electric mixer (hand or stand) – Makes creaming butter and sugars a breeze. You could do it by hand, but let’s face it, an electric mixer saves your arm!
- Measuring cups and spoons – Precision matters for baking, so grab your favorites.
- Baking sheets – Line with parchment paper for easy cleanup. I use Nordic Ware, but any sturdy sheet works.
- Parchment paper – Prevents sticking and helps cookies bake evenly.
- Cookie scoop (medium, about 1.5 tbsp/22ml) – For uniform cookies. If you don’t have one, two spoons work fine (just a little messier).
- Wire cooling rack – Keeps cookies from getting soggy bottoms.
- Spatula – For transferring cookies and scraping bowls.
Personal Tip: My trusty hand mixer has survived years of cookie baking, but I’ve also used a wooden spoon in a pinch. If you’re investing in equipment, look for dishwasher-safe options—they save a ton of cleanup time. And if you’re on a budget, Dollar Store measuring cups work just fine. Just make sure your baking sheets are flat (warped pans mean uneven cookies!).
Maintenance? Wipe down your mixer after each use and replace parchment paper every bake for best results. Easy peasy.
Preparation Method

- Prep Your Ingredients: Set out butter, cream cheese, and egg to reach room temperature (about 30 minutes). Unwrap 24 Hershey’s Kisses and set aside. Line two baking sheets with parchment paper.
- Mix Dry Ingredients: In a medium bowl, whisk together 200g all-purpose flour, 15g cocoa powder, 8g cornstarch, 2g baking soda, and 1g salt. The cocoa should smell rich—if it’s clumping, sift for a smoother mix.
- Cream Butter, Cream Cheese, and Sugars: In a large bowl, beat 113g unsalted butter and 56g cream cheese until smooth and fluffy (about 2 minutes on medium). Add 150g granulated sugar and 50g brown sugar; beat until well combined and light.
- Add Egg & Flavorings: Beat in one large egg and 5ml vanilla extract. Scrape down the bowl to make sure everything is mixed. Add 15-30ml red food coloring (start with less, add more for brighter color). The batter should look vibrantly red—if not, add a tiny bit more coloring.
- Combine Wet & Dry: Gradually add the dry ingredients into the wet, mixing on low until just combined. Don’t overmix; stop when you see no streaks of flour. The dough will be soft, slightly sticky, and deep red.
- Chill Dough (Optional): If your kitchen is warm or dough is very sticky, chill for 15-20 minutes. Not required, but helps if you want thicker cookies.
- Shape Cookies: Scoop dough into 1.5 tbsp (22ml) balls. Roll each in granulated sugar for a sparkly finish. Place on prepared baking sheets, spacing 2 inches apart.
- Bake: Bake at 350°F (175°C) for 9-11 minutes, until edges are set and tops are just crackled. Don’t overbake—cookies should look slightly underdone in the center.
- Add Hershey’s Kiss: Immediately press a Hershey’s Kiss into the center of each cookie. Cookies may crack a little—this is normal and makes them look homemade! Let cookies sit on the baking sheet for 2 minutes, then transfer to wire racks to cool completely.
- Troubleshooting:
- If cookies spread too much, chill dough longer or add 1-2 tbsp extra flour next time.
- Crumbly dough? Add 1 tsp milk to bring it together.
- If Hershey’s Kiss melts too much, wait 1 minute before pressing in.
- Efficiency Tip: While one tray bakes, roll and shape your next batch. If doubling the recipe, rotate baking sheets for even results.
- Final Check: Cookies should be bright red, sparkly, and soft with a gooey chocolate center. The smell will tell you—if your kitchen smells like a bakery, you’ve nailed it!
Honestly, the hardest part is waiting for them to cool. But trust me—warm cookies with a melty Kiss are worth every minute!
Cooking Tips & Techniques
Baking cookies sounds simple, but these little tricks make your Red Velvet Blossoms Cookies truly special. I’ve learned a thing or two (sometimes the hard way!) over the years.
- Room Temp Matters: Always bring butter, cream cheese, and egg to room temperature. Cold ingredients don’t mix as well, and you want that dough silky-smooth.
- Don’t Overmix: Once you add the dry ingredients, mix until just combined. Overmixing leads to tough cookies—learned that after a few hockey puck batches!
- Chill for Control: If your dough is too soft, a quick chill helps control spread and keeps cookies thick and pillowy.
- Watch the Bake: These cookies go from perfect to dry in a flash. Pull them out when the edges are set and the centers look slightly underbaked—they’ll finish on the tray.
- Space Out: Give cookies room to breathe on the baking sheet. Crowding leads to uneven baking (trust me, I once ended up with a cookie blob instead of blossoms!).
- Timing Is Key: Press the Kiss in right after baking, but don’t wait too long or the cookie will set and crack. If you’re a multitasker, unwrap your Kisses while the cookies bake—that way, you’re ready to go.
- Uniform Size: A cookie scoop keeps cookies even, so every one gets a perfect chocolate center.
- Consistency Tips: If you want bakery-style results, weigh your ingredients. It really does make a difference in texture and flavor.
Honestly, I’ve burned a few batches trying to multitask, so set a timer and keep an eye on those cookies. The little things add up to big flavor and perfect texture every time.
Variations & Adaptations
Red Velvet Blossoms Cookies are fun to customize! Over the years, I’ve tried a few variations—some by accident, some on purpose. Here are my favorites:
- Gluten-Free: Use a 1:1 gluten-free flour blend. I like King Arthur’s; it keeps cookies tender and chewy without the wheat.
- Dairy-Free: Swap butter and cream cheese with plant-based versions. Miyoko’s makes a great vegan cream cheese for baking.
- Seasonal Flavors: For winter, add a pinch of cinnamon or nutmeg; in spring, swap the Hershey’s Kiss for a white chocolate Kiss or a pastel candy.
- Extra Chocolate: Mix mini chocolate chips into the dough or use dark chocolate Kisses for a richer bite.
- Nutty Twist: Roll the dough balls in finely chopped pecans before baking for a crunchy exterior.
- No Food Coloring: Omit the red dye for cocoa blossoms—a bit less “red velvet,” but just as tasty.
- Personal Favorite: I once swapped the Hershey’s Kiss for a caramel-filled Rolo, and wow—the gooey center was a hit. It’s not classic, but it’s delicious!
Feel free to experiment. Adjust for allergies, taste preferences, even the season. That’s the beauty of a good cookie recipe—it’s forgiving, and there’s always room for a little fun!
Serving & Storage Suggestions
These Red Velvet Blossoms Cookies are best served at room temperature, but I’ll be honest—warm from the oven with a slightly soft Hershey’s Kiss center is pure bliss. Stack them high on a pretty plate, or arrange them in a festive tin for gifting. They look stunning with a simple sprinkle of powdered sugar for extra sparkle.
Pair these cookies with cold milk, hot cocoa, or even a cup of coffee for grown-ups. They make a sweet finish to brunch, or the perfect after-school snack.
Storage Tips:
- Store in an airtight container at room temperature for up to 4 days. They’ll stay soft and chewy (if they last that long!).
- Freeze baked cookies in a single layer, then transfer to a zip-top bag for up to 2 months. Thaw at room temp—no reheating needed.
- To reheat for that “just-baked” feel, pop a cookie in the microwave for 5-7 seconds. The Kiss will get just a little melty again—yum!
- Flavors actually deepen slightly after a day, so they’re great for making ahead.
Honestly, these cookies don’t stick around long in my house. But if you do have leftovers, they’re just as delicious a few days later.
Nutritional Information & Benefits
Each Red Velvet Blossoms Cookie (with Hershey’s Kiss) is approximately 110 calories, with about 5g fat, 15g carbs, and 1g protein. They’re a treat, for sure, but not too heavy, so you can enjoy more than one (no judgment here!).
Key ingredients like cocoa powder offer antioxidants, and using real butter provides a touch of vitamin A. If you opt for gluten-free or dairy-free swaps, they fit a wider range of diets—just watch for allergens (wheat, dairy, eggs, and chocolate).
From a wellness perspective, these cookies are about balance and joy. They’re a small, sweet bite that brings a little happiness to your day—totally worth it.
Conclusion
If you’re looking for a cookie that’s equal parts stunning and scrumptious, this Red Velvet Blossoms Cookies Recipe with Hershey’s Kiss center is a must-try. It’s easy to make, endlessly customizable, and always a crowd favorite. Whether you’re baking for family, friends, or just yourself, these cookies deliver a little comfort and a lot of flavor.
Don’t be afraid to make this recipe your own—swap in seasonal candies, play with flavors, or tweak for dietary needs. That’s the magic of baking! I truly love this recipe because it brings smiles, sparks nostalgia, and never fails to impress.
Give it a whirl, then let me know how you liked it—drop a comment, share your batch on Pinterest, or tell me your favorite twist. Happy baking, and may your kitchen always smell like cookies!
FAQs
Can I make Red Velvet Blossoms Cookies ahead of time?
Absolutely! You can bake them a day in advance and store in an airtight container. They stay soft and delicious for at least 4 days.
What if I don’t have red food coloring?
No problem—just skip it for cocoa blossoms, or use natural beet powder for a more subtle color.
Can I freeze the cookie dough?
Yes! Scoop and roll the dough balls, then freeze on a baking sheet. Once solid, store in a zip-top bag and bake straight from frozen—just add 1-2 minutes to the baking time.
Do I need to chill the dough?
It’s optional, but chilling helps control spread and keeps cookies thick. If your dough is sticky or your kitchen is warm, 15-20 minutes in the fridge works wonders.
Can I use a different candy in the center?
Definitely! Try caramel Rolos, peanut butter cups, or dark chocolate Kisses for a fun twist.
Pin This Recipe!

Red Velvet Blossoms Cookies Recipe – Easy Hershey’s Kiss Center Treats
These Red Velvet Blossoms Cookies feature a soft, chewy red velvet base with a classic Hershey’s Kiss nestled in the center. Quick to make and perfect for any occasion, they combine cocoa, vanilla, and cream cheese for a nostalgic, crowd-pleasing treat.
- Prep Time: 15 minutes
- Cook Time: 10 minutes
- Total Time: 25 minutes
- Yield: 24 cookies 1x
- Category: Dessert
- Cuisine: American
Ingredients
- 1 1/2 cups all-purpose flour (200g)
- 2 tablespoons unsweetened cocoa powder (15g)
- 1 tablespoon cornstarch (8g)
- 1/2 teaspoon baking soda (2g)
- 1/4 teaspoon salt (1g)
- 1/2 cup unsalted butter, softened (113g)
- 2 ounces cream cheese, softened (56g)
- 3/4 cup granulated sugar (150g)
- 1/4 cup brown sugar, packed (50g)
- 1 large egg, room temperature
- 1 teaspoon vanilla extract (5ml)
- 1–2 tablespoons red food coloring (liquid or gel, 15-30ml)
- 1/4 cup granulated sugar (for rolling, 50g)
- 24 Hershey’s Kisses (milk chocolate), unwrapped
Instructions
- Set out butter, cream cheese, and egg to reach room temperature (about 30 minutes). Unwrap 24 Hershey’s Kisses and set aside. Line two baking sheets with parchment paper.
- In a medium bowl, whisk together flour, cocoa powder, cornstarch, baking soda, and salt.
- In a large bowl, beat butter and cream cheese until smooth and fluffy (about 2 minutes on medium speed).
- Add granulated sugar and brown sugar; beat until well combined and light.
- Beat in the egg and vanilla extract. Scrape down the bowl to ensure everything is mixed.
- Add red food coloring, starting with 1 tablespoon and adding more for a brighter color.
- Gradually add the dry ingredients to the wet mixture, mixing on low until just combined. Do not overmix.
- If dough is very sticky or kitchen is warm, chill for 15-20 minutes (optional).
- Scoop dough into 1.5 tablespoon balls. Roll each ball in granulated sugar and place on prepared baking sheets, spacing 2 inches apart.
- Bake at 350°F (175°C) for 9-11 minutes, until edges are set and tops are crackled. Do not overbake.
- Immediately press a Hershey’s Kiss into the center of each cookie. Let cookies sit on the baking sheet for 2 minutes, then transfer to wire racks to cool completely.
- Store cookies in an airtight container at room temperature for up to 4 days, or freeze for up to 2 months.
Notes
For best results, use room temperature butter, cream cheese, and egg. Chilling the dough helps control spread and keeps cookies thick. You can substitute gluten-free flour or plant-based dairy for dietary needs. Press the Hershey’s Kiss in immediately after baking for the classic look. Cookies can be customized with different candies or rolled in nuts for variation.
Nutrition
- Serving Size: 1 cookie
- Calories: 110
- Sugar: 10
- Sodium: 60
- Fat: 5
- Saturated Fat: 3
- Carbohydrates: 15
- Fiber: 0.5
- Protein: 1
Keywords: red velvet, blossom cookies, Hershey's Kiss, holiday cookies, easy dessert, cream cheese cookies, chocolate center, kid-friendly, party treats, cookie platter


