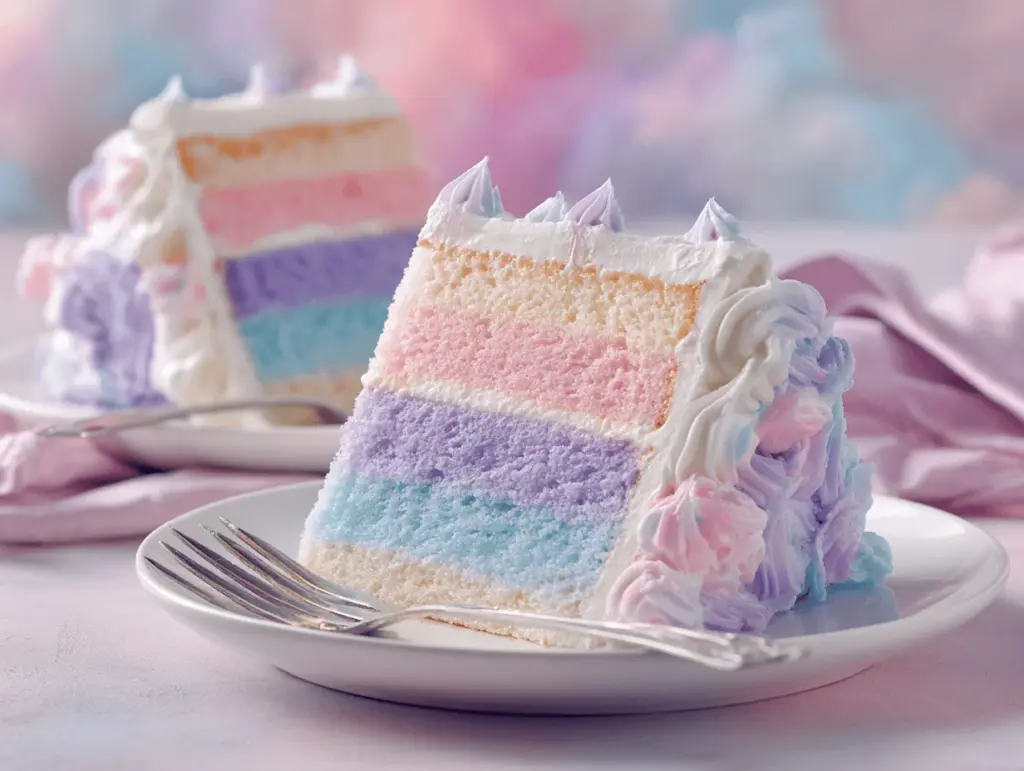
There’s something honestly magical about slicing into a cake and seeing a swirl of pastel rainbows inside—like a sweet surprise just waiting to be discovered! The first time I baked this rainbow cloud cake, my kitchen smelled like vanilla and sugar, and I couldn’t stop smiling at those soft, pillowy layers. I’ll admit, I’m not always the most patient decorator, but with this recipe, the process itself is half the fun (and a little bit of a mess, but who’s judging?).
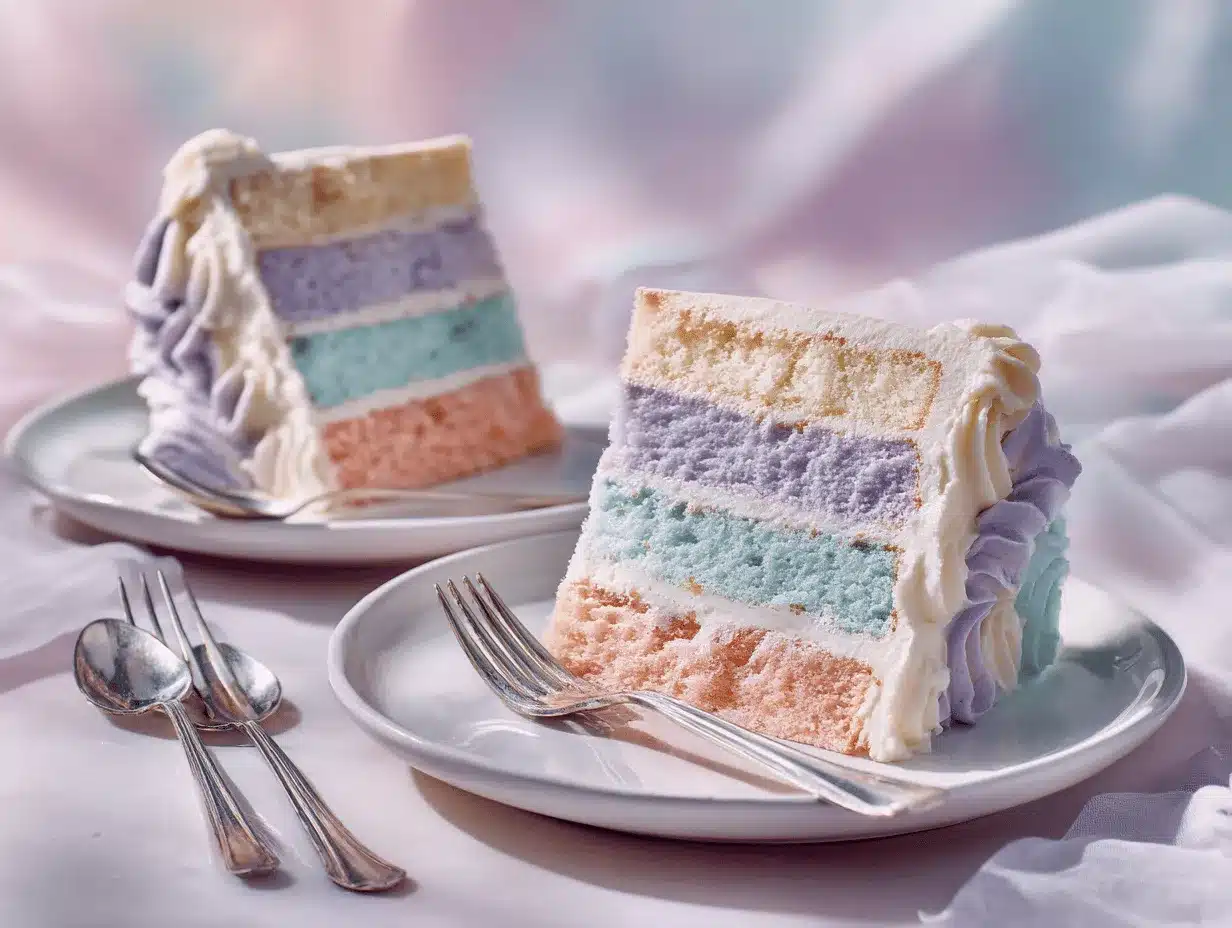
This dreamy pastel rainbow cloud cake isn’t just a treat for the eyes—it’s got that soft, melt-in-your-mouth crumb and a light cloud-like frosting that makes every bite feel like a celebration. I first made this for my daughter’s birthday, after she begged for a “unicorn cake with clouds.” Since then, it’s become my go-to for birthdays, baby showers, and any day that needs a bit more whimsy. Honestly, I think everyone deserves a slice of pastel happiness now and then.
Whether you’re baking for a special occasion or just want to brighten someone’s day, this rainbow cloud cake recipe is easier than it looks. The colors are all soft pastels, so it’s extra dreamy—think watercolor rainbows on a fluffy, cloud-like base. Plus, you don’t need fancy bakery skills or rare ingredients, and you can absolutely customize the colors to match your party theme. If you’ve ever felt intimidated by rainbow cakes, don’t worry! After testing this recipe a dozen times (and learning from my own kitchen mishaps), I promise you’ll get show-stopping results with less fuss than you’d expect.
Why You’ll Love This Rainbow Cloud Cake Recipe
- Showstopper Looks, Simple Steps: This rainbow cloud cake wowed every guest at our last birthday bash, and honestly, the “oohs” and “aahs” were worth every minute! The pastel colors create a dreamy effect, but the technique is beginner-friendly—even if you’re not a pro baker.
- Soft, Fluffy Texture: The cake layers are incredibly light and moist (thanks to a little buttermilk magic), and each forkful tastes like a vanilla cloud. No dry or crumbly cake here!
- Easy to Customize: Pick your favorite pastel shades or match the cake to your party theme. I’ve made this with everything from soft pinks and blues for baby showers to a full spectrum for birthdays.
- Kid-Approved (and Grown-Ups Too!): My kids think this is “the best cake ever,” and I’ve watched adults sneak second slices. The mild vanilla flavor and creamy frosting make it a crowd-pleaser.
- No Fancy Equipment Needed: You can pull this off with regular cake pans and some zip-top bags for piping. No need for specialty supplies—just a little patience and creativity.
- Perfect for Celebrations: Whether it’s a birthday, baby shower, or just a rainy Saturday, this cake brings instant joy. It’s the kind of dessert that feels like a party all by itself!
What truly sets this rainbow cloud cake recipe apart is the pastel palette and the pillowy, marshmallow-like cloud frosting. Instead of vivid, bold colors, these dreamy hues look like something out of a storybook. I use a super simple blending method for the batter, so your layers stay light and tender. The frosting—my secret weapon—is a whipped vanilla buttercream that pipes up into the fluffiest clouds (and holds its shape, even on warm days). If you want a cake that’s as fun to make as it is to eat, this is it. You’ll love how every slice looks slightly different, like a watercolor painting in cake form.
What Ingredients You Will Need
This recipe uses everyday ingredients to create a show-stopping rainbow cloud cake. You probably have most of these on hand already, and there’s plenty of flexibility if you need to swap things out. Here’s what you’ll need for the cake and dreamy cloud frosting:
- For the Cake:
- 2 1/2 cups (315g) all-purpose flour (sifted for a lighter crumb)
- 2 teaspoons baking powder
- 1/2 teaspoon baking soda
- 1/2 teaspoon fine sea salt
- 1/2 cup (115g) unsalted butter, softened (adds richness)
- 1/2 cup (120ml) neutral oil (like canola or vegetable oil—keeps cake moist)
- 1 3/4 cups (350g) granulated sugar
- 4 large eggs, room temperature
- 1 tablespoon pure vanilla extract (I love Nielsen-Massey for best flavor)
- 1 cup (240ml) buttermilk, room temperature (for softness and flavor; sub with milk + 1 tbsp lemon juice)
- Pastel Gel Food Coloring: Pink, yellow, green, blue, lavender (I use Americolor or Wilton—gels won’t thin your batter like liquid colors do)
- For the Dreamy Cloud Frosting:
- 1 cup (225g) unsalted butter, softened
- 4 cups (480g) powdered sugar, sifted
- 1/4 cup (60ml) whole milk or heavy cream (adjust for consistency)
- 2 teaspoons pure vanilla extract
- 1/4 teaspoon fine salt
- Optional: 1/2 cup (120g) marshmallow fluff (for extra fluffy clouds—seriously dreamy!)
- Pastel gel food coloring for cloud accents (optional)
- For Decorating:
- Pastel sprinkles or edible glitter (totally optional, but so fun!)
- Mini meringues or marshmallows (for extra “cloud” texture on top)
Ingredient Tips: If you need a gluten-free option, swap in a good 1:1 gluten-free flour blend (I’ve tried King Arthur’s with great results). For a dairy-free cake, use plant-based butter and milk, and check that your food coloring is allergy-friendly. In a pinch, plain yogurt can sub for buttermilk—just thin slightly with milk.
If you want your colors extra soft, use just a toothpick’s worth of gel coloring—less is more! For vibrant, bolder rainbows, add a touch more. And don’t worry if your shades aren’t perfectly even (the watercolor look is part of the charm!).
Equipment Needed
- Three 8-inch (20cm) round cake pans: If you only have two, bake in batches. Line with parchment for easy release.
- Mixing bowls: At least two large bowls—one for dry, one for wet ingredients.
- Hand mixer or stand mixer: Either works—hand mixers are great for smaller kitchens.
- Flexible spatulas: For folding and scraping every last bit of batter and frosting.
- Measuring cups and spoons: For precise results, I use a digital kitchen scale (worth the investment!).
- Offset spatula: Makes frosting smoother (a butter knife works in a pinch).
- Piping bags (or zip-top bags): For cloud frosting—snip the end off if you don’t have tips.
- Cooling racks: Crucial for even cooling and avoiding soggy bottoms.
- Toothpicks: For swirling pastel colors and checking doneness.
Honestly, I’ve made this cake with just a whisk and elbow grease when my mixer was on the fritz (it’s doable, but your arms will get a workout!). If you’re on a budget, most dollar stores have great basic baking pans and spatulas. Keep pans in good shape by hand-washing and drying thoroughly—nothing worse than a rusty cake pan when you’re in the middle of baking!
How to Make Rainbow Cloud Cake
- Prep Your Pans & Oven (10 min): Preheat oven to 350°F (175°C). Grease three 8-inch (20cm) round cake pans and line bottoms with parchment. Lightly dust with flour and tap out excess. (Trust me—parchment is your friend for easy cake removal!)
- Mix Dry Ingredients (5 min): In a large bowl, whisk together 2 1/2 cups (315g) flour, 2 tsp baking powder, 1/2 tsp baking soda, and 1/2 tsp salt. Set aside.
- Cream Butter, Oil, & Sugar (5 min): In another large bowl (or stand mixer), beat 1/2 cup (115g) softened butter and 1/2 cup (120ml) oil until smooth and creamy. Add 1 3/4 cups (350g) sugar and beat until light and fluffy, about 2-3 minutes.
- Add Eggs & Vanilla (2 min): Beat in 4 large eggs one at a time, scraping down the bowl after each. Add 1 tbsp vanilla and mix until combined. If your mixture looks a bit curdled, don’t worry—it’ll smooth out once you add the flour.
- Alternate Dry Ingredients & Buttermilk (5 min): Add the dry ingredients in three parts, alternating with 1 cup (240ml) buttermilk. Start and end with dry ingredients. Mix just until combined—overmixing makes cake dense, so stop when you see no more dry streaks.
- Divide & Tint the Batter (10 min): Evenly divide batter into 5 bowls (about 1 1/2 cups each). Tint each with a different pastel gel food coloring: pink, yellow, green, blue, lavender. Use a toothpick for subtle shades. Gently stir—don’t overmix or the colors will fade.
- Layer & Swirl (5 min): Spoon random dollops of each color into cake pans, alternating shades for a marbled, watercolor effect. Swirl gently with a skewer or toothpick for soft streaks. Don’t overdo it—just a few swirls!
- Bake (25-30 min): Bake pans side by side (or in batches if needed) for 25-30 minutes, or until a toothpick comes out clean and cakes spring back lightly. If cakes are browning too fast, tent with foil. Rotate pans halfway for even baking.
- Cool Cakes (60 min): Cool in pans for 10 minutes, then run a knife around edges and turn onto racks. Peel off parchment. Let cool completely before frosting—warm cakes melt frosting (been there, regretted that!).
- Make Cloud Frosting (10 min): In a large bowl, beat 1 cup (225g) butter until smooth. Gradually add 4 cups (480g) powdered sugar, 1/4 cup (60ml) milk or cream, 2 tsp vanilla, and 1/4 tsp salt. Beat until fluffy, about 3-5 minutes. If using, fold in 1/2 cup (120g) marshmallow fluff for extra “cloud.” Adjust milk for spreadable consistency—should hold soft peaks.
- Assemble the Cake (15 min): Place one layer on a cake stand. Spread a generous layer of frosting on top. Repeat with remaining layers. Frost the sides and top with a thick coat—imperfections are hidden by clouds!
- Add Cloud Decorations (10 min): Spoon remaining frosting into a piping bag (or zip-top bag with corner snipped). Pipe fluffy “cloud” blobs around top and sides. Decorate with pastel sprinkles, edible glitter, or mini meringues/marshmallows as desired. For extra wow, dab a little pastel food coloring on clouds for a watercolor effect.
Troubleshooting: If your cake layers dome, trim tops with a serrated knife for easy stacking. If colors blend too much, next time use thicker batter or chill briefly before swirling. Dry cake? Check oven temp and don’t overbake. And if your frosting feels too soft, chill it for 10-15 minutes before piping.
Pro Tips & Techniques for a Perfect Rainbow Cloud Cake
- Go Easy on the Coloring: Pastel cakes are all about subtlety. Start with the tiniest bit—you can always add more, but you can’t take it out. I once made a neon yellow layer by accident—still tasty, just not quite the vibe!
- Room Temp Ingredients: Butter, eggs, and buttermilk at room temp blend smoothly, making your batter fluffier. Cold ingredients can make the batter seize or curdle.
- Don’t Overmix: Once you add flour, stir just until combined. Overmixing makes cake tough. If you see a few streaks, that’s fine—they’ll disappear when baking.
- Even Layers: Use a kitchen scale for dividing batter if you want perfectly even layers. If you’re eyeballing it (like me on busy days), just smooth out the top with a spatula before baking.
- Cloud Frosting That Holds: Beat your butter well before adding sugar. If your frosting is too soft for piping, chill for 10-20 minutes or add a bit more powdered sugar. Marshmallow fluff gives extra stability and that “cloud” texture.
- Multitasking: While the cakes are baking, wash your bowls and prep your frosting—no need to wait until the end. Saves you from a sink full of dishes later!
- Test for Doneness: Cakes are ready when a toothpick comes out clean with a few moist crumbs. Press the center gently—it should spring back. Overbaked cakes dry out fast.
- Personal Fails: Once, I tried to frost a warm cake—disaster! Now I always wait until layers are fully cool. Don’t rush it, even if you’re excited to decorate.
With these simple techniques, you’ll get a dreamy, Pinterest-worthy rainbow cloud cake every time—even if you’re a little messy (like me!).
Variations & Adaptations
- Gluten-Free: Use a 1:1 gluten-free baking flour blend in place of regular flour. I’ve had great results with King Arthur and Bob’s Red Mill. Just check for any extra gum or leavening needed.
- Dairy-Free: Swap in plant-based butter and your favorite dairy-free milk (oat milk works great). Use a vegan marshmallow fluff for the clouds if you like.
- Vegan Option: Use dairy-free milk and butter, and replace eggs with flax eggs (1 tbsp ground flax + 2.5 tbsp water per egg, let sit 5 min). The cake will be slightly denser, but still delicious and colorful!
- Flavor Twists: Add 1 tsp almond extract for a nutty twist, or fold in lemon zest for a hint of citrus. I’ve even mixed in freeze-dried berry powder for subtle berry flavor (just reduce flour by 2 tbsp).
- Seasonal Colors: For spring, try soft pinks, yellows, and greens. Winter birthdays? Go with icy blues and lavenders. The palette is yours to play with!
- Different Frosting: Swap the cloud frosting for cream cheese frosting or whipped ganache if you want a richer flavor. Both pair beautifully with the vanilla cake.
- Personal Take: My favorite variation is a “sunset” cake—peach, pink, and lavender layers with a hint of orange zest in the batter. It’s stunning for summer birthdays!
Don’t be afraid to make it your own—the rainbow cloud cake is all about creativity and fun.
Serving & Storage Suggestions
Serving: This cake is best served at room temperature, when the frosting is soft and cloud-like. For a party, set it on a white cake stand and let those pastel swirls steal the show! Add a few edible flowers or extra clouds on top for a dreamy, Pinterest-worthy finish.
Beverage Pairings: Pair with sparkling lemonade, pink punch, or a vanilla latte for grown-up celebrations. For kids, rainbow milk or pastel fruit punch is a hit!
Storage: Cover leftovers with plastic wrap or store in an airtight cake container at room temp for up to 2 days. For longer storage, refrigerate up to 5 days—just let slices come to room temp before serving for the softest texture. Freeze unfrosted layers for up to 2 months; thaw overnight in the fridge, then frost fresh. If you freeze a fully frosted cake, wrap well and thaw gently in the fridge.
Flavor Tip: The pastel rainbow cloud cake actually tastes even better on day two, after the flavors meld and the crumb softens. If you’re prepping for a party, bake and frost the day before—just add the final clouds and sprinkles before serving for the freshest look.
Nutritional Information & Benefits
Estimated per slice (1/16 of cake):
- Calories: ~380
- Fat: 18g
- Carbohydrates: 52g
- Protein: 3g
- Sugar: 36g
This rainbow cloud cake is an occasional treat—definitely a celebration dessert! The buttermilk adds a bit of calcium and helps keep the crumb tender without needing tons of oil or butter. You can make it a little lighter by reducing sugar by 1/4 cup or using a lower-fat milk. For gluten-free or dairy-free needs, just follow the swaps above. Contains eggs, wheat, and dairy (unless adapted).
In my house, we see this cake as a joy-bringer. It’s not about counting every calorie, but about sharing something beautiful and delicious. A slice of pastel rainbow cloud cake is pure happiness—sometimes, that’s the best wellness boost of all!
Conclusion
If you’re looking for a cake that’s as fun to make as it is to eat, this rainbow cloud cake recipe is pure magic. Those watercolor pastel layers and pillowy clouds make every celebration feel extra special (and yes, you’ll want to take a million photos before you slice!).
I love how customizable this cake is—you can tweak the colors, flavors, and even the frosting to fit your mood or event. Whether you’re baking for a birthday, baby shower, or just to make a random Tuesday feel like a party, this cake brings instant joy. Honestly, every time I make it, someone asks for the recipe—it’s that good!
Give it a try, and don’t forget to share your own pastel creations in the comments below. Did you switch up the colors or add a fun twist? I’d love to hear how you made it your own! Happy baking, and may every slice bring a little more color to your day.
FAQs About Rainbow Cloud Cake Recipe
How do I get pastel colors in my cake layers?
Use gel food coloring and start with a very small amount—just a toothpick tip. Gently mix until you reach your desired shade. Too much color will give you bold, neon layers instead of dreamy pastels.
Can I make this rainbow cloud cake ahead of time?
Absolutely! Bake the cake layers a day ahead and wrap them well. Frost just before serving, or frost and chill overnight. Let the cake come to room temperature before slicing for best texture.
What if I don’t have three cake pans?
No worries—just bake in batches. Rinse and dry the pan between uses, and keep extra batter covered at room temperature until you’re ready to bake the next layer.
Can I use natural food coloring?
Yes! Natural gel colors work, but the pastels will be more muted. Beet, spinach, and blueberry powders are good options for subtle hues, but results may vary. Always test a small amount first.
How do I make cloud frosting without marshmallow fluff?
You can skip the fluff and just whip up a classic vanilla buttercream. For extra airiness, beat the frosting for a few more minutes at high speed until super light and fluffy.
Pin This Recipe!
Rainbow Cloud Cake
This dreamy pastel rainbow cloud cake features soft, pillowy vanilla layers swirled with watercolor pastels and topped with fluffy cloud-like frosting. It’s a show-stopping, customizable dessert perfect for birthdays, baby showers, or any celebration that needs a touch of whimsy.
- Prep Time: 40 minutes
- Cook Time: 30 minutes
- Total Time: 1 hour 30 minutes
- Yield: 16 servings 1x
- Category: Dessert
- Cuisine: American
Ingredients
- 2 1/2 cups (315g) all-purpose flour, sifted
- 2 teaspoons baking powder
- 1/2 teaspoon baking soda
- 1/2 teaspoon fine sea salt
- 1/2 cup (115g) unsalted butter, softened
- 1/2 cup (120ml) neutral oil (canola or vegetable oil)
- 1 3/4 cups (350g) granulated sugar
- 4 large eggs, room temperature
- 1 tablespoon pure vanilla extract
- 1 cup (240ml) buttermilk, room temperature (or milk + 1 tbsp lemon juice)
- Pastel gel food coloring: pink, yellow, green, blue, lavender
- 1 cup (225g) unsalted butter, softened (for frosting)
- 4 cups (480g) powdered sugar, sifted (for frosting)
- 1/4 cup (60ml) whole milk or heavy cream (for frosting, adjust for consistency)
- 2 teaspoons pure vanilla extract (for frosting)
- 1/4 teaspoon fine salt (for frosting)
- 1/2 cup (120g) marshmallow fluff (optional, for frosting)
- Pastel gel food coloring for cloud accents (optional, for frosting)
- Pastel sprinkles or edible glitter (optional, for decorating)
- Mini meringues or marshmallows (optional, for decorating)
Instructions
- Preheat oven to 350°F (175°C). Grease three 8-inch round cake pans, line bottoms with parchment, and dust with flour.
- In a large bowl, whisk together flour, baking powder, baking soda, and salt. Set aside.
- In another large bowl or stand mixer, beat butter and oil until smooth and creamy. Add sugar and beat until light and fluffy, about 2-3 minutes.
- Beat in eggs one at a time, scraping down the bowl after each. Add vanilla and mix until combined.
- Add dry ingredients in three parts, alternating with buttermilk, starting and ending with dry ingredients. Mix just until combined.
- Divide batter evenly into 5 bowls. Tint each with a different pastel gel food coloring (pink, yellow, green, blue, lavender). Gently stir to combine.
- Spoon random dollops of each colored batter into prepared pans, alternating shades for a marbled effect. Swirl gently with a toothpick or skewer.
- Bake for 25-30 minutes, or until a toothpick comes out clean and cakes spring back lightly. Rotate pans halfway through baking.
- Cool cakes in pans for 10 minutes, then turn onto racks, remove parchment, and let cool completely.
- For the frosting: In a large bowl, beat butter until smooth. Gradually add powdered sugar, milk or cream, vanilla, and salt. Beat until fluffy, 3-5 minutes. If using, fold in marshmallow fluff. Adjust milk for spreadable consistency.
- To assemble: Place one cake layer on a stand. Spread frosting on top. Repeat with remaining layers. Frost sides and top with a thick coat.
- Pipe fluffy ‘cloud’ blobs with remaining frosting using a piping bag or zip-top bag. Decorate with pastel sprinkles, edible glitter, or mini meringues/marshmallows as desired. Optionally, dab pastel food coloring on clouds for a watercolor effect.
Notes
For best pastel colors, use gel food coloring and start with a tiny amount. Room temperature ingredients help create a fluffy batter. If you need gluten-free or dairy-free options, substitute with a 1:1 gluten-free flour blend and plant-based dairy alternatives. Chill frosting if too soft before piping. Cake tastes even better on day two after flavors meld.
Nutrition
- Serving Size: 1 slice (1/16 of cake)
- Calories: 380
- Sugar: 36
- Sodium: 210
- Fat: 18
- Saturated Fat: 9
- Carbohydrates: 52
- Protein: 3
Keywords: rainbow cake, pastel cake, birthday cake, cloud cake, unicorn cake, kids birthday, baby shower dessert, easy cake recipe, vanilla cake, pastel dessert


