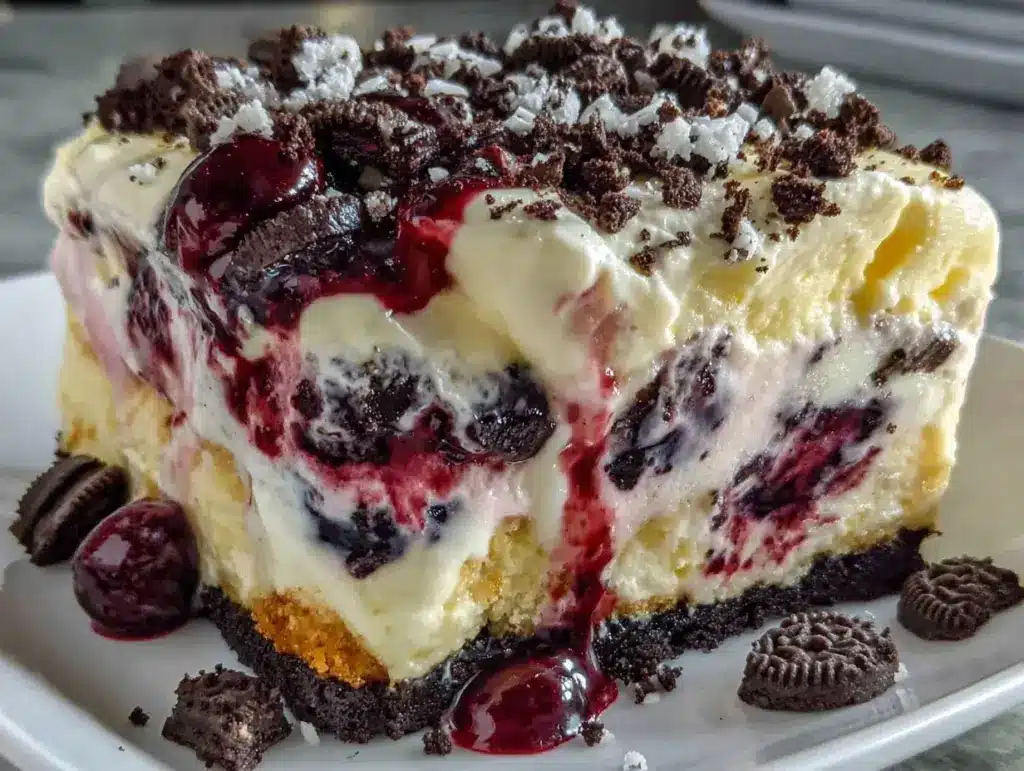
“Wait, you made this entire cake without turning on the oven?” my friend asked, eyeing the vibrant layers of my red white blue Oreo ice cream cake skeptically. Honestly, I was just as surprised the first time I tossed this together. It all began one scorching summer afternoon when the thought of heating up the kitchen felt like a crime. The freezer was calling, and my sweet tooth was relentless.
I grabbed a pack of Oreo cookies—because, well, Oreo—and some basic ice cream flavors I had on hand. The idea was simple: no-bake, fuss-free, and festive enough to make anyone smile. What happened next was a kind of magic, layering crushed Oreos, creamy ice cream, and a splash of patriotic colors that somehow turned out flawless. Friends kept asking for the recipe, and it quickly became my go-to for summer gatherings.
There’s something kind of cozy about making a dessert that doesn’t require the oven’s warmth, especially when you want to impress without the stress. This red white blue Oreo ice cream cake isn’t just a pretty face; it’s a cool, creamy reminder that sometimes the easiest recipes stick with you the longest. And I bet it’ll do the same for you.
Why You’ll Love This Recipe
Having whipped up this Perfect Red White Blue Oreo Ice Cream Cake more times than I can count, I can tell you it’s a winner for so many reasons. Here’s why it’s become a staple in my summer dessert lineup:
- Quick & Easy: Ready in under 30 minutes, no baking needed—ideal when you want a show-stopping dessert without the fuss.
- Simple Ingredients: Uses everyday staples like Oreos and vanilla ice cream. No special trips to exotic stores.
- Perfect for Patriotic Celebrations: Makes a festive centerpiece for Fourth of July, Memorial Day, or any red, white, and blue themed party.
- Crowd-Pleaser: The creamy texture combined with the crunch of Oreos wins over kids and adults alike. It’s got that classic Oreo appeal with a fun twist.
- Unbelievably Delicious: The layers balance sweet, creamy, and crunchy perfectly, giving you a refreshing dessert that feels indulgent but never heavy.
This isn’t just another ice cream cake you find online. I take my time crushing those Oreos just right (not too fine, not too chunky), and layering the ice cream with a touch of food coloring for that vibrant patriotic flair. The no-bake aspect means you can whip it up any time the craving hits, and it cools down the summer heat instantly.
Honestly, it’s like a cool hug on a hot day, and the kind of dessert that makes everyone pause and smile after the first bite. This recipe has earned its spot in my kitchen—and I have a feeling it will in yours too.
What Ingredients You Will Need
This Perfect Red White Blue Oreo Ice Cream Cake keeps things straightforward with ingredients that pack flavor and texture without complicating your prep. Most of these are pantry staples or easy to find at any grocery store.
- Oreo Cookies: About 40 cookies, crushed (reserve some whole for garnish if you want). I like using the classic Oreo for that perfect balance of cream and cookie crunch.
- Vanilla Ice Cream: 1.5 quarts (approx. 1.4 liters), softened slightly for easier layering. Use a good quality brand like Häagen-Dazs or Breyers for creamy results.
- Blueberry or Blue Food Coloring: For the blue layer. You can use natural blueberry puree if you want a fresh twist, or a few drops of gel food coloring for intensity.
- Strawberries or Red Food Coloring: Fresh strawberries, finely chopped, or red gel food coloring mixed into softened ice cream for that vibrant red layer.
- Whipped Cream: 1 cup (240 ml), for frosting and a light topping—homemade or store-bought works.
- Sugar (optional): 1-2 tablespoons, if you prefer a sweeter whipped cream or want to sweeten fresh strawberries.
- Vanilla Extract: 1 teaspoon, to enhance the ice cream flavor.
For substitutions, if you want a dairy-free version, swap the vanilla ice cream with coconut milk-based ice cream. Similarly, use a dairy-free whipped topping instead of traditional whipped cream. For a gluten-free option, opt for gluten-free sandwich cookies instead of Oreos.
Seasonal tip: If fresh berries are in season, chopped strawberries add a fresh bite to the red layer, making it feel less artificial and more summery.
Equipment Needed
Since this is a no-bake recipe, equipment needs are minimal but having the right tools makes the process smoother.
- 9×5-inch loaf pan or springform pan: I prefer a springform pan for easier removal, but a loaf pan lined with parchment works great too.
- Mixing bowls: Several bowls for mixing ice cream with coloring and prepping crushed Oreos.
- Plastic spatula or offset spatula: For spreading layers evenly without breaking the ice cream.
- Food processor or plastic bag and rolling pin: To crush the Oreos finely but with some texture. I find a food processor saves time, but a rolling pin works just as well.
- Measuring cups and spoons: For precise ingredient amounts (especially with flavorings).
- Whisk or electric mixer: For whipping cream if you’re making your own whipped topping.
Budget-friendly tip: No food processor? No worries. Crushing Oreos in a sturdy plastic bag and rolling with a can or rolling pin works just fine—just don’t smash them into dust.
Preparation Method
- Prepare the pan: Line your pan with parchment paper or plastic wrap with some overhang to help lift the cake out later. This step is key to a clean release.
- Crush the Oreos: Pulse Oreos in a food processor until you have a mix of fine crumbs and small chunks, about 1 to 2 cups reserved for the top garnish. If using a bag and rolling pin, gently crush until you get a similar texture.
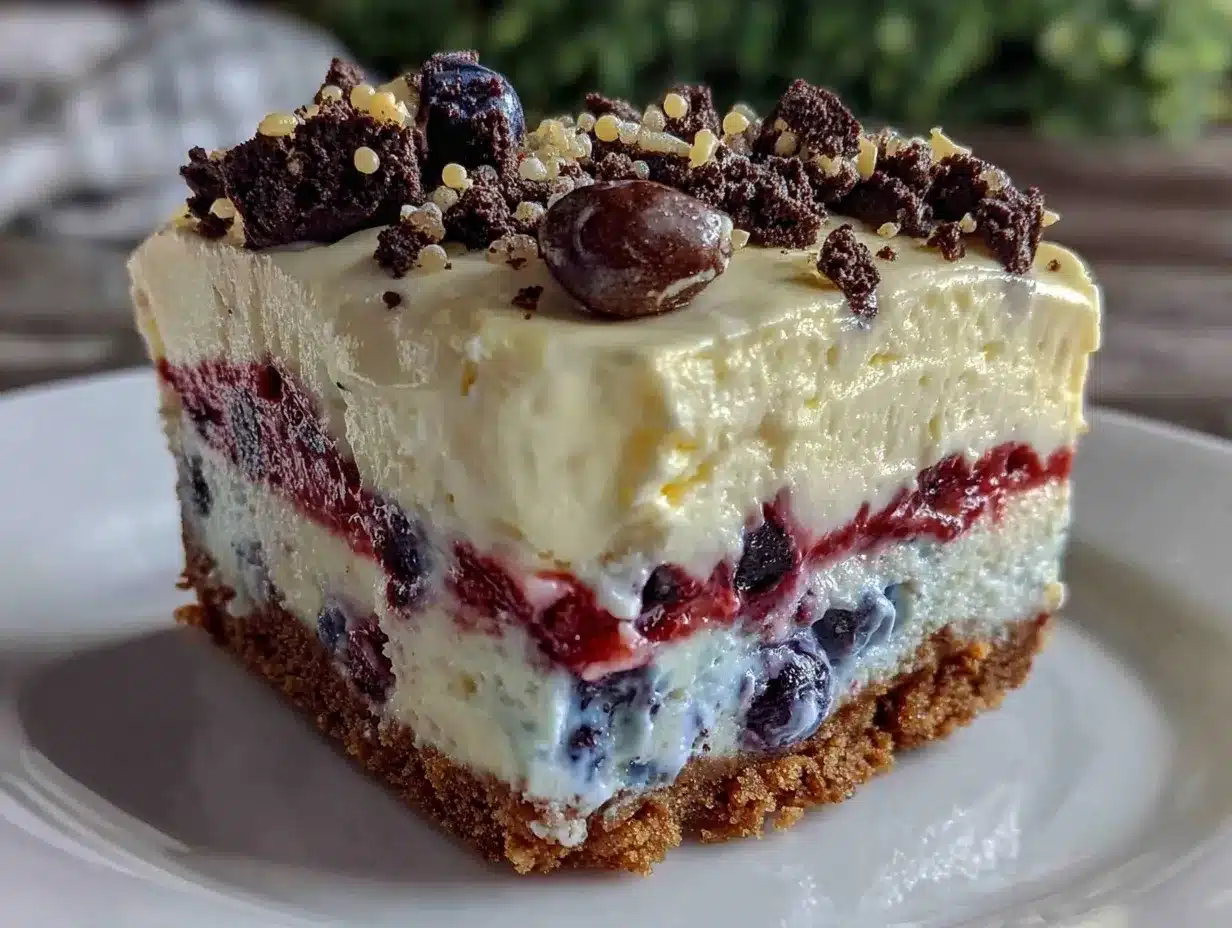
- Mix the base layer: Combine about 2 cups of crushed Oreos with 1/4 cup softened vanilla ice cream to form a slightly sticky crust. Press this mixture evenly into the bottom of the pan using the back of a spoon. Freeze for 10 minutes to set.
- Create the white layer: In a bowl, mix 1/2 quart (approx. 475 ml) softened vanilla ice cream with 1 teaspoon vanilla extract. Spread this layer evenly over the Oreo crust. Return to freezer for 20 minutes.
- Make the red layer: Mix 1/2 quart softened vanilla ice cream with chopped strawberries or a few drops of red food coloring until the color is vibrant and consistent. Spread over the white layer carefully. Freeze again for 20 minutes.
- Prepare the blue layer: Mix the remaining 1/2 quart softened ice cream with blueberry puree or blue food coloring. Spread as the final ice cream layer. Freeze for 30 minutes to firm up.
- Whip the cream: Whip 1 cup of chilled cream with 1 tablespoon sugar until soft peaks form. Spread evenly over the top of the frozen cake.
- Garnish and finish: Sprinkle reserved Oreo crumbs and optionally some fresh berries on top for a festive finish. Freeze for at least 2 hours or overnight for best slicing.
- Serving: To serve, remove the cake from the pan using the parchment overhang, slice with a warm knife dipped in hot water for clean cuts.
Note: Letting the ice cream soften slightly between layers helps with smooth spreading and prevents cracking. And don’t rush the freezing steps—it helps keep distinct, clean layers.
Cooking Tips & Techniques
Getting this ice cream cake just right is more about patience than technique, but a few tips I’ve picked up can really make a difference:
- Softening ice cream: Leave it out of the freezer for about 10 minutes before mixing. It should be soft enough to spread but not melted.
- Crushing Oreos: Aim for a mix of textures—some fine crumbs to bind the base and chunkier bits for crunch in the topping.
- Layering evenly: Use an offset spatula or the back of a spoon to smooth each layer. If you notice cracks, try warming your spatula under hot water and drying it off before smoothing.
- Freezing time: Don’t skip the freezing between layers to keep each color distinct and prevent them from blending.
- Cutting the cake: A sharp, warm knife works wonders. Dip the knife in hot water, wipe dry, and slice in one smooth motion.
From personal experience, skipping the chilling steps leads to a messy, melty disaster. This cake is forgiving in flavor but fussy about temperature. If you’re short on time, prepping it the night before saves a lot of hassle.
Variations & Adaptations
This recipe is flexible enough to fit different dietary needs and flavor preferences:
- Dairy-Free: Swap vanilla ice cream for coconut or almond milk-based ice cream and use dairy-free whipped topping.
- Fruit Variations: For a different twist, swap strawberries with raspberries or cherries for the red layer, and blueberries with blackberries or purple food coloring for the blue layer.
- Chocolate Lovers: Add a thin layer of chocolate ganache on top of the Oreo crust before adding the white ice cream layer for an extra indulgence.
- Mini Cakes: Make individual portions in mason jars or silicone molds for easy serving and portion control.
- Festive Swirls: Instead of distinct layers, gently swirl red and blue coloring into vanilla ice cream for a marbled effect.
Once, I tried blending crushed peppermint candies into the white layer for a holiday spin, which was surprisingly refreshing. Feel free to experiment with your favorite flavors or add-ins.
Serving & Storage Suggestions
Serve this red white blue Oreo ice cream cake straight from the freezer for the best texture and flavor. Letting it sit at room temperature for 5-10 minutes softens it just enough for easy slicing without melting.
It pairs beautifully with fresh berries or a drizzle of chocolate sauce for an extra touch. For a grown-up party, a scoop alongside a glass of frozen strawberry margarita makes a delightful combo.
Storage is simple: wrap the cake tightly with plastic wrap or store it in an airtight container and keep it in the freezer for up to 5 days. Avoid frequent thaw and refreeze cycles to maintain texture.
Reheat tip: If your slices get too hard, thaw in the fridge for 15-20 minutes before serving. Flavors tend to develop and meld beautifully after a day or two in the freezer, so feel free to prepare ahead.
Nutritional Information & Benefits
Each slice of this ice cream cake offers a satisfying treat with a balance of indulgence and familiar ingredients. It’s not a low-calorie dessert by any means, but here’s what you’re getting:
- Calories: Approximately 350-400 per slice (depending on portion size and ice cream brand)
- Protein: Moderate, mainly from dairy in the ice cream and whipped cream
- Calcium: Good source, thanks to dairy ingredients
- Contains gluten and dairy allergens; gluten-free options available with substitute cookies
This cake offers a fun way to enjoy dessert without complex ingredients or preservatives. Using fresh fruit in the layers adds a touch of antioxidants and vitamins, making it feel a bit less guilty. For those mindful of dietary needs, the recipe’s flexibility with dairy-free and gluten-free swaps means more people can enjoy it.
Conclusion
There’s something truly satisfying about a dessert that combines ease, flavor, and festive flair, and this Perfect Red White Blue Oreo Ice Cream Cake checks all those boxes. It’s a recipe that’s as approachable as it is impressive, with layers that taste like summer in every bite.
Feel free to make it your own—swap colors, add your favorite mix-ins, or even try mini versions. I love how it brings people together, whether it’s a backyard barbecue or an impromptu celebration.
Try it out, and I’d love to hear how your version turns out. Sharing those wins (or lessons learned!) is part of the fun—so drop a comment or share your photos. Here’s to cool treats and good times ahead.
FAQs About Perfect Red White Blue Oreo Ice Cream Cake
Can I make this ice cream cake ahead of time?
Absolutely! It actually tastes better after sitting frozen for several hours or overnight, as the flavors meld perfectly.
What if I don’t have a food processor to crush the Oreos?
No worries—place the cookies in a sealed plastic bag and crush them gently with a rolling pin or heavy pan until you get the desired texture.
Can I use other types of cookies instead of Oreos?
Yes, chocolate sandwich cookies or gluten-free cookie varieties work well. Just aim for a similar texture and flavor balance.
How do I prevent the layers from mixing together?
Freeze each layer for about 20-30 minutes before adding the next. This keeps the layers firm and distinct.
Is this recipe suitable for kids?
Definitely! Kids love the colorful layers and the Oreo crunch. Just keep an eye on portion sizes since it’s a rich treat.
While you’re planning your summer dessert lineup, this cake pairs nicely with simple mains like the one-pan Greek chicken with vegetables or the sticky teriyaki chicken stir fry. Both offer hearty, flavorful dishes that complement this cool, creamy delight perfectly.
Pin This Recipe!

Perfect Red White Blue Oreo Ice Cream Cake

A no-bake, festive ice cream cake layered with crushed Oreos and patriotic red, white, and blue ice cream layers. Easy to make and perfect for summer celebrations.
- Prep Time: 15 minutes
- Cook Time: 2 hours 30 minutes (including freezing time)
- Total Time: 2 hours 45 minutes
- Yield: 10 servings 1x
- Category: Dessert
- Cuisine: American
Ingredients
- About 40 Oreo cookies, crushed (reserve some whole for garnish)
- 1.5 quarts vanilla ice cream, softened
- Blueberry puree or blue food coloring for blue layer
- Fresh strawberries, finely chopped or red gel food coloring for red layer
- 1 cup whipped cream (homemade or store-bought)
- 1–2 tablespoons sugar (optional, for sweetening whipped cream or strawberries)
- 1 teaspoon vanilla extract
Instructions
- Line a 9×5-inch loaf pan or springform pan with parchment paper or plastic wrap with overhang for easy removal.
- Crush Oreos using a food processor or plastic bag and rolling pin until a mix of fine crumbs and small chunks is achieved. Reserve 1-2 cups for garnish.
- Mix about 2 cups crushed Oreos with 1/4 cup softened vanilla ice cream to form a sticky crust. Press evenly into the bottom of the pan and freeze for 10 minutes.
- Mix 1/2 quart softened vanilla ice cream with 1 teaspoon vanilla extract. Spread evenly over the Oreo crust and freeze for 20 minutes.
- Mix 1/2 quart softened vanilla ice cream with chopped strawberries or red food coloring until vibrant. Spread over the white layer and freeze for 20 minutes.
- Mix remaining 1/2 quart softened vanilla ice cream with blueberry puree or blue food coloring. Spread as the final ice cream layer and freeze for 30 minutes.
- Whip 1 cup chilled cream with 1 tablespoon sugar until soft peaks form. Spread evenly over the frozen cake.
- Sprinkle reserved Oreo crumbs and optionally fresh berries on top. Freeze for at least 2 hours or overnight for best slicing.
- To serve, remove cake from pan using parchment overhang. Slice with a warm knife dipped in hot water for clean cuts.
Notes
Let ice cream soften about 10 minutes before mixing for easier spreading. Freeze each layer thoroughly to keep colors distinct. Use a warm knife dipped in hot water for clean slicing. For dairy-free, substitute coconut milk-based ice cream and dairy-free whipped topping. For gluten-free, use gluten-free sandwich cookies.
Nutrition
- Serving Size: 1 slice (1/10th of c
- Calories: 375
- Sugar: 32
- Sodium: 210
- Fat: 18
- Saturated Fat: 11
- Carbohydrates: 45
- Fiber: 2
- Protein: 5
Keywords: ice cream cake, no bake dessert, Oreo cake, patriotic dessert, red white blue dessert, summer dessert, easy ice cream cake


