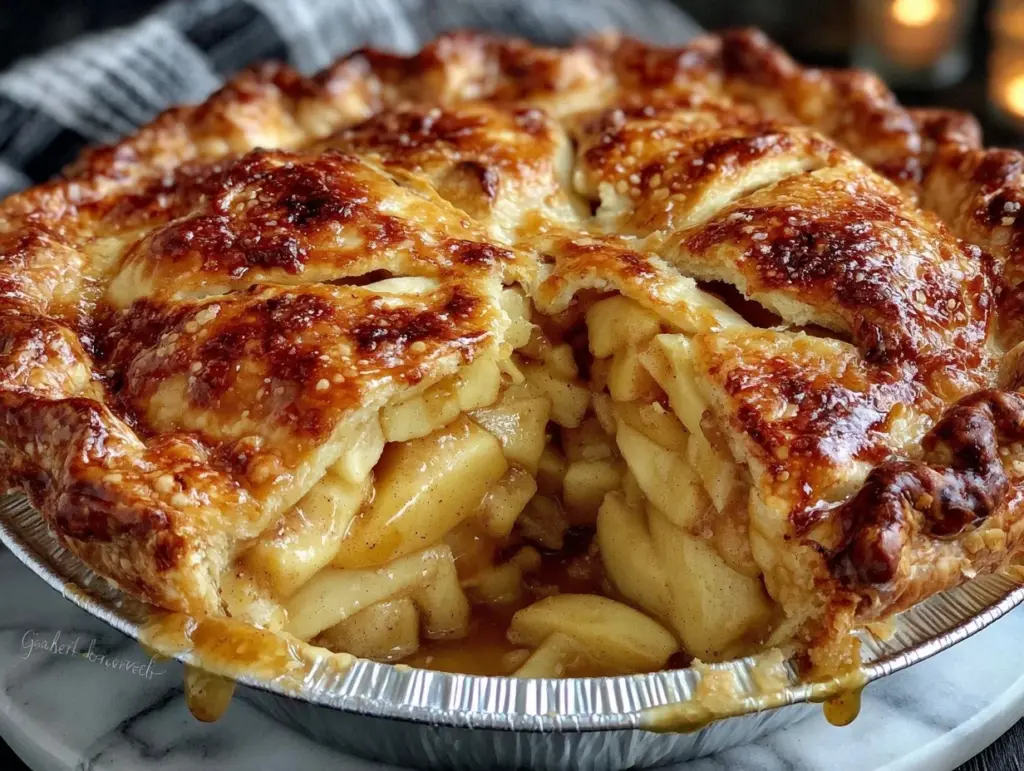
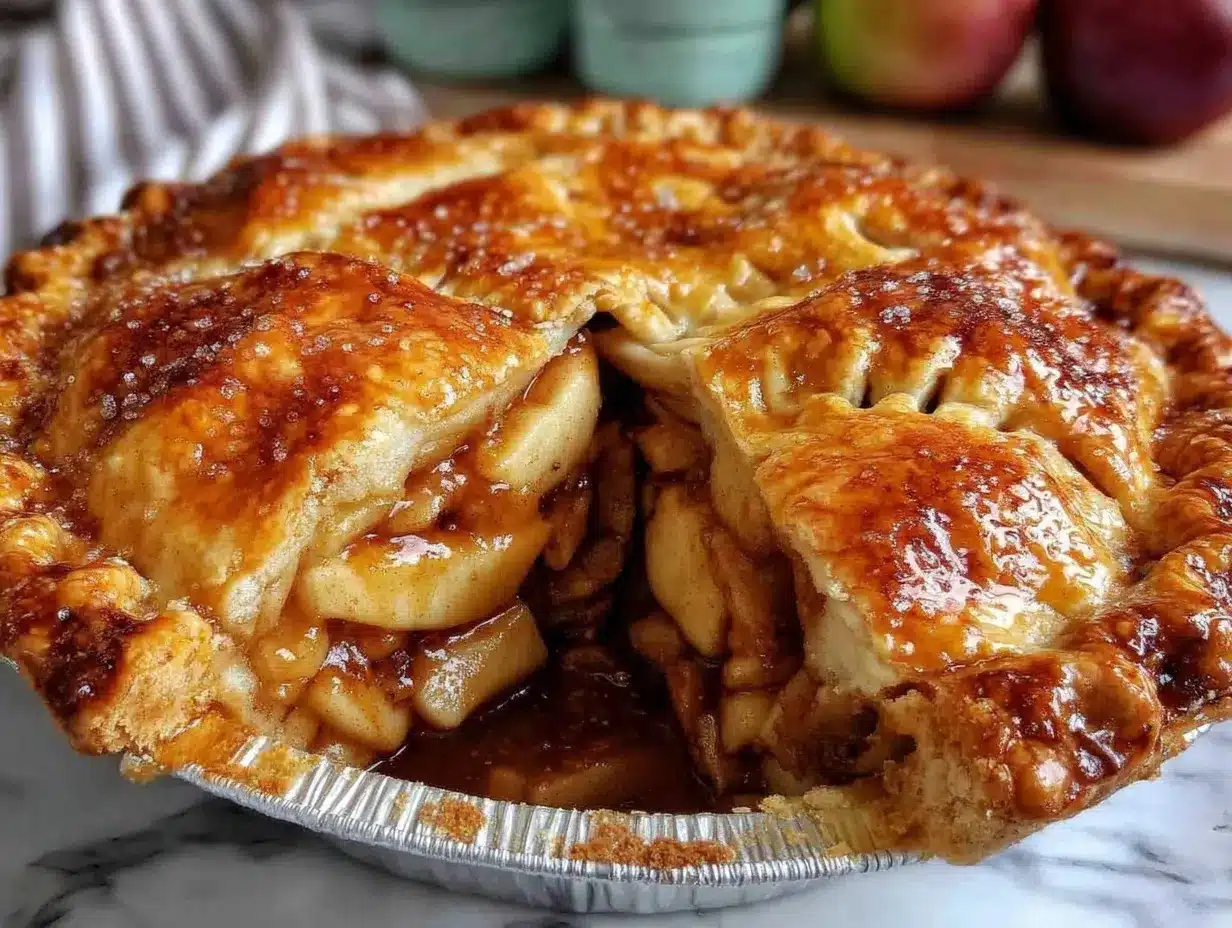
Picture this: the house is filled with the warm, cinnamon-laced aroma of bubbling apples, and you can actually hear the gentle sizzle from the pie as it bakes. The golden, flaky top crust cracks just perfectly when you tap it with a fork, releasing a rush of steam and the sweet scent that reminds you instantly of cozy autumn afternoons. Honestly, every time I pull my Easy Apple Pie Recipe With Premade Crust out of the oven, I have to pause—take a deep breath—and just smile. There’s something magical about how simple ingredients can turn into such a heartwarming treat (especially when you haven’t spent hours fussing over homemade dough).
The first time I made this apple pie, it was an impromptu experiment on a rainy Saturday, when my kids begged for something sweet but I was fresh out of patience for rolling and chilling pie dough. I grabbed a premade crust, crossed my fingers, and hoped it’d taste like the pies my grandma baked when I was knee-high to a grasshopper. You know what? It was a hit. The kind of hit where the pie dish is scraped clean before the evening movie starts, and even the neighbor who “doesn’t care for pie” grabs a second slice.
My family’s reactions? Well, let’s just say the cooling rack is no longer a safe place for pies in my house. These slices disappear fast, and everyone always asks if I’ll make it again for the next potluck or birthday. I’ve tested this recipe more times than I care to admit (in the name of research, of course), and it’s become a staple for last-minute gatherings, gifting, and those nights when you just need a little nostalgic comfort. Honestly, this is the kind of dessert that feels like a warm hug—and you’re going to want to bookmark this one for busy weekends, holiday feasts, and everything in between.
Why You’ll Love This Easy Apple Pie Recipe With Premade Crust
Let’s face it—everyone loves apple pie, but not everyone loves the effort. Here’s why this recipe is a total game-changer for busy home bakers and pie lovers alike:
- Quick & Easy: You’ll have this pie ready for the oven in about 15 minutes. No rolling, chilling, or major clean-up. Perfect for last-minute dessert cravings or when unexpected guests show up.
- Simple Ingredients: All the flavors of a classic apple pie, but you probably already have everything in your pantry. No need for fancy apples or specialty spices—just straightforward deliciousness.
- Perfect for Any Occasion: From holiday dinners to quiet brunches, this pie fits right in. It’s also great for potlucks, bake sales, and those “just because” moments.
- Crowd-Pleaser: Kids, grandparents, picky eaters—everyone loves this pie. It’s sweet, familiar, and always gets rave reviews (trust me, even my pie-snob uncle approves).
- Unbelievably Delicious: The texture is spot-on: tender apples, gooey filling, and a perfectly crisp crust. It’s comfort food at its best, with a little shortcut that doesn’t compromise on flavor.
What makes this recipe stand out? Instead of the usual soggy bottom or bland taste you sometimes get with premade crusts, I’ve tested a few tricks—like brushing the crust with egg wash and using a blend of tart and sweet apples—to lock in that old-fashioned flavor. Plus, I add a touch of lemon juice to brighten up the filling (a little trick I picked up from my mom’s old recipe box). This isn’t just another apple pie; it’s the one you’ll keep coming back to because it’s fast, tasty, and honestly feels like a little slice of home.
Whether you’re looking for a dessert that impresses guests without stress, or just want something sweet after a long day, this easy apple pie recipe with premade crust is the answer. It’s comfort food made modern—healthier, faster, but with all the soul-soothing satisfaction you remember.
What Ingredients You Will Need
This recipe uses simple, wholesome ingredients to deliver bold flavor and that classic, gooey apple pie texture without any fuss. Most of these are pantry staples, and you can swap things easily depending on what you have on hand.
- Premade pie crusts (2) – One for the bottom, one for the top. I personally prefer Pillsbury or Trader Joe’s; they bake up flaky and golden every time.
- For the apple filling:
- Apples (6 cups, about 6 medium, peeled, cored, sliced thinly) – A mix of Granny Smith (for tartness) and Fuji or Honeycrisp (for sweetness) works well. You can use all one type if needed.
- Granulated sugar (2/3 cup / 130g) – Sweetens the filling without overpowering the apple flavor.
- Brown sugar (1/4 cup / 50g) – Adds a hint of caramel depth.
- Ground cinnamon (1 1/2 tsp) – For that classic apple pie warmth.
- Ground nutmeg (1/4 tsp) – Optional, but adds a subtle spice note.
- Lemon juice (1 tbsp) – Brightens up the fruit and balances the sweetness.
- All-purpose flour (2 tbsp / 16g) – Thickens the filling so it doesn’t run everywhere.
- Salt (1/4 tsp) – Just a pinch to round out the flavors.
- Unsalted butter (2 tbsp / 28g, cut into small pieces) – Dot on top of the apples for a richer filling.
- For the crust:
- Egg (1, beaten) – For brushing the top crust, helps with browning and shine.
- Coarse sugar (1 tbsp) – Optional, but gives a sparkly, crunchy finish.
Ingredient Tips:
- If you’re gluten-free, swap in a gluten-free pie crust and use cornstarch instead of flour.
- For a dairy-free pie, skip the butter or use plant-based margarine.
- If apples aren’t in season, frozen sliced apples work in a pinch—just thaw and pat dry.
I always keep a couple of premade pie crusts in the freezer just in case—pie emergencies are real! And if you want to get creative, toss in a handful of fresh berries or swap the cinnamon for apple pie spice blend. The recipe is pretty forgiving and lets you play around with what’s in your kitchen.
Equipment Needed
- 9-inch pie pan: Glass or metal both work, but I find glass helps you judge browning better.
- Large mixing bowl: For tossing the apples with sugar and spices.
- Measuring cups and spoons: Accuracy matters for the perfect filling texture.
- Peeler and corer: Speeds up apple prep. If you don’t have a corer, a small knife works fine.
- Sharp knife: For slicing apples thinly (the thinner, the softer they’ll bake up).
- Rolling pin: Optional, only needed if your premade crust needs a little smoothing out.
- Pastry brush: For applying egg wash to the top crust.
- Aluminum foil or pie crust shield: Prevents the edges from overbrowning (a lesson learned after one too many crispy crust incidents).
If you don’t own a pie pan, a cake pan or even a cast iron skillet can work in a pinch—just keep an eye on baking time. For the budget-minded, dollar store pie pans are surprisingly sturdy. And hey, I’ve made this pie with nothing but a butter knife and a soup spoon before (not ideal, but it works in a pinch!). Maintenance tip: keep your pie pan clean by soaking it right after baking—those sugary bits can get stuck and become a pain to scrub.
How to Make Easy Apple Pie With Premade Crust
- Prep your oven and crust: Preheat the oven to 425°F (220°C). Let your premade pie crusts sit out for 10 minutes so they’re easier to handle. Unroll one and fit it into your 9-inch pie pan. If the edges crack, patch them gently with your fingers (no worries—it’s forgiving).
- Prepare the apple filling: In a large mixing bowl, combine sliced apples (about 6 cups/750g), granulated sugar, brown sugar, cinnamon, nutmeg, flour, salt, and lemon juice. Toss until the apples are evenly coated. The mixture should look glossy and smell amazing—like a cinnamon orchard!
- Fill the pie: Pour the apple mixture into the crust-lined pan, spreading evenly. Dot the top with the butter pieces for extra richness. If you’re using berries or swapping spices, now’s the time to mix them in.
- Top and seal the pie: Unroll the second crust and lay it over the apples. Trim, fold, and crimp the edges together. Cut 4-5 small slits in the top crust for steam to escape (I usually make a simple leaf pattern—nothing fancy).
- Brush and sprinkle: Brush the top crust with the beaten egg using a pastry brush. Sprinkle coarse sugar over the top for crunch and sparkle.
- Shield the edges: To prevent overbrowning, cover the edge of the pie with aluminum foil or a pie crust shield. Trust me, this step keeps the rim from turning into a crunchy disaster.
- Bake: Place the pie on the center rack. Bake for 25 minutes at 425°F (220°C), then remove the foil and reduce the temperature to 375°F (190°C). Continue baking for another 30-35 minutes, until the crust is golden and you see bubbling juices through the slits.
- Cool: Remove from the oven and let cool at least 2 hours before slicing. The filling will set up as it cools—cutting too early leads to a runny pie (been there, done that!).
Troubleshooting: If your crust cracks, patch with a little dough and a dab of water. If filling bubbles over, place a baking sheet on the rack below to catch drips. Apples should be tender but not mushy; if they’re too firm, next time slice thinner or bake an extra 10 minutes.
Efficiency tip: Slice apples while the crust comes to room temp. I use an apple peeler-corer-slicer tool for speed, but a regular paring knife works just fine. Don’t stress the details—this pie is all about easy comfort!
Expert Cooking Tips & Techniques
- Apple prep: Slice apples evenly (about 1/4-inch thick) so they cook at the same rate. Thinner slices mean softer, jammy filling—thicker ones keep a bit of bite.
- Crust handling: Let premade crusts warm up a bit before unrolling. If they crack, patch with scraps and a sprinkle of water. I’ve found that brushing the bottom crust with a little egg white before filling helps keep it from getting soggy.
- Steam vents: Cut enough slits in the top crust so the steam escapes. Too few, and your pie can bubble over. I learned the hard way after one pie exploded in the oven (it was still delicious, but the cleanup was a nightmare).
- Edge protection: Always shield the edge with foil or a pie shield for the first half of baking. It keeps the crust tender and golden, not burnt.
- Doneness cues: The pie is ready when the juices bubble thickly through the slits and the crust is deep golden. If the edges brown too fast, re-cover with foil.
Common mistakes to avoid: Using too much flour or not enough sugar can make the filling dry or bland. If your apples are super tart, add an extra tablespoon of sugar. And don’t skip the cool-down—cutting too soon makes for a soupy pie.
I’ve had pies turn out runny, too firm, and even a little burnt on top—so don’t sweat the little imperfections. With premade crust, consistency is easier, but each oven is a little different. Multitasking tip: prep your apples while the oven heats, and clean up the kitchen before the pie is done for a stress-free finish.
Variations & Adaptations
- Gluten-Free Apple Pie: Use a gluten-free premade crust and swap the flour for cornstarch or arrowroot in the filling. Works surprisingly well—my sister swears by the Wholly Gluten Free brand.
- Vegan Apple Pie: Choose a dairy-free pie crust (many store brands are vegan), skip the butter, and use a plant-based margarine or coconut oil. Brush the top with almond milk instead of egg for browning.
- Caramel Apple Pie: Add 1/4 cup of caramel sauce to the filling before topping with the crust. The end result is sticky, sweet, and seriously addictive.
- Berry Apple Pie: Toss in 1 cup of fresh or frozen berries (blueberries, raspberries) for a fruity twist. This version is a summer favorite in my house.
- Streusel Topping: Instead of a full top crust, use a crumbly mix of flour, brown sugar, and butter. Bake as usual—great for those who love a crunchy topping.
For different cooking methods, you can bake this pie in a toaster oven (just reduce the size and check early) or try mini pies in muffin tins for single servings. Allergens? Skip the nuts, swap dairy butter for plant-based, and check your crust for egg if needed. Personally, my favorite twist is adding a pinch of cardamom to the filling—it’s subtle, but oh-so-good.
Serving & Storage Suggestions
Serve your apple pie slightly warm or at room temperature for the best texture. I love presenting it on a rustic wooden board with a dusting of powdered sugar—looks beautiful and tastes even better. Add a scoop of vanilla ice cream or a dollop of lightly whipped cream for extra decadence.
Pairing ideas: Apple pie goes perfectly with hot coffee, spiced chai, or a chilled glass of milk. For a fall feast, serve alongside roasted pork or savory soups. It’s also a hit at brunch with fresh fruit and muffins.
Storage: Wrap leftovers tightly in plastic wrap or aluminum foil and refrigerate for up to 4 days. For longer storage, freeze individual slices on a baking sheet, then transfer to a freezer-safe bag—keeps well for up to 2 months. Reheat in a 350°F (175°C) oven for 10-15 minutes to restore the crispness.
Flavor notes: The pie’s flavor deepens after a day, as the spices meld and the apples soften. If you like a firmer filling, serve within a few hours; for a softer, more blended taste, let it rest overnight (if you can wait that long!).
Nutritional Information & Benefits
One slice of this easy apple pie (1/8 of an 9-inch pie) packs roughly 320 calories, 14g fat, 48g carbs, and 3g protein. It’s a dessert, so it’s not exactly “light,” but it’s full of real fruit and can be adapted for lower sugar if needed.
Key ingredients like apples provide fiber, vitamin C, and antioxidants. Cinnamon is known for its anti-inflammatory properties. Using a premade crust keeps things simple, but for a lighter pie, you can use reduced-sugar options or skip the butter.
Dietary considerations: You can easily make this pie gluten-free or dairy-free with the swaps mentioned above. Allergens to watch for: wheat (in crust), eggs (in wash), dairy (in butter/crust). I love that you can enjoy this pie as part of a balanced treat—comfort food that’s not too heavy on guilt.
Conclusion
This Easy Apple Pie Recipe With Premade Crust is honestly the kind of dessert you’ll want to make on repeat. It’s simple, fast, and brings all the classic flavors with none of the fuss. Whether you’re baking for a crowd or just need a little pick-me-up after a long day, this pie delivers pure comfort by the slice.
Feel free to tweak the filling, try different apples, or play around with the spice blend—it’s incredibly forgiving and always delicious. I love this recipe because it reminds me of family gatherings and cozy weekends, but with a modern shortcut that makes baking so much easier.
If you try this recipe, please leave a comment below—let me know your favorite apple combinations, or how you made it your own. Share it with friends, pin it for later, or tag me when you bake it! Here’s to warm kitchens, happy memories, and the world’s easiest classic dessert.
FAQs about Easy Apple Pie Recipe With Premade Crust
Can I use frozen apples for this apple pie recipe?
Yes! Just thaw and pat them dry before using. They work almost as well as fresh apples, especially if you’re in a hurry.
How do I prevent the bottom crust from getting soggy?
Brush the bottom crust with a little beaten egg white before adding the filling. You can also sprinkle a teaspoon of flour or ground almonds on the crust for extra protection.
What’s the best type of apple to use?
A mix of tart and sweet apples (like Granny Smith and Honeycrisp) gives the best flavor and texture. But honestly, any apple you have will work fine—just taste and adjust the sugar if needed.
Can I make this apple pie ahead of time?
Absolutely! Bake the pie a day ahead and let it cool completely. Store covered at room temperature or in the fridge, then reheat before serving for that fresh-from-the-oven taste.
Is it possible to make this recipe gluten-free or vegan?
Yes, just use gluten-free premade crusts and swap out the butter for plant-based margarine. For vegan, skip the egg wash and use almond milk or coconut oil instead.
Pin This Recipe!

Easy Apple Pie Recipe with Premade Crust

This quick and easy apple pie uses premade crust for a classic, comforting dessert with minimal fuss. Tender apples, warm spices, and a golden, flaky top make it perfect for busy days or last-minute gatherings.
- Prep Time: 15 minutes
- Cook Time: 55-60 minutes
- Total Time: 1 hour 15 minutes
- Yield: 8 servings 1x
- Category: Dessert
- Cuisine: American
Ingredients
- 2 premade pie crusts (9-inch)
- 6 cups apples (about 6 medium, peeled, cored, sliced thinly; Granny Smith and Fuji or Honeycrisp recommended)
- 2/3 cup granulated sugar
- 1/4 cup brown sugar
- 1 1/2 teaspoons ground cinnamon
- 1/4 teaspoon ground nutmeg (optional)
- 1 tablespoon lemon juice
- 2 tablespoons all-purpose flour
- 1/4 teaspoon salt
- 2 tablespoons unsalted butter, cut into small pieces
- 1 egg, beaten (for brushing top crust)
- 1 tablespoon coarse sugar (optional, for topping)
Instructions
- Preheat oven to 425°F (220°C). Let premade pie crusts sit out for 10 minutes to soften. Unroll one crust and fit into a 9-inch pie pan, patching any cracks.
- In a large mixing bowl, toss sliced apples with granulated sugar, brown sugar, cinnamon, nutmeg, flour, salt, and lemon juice until evenly coated.
- Pour apple mixture into the crust-lined pan and spread evenly. Dot the top with butter pieces.
- Unroll the second crust and lay it over the apples. Trim, fold, and crimp the edges together. Cut 4-5 small slits in the top crust for steam to escape.
- Brush the top crust with beaten egg and sprinkle with coarse sugar if desired.
- Cover the edge of the pie with aluminum foil or a pie crust shield to prevent overbrowning.
- Bake for 25 minutes at 425°F (220°C). Remove foil, reduce oven temperature to 375°F (190°C), and bake for another 30-35 minutes until the crust is golden and juices bubble through the slits.
- Remove from oven and let cool at least 2 hours before slicing to allow the filling to set.
Notes
For gluten-free, use gluten-free pie crust and cornstarch instead of flour. For vegan, use plant-based margarine and almond milk for brushing. Slice apples evenly for best texture. Shield pie edges to prevent burning. Let pie cool fully before slicing for a set filling. Add berries or caramel for variations.
Nutrition
- Serving Size: 1 slice (1/8 of 9-in
- Calories: 320
- Sugar: 28
- Sodium: 220
- Fat: 14
- Saturated Fat: 6
- Carbohydrates: 48
- Fiber: 3
- Protein: 3
Keywords: apple pie, premade crust, easy dessert, quick apple pie, classic apple pie, fall baking, holiday dessert, comfort food


