Picture this: You walk into your kitchen, and the air is thick with the warm, sweet scent of pumpkin and spices swirling together with a hint of cream cheese tang. The first time I rolled a batch of crispy pumpkin cheesecake truffles, I knew I’d stumbled upon something magical—the kind of treat that makes you pause, grin, and maybe dance a little in anticipation. There’s just something about that cozy orange color and the snap of crispy coating that screams “fall” louder than a pumpkin patch on a brisk October afternoon.
Honestly, I was knee-high to a grasshopper when I first tasted anything resembling pumpkin cheesecake. My grandma used to serve the classic pie, but I wanted something portable, a little playful, and perfect for sharing at Halloween parties or handing out at fall potlucks. One rainy weekend, I decided to mash up my favorite autumn flavors with a bit of cheesecake flair and, you know what, it was dangerously easy. My family couldn’t stop sneaking truffles off the tray (and I can’t blame them—these disappear faster than you can say “trick or treat”).
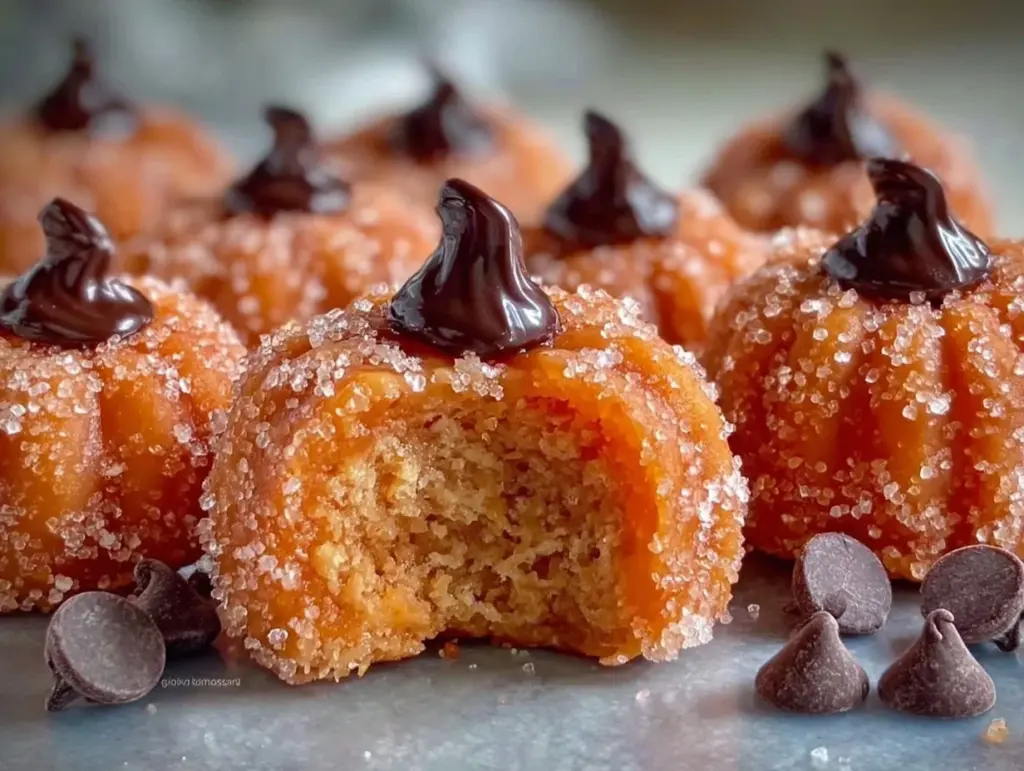
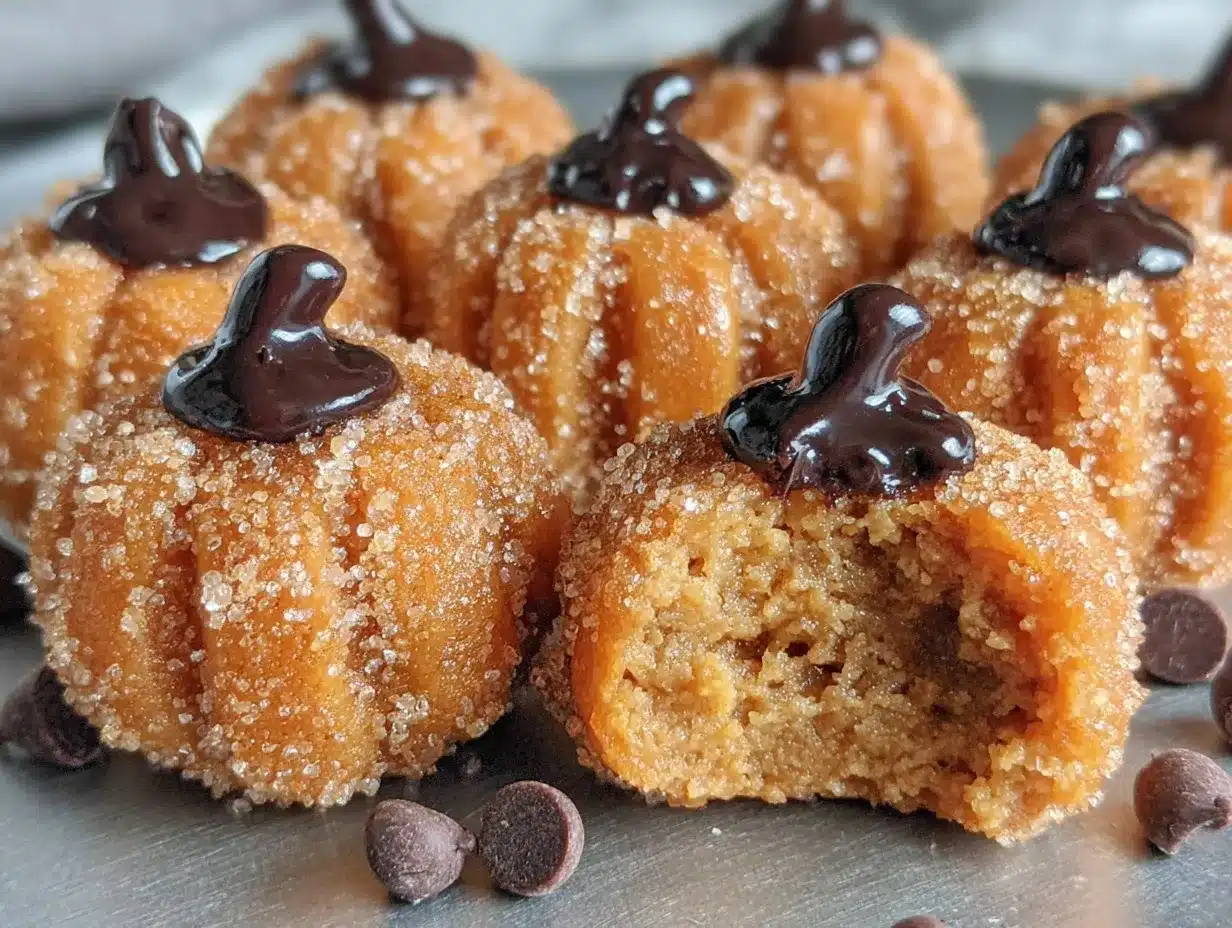
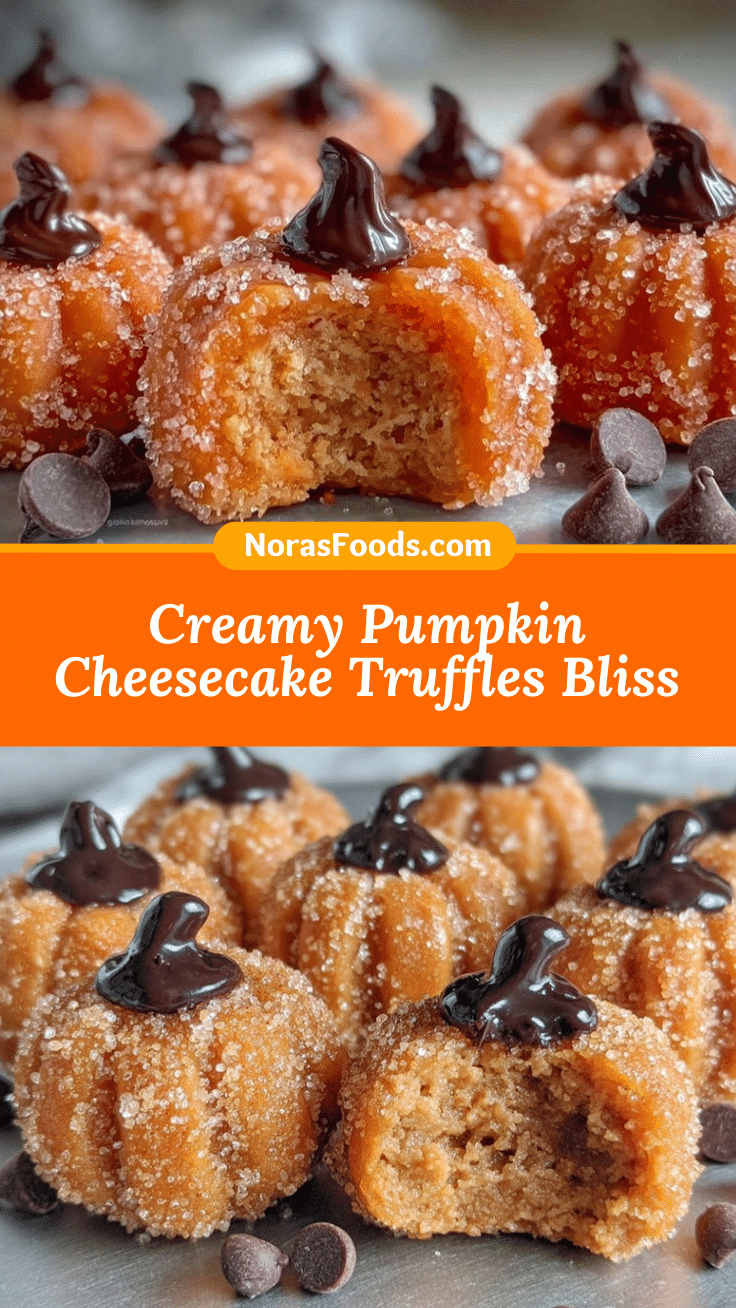
If you’re searching for a sweet treat to brighten up your Pinterest board or add a festive touch to your fall gatherings, these crispy pumpkin cheesecake truffles are your answer. They’re bite-sized, rich, and coated in a crispy shell that makes every mouthful a tiny celebration. After testing the recipe more times than I care to admit (in the name of research, of course), it’s become a staple for family gatherings, teacher gifts, and, honestly, those evenings when you need a little pick-me-up. It’s pure, nostalgic comfort—like a warm hug in truffle form. Bookmark this one, because you’ll want it at every autumn festivity!
Why You’ll Love This Recipe
If you’ve ever craved that perfect blend of creamy, pumpkin-spiced goodness with a satisfying crunch, these crispy pumpkin cheesecake truffles will hit the spot. I’ve tried countless pumpkin desserts, and trust me, this one stands out for all the right reasons. Here’s why you’ll keep coming back:
- Quick & Easy: You can whip these up in under 40 minutes—no baking required, so they’re perfect for busy schedules or last-minute party planning.
- Simple Ingredients: Everything you need is probably already in your pantry or fridge. No wild goose chases for specialty items.
- Perfect for Fall Parties & Halloween: These truffles make a stunning addition to any autumn spread, especially when you want to impress without fuss.
- Crowd-Pleaser: Kids love them for their crispy shell, adults adore the creamy center. Even picky eaters can’t resist.
- Unbelievably Delicious: The combo of tangy cream cheese, spiced pumpkin, and sweet coating is pure comfort food—just in a bite-size package.
What sets these crispy pumpkin cheesecake truffles apart is the ultra-smooth filling (thanks to softening and blending cream cheese with pumpkin puree) and the creative twist of coating them in crunchy cookie crumbs or crispy rice cereal. It’s not just another pumpkin truffle—it’s the best version I know, made even better with a touch of white chocolate and seasonal spices. The texture is spot-on: creamy inside, crispy outside, with a flavor that lingers just long enough to make you want another.
For me, these truffles aren’t just a recipe—they’re a fall tradition. They bring comfort with every bite, make parties a little more festive, and, let’s face it, they’re ridiculously fun to make and eat. Whether you’re a novice or a seasoned home chef, you’ll find these truffles are easy enough to master, impressive enough to share, and delicious enough to become your new favorite autumn treat.
What Ingredients You Will Need
This recipe uses simple, wholesome ingredients to deliver bold flavor and satisfying texture without the fuss. Most items are pantry staples, and you can easily swap or substitute based on what you have on hand. Here’s what you’ll need:
- For the truffle filling:
- Cream cheese, softened (8 oz / 225g) – full-fat for best texture and flavor
- Pumpkin puree (not pumpkin pie filling, 1/2 cup / 120g) – homemade or canned works
- Powdered sugar (1 cup / 120g) – helps bind and sweeten
- Vanilla extract (1 tsp / 5ml) – adds warmth
- Pumpkin pie spice (1.5 tsp / 6g) – use a blend or make your own with cinnamon, nutmeg, ginger, cloves
- Salt (1/8 tsp / a pinch) – balances sweetness
- For the crispy coating:
- White chocolate or candy melts (12 oz / 340g) – for dipping; I like Ghirardelli or Wilton
- Crispy rice cereal (1.5 cups / 45g) – gives the signature crunch; you can use crushed graham crackers or vanilla wafers as an alternative
- Orange and black sprinkles (optional) – for festive flair
- For garnish (optional):
- Crushed pecans or walnuts (1/4 cup / 30g) – adds a nutty touch
- Extra pumpkin pie spice – dust over finished truffles for a little sparkle
If you need to make these gluten-free, swap the crispy rice cereal for a certified gluten-free brand or use gluten-free graham crackers. For dairy-free, try a vegan cream cheese (like Kite Hill) and dairy-free white chocolate chips. I’ve found that Libby’s pumpkin puree gives a consistent texture, but any pure pumpkin will do. In summer, you could even swap in sweet potato puree for a twist! The ingredients are forgiving, so don’t stress if you need to make a quick substitution.
Equipment Needed
- Mixing bowls – at least two, medium and large
- Hand mixer or stand mixer – for whipping the filling smooth (a sturdy whisk works in a pinch, though your arms may get a workout!)
- Rubber spatula – for scraping down the sides and folding ingredients
- Cookie scoop or tablespoon – for portioning even truffles
- Baking sheet – lined with parchment or wax paper for chilling
- Microwave-safe bowl – for melting chocolate
- Forks or dipping tools – for coating truffles in chocolate
- Wire rack (optional) – useful for letting excess chocolate drip off
I’ve made these with just a spoon and my hands, so don’t worry if you’re missing something fancy. If you use a stand mixer, keep it on low—cream cheese can get soft fast. Parchment paper is a lifesaver for easy cleanup. For budget-friendly options, regular cereal instead of fancier cookie crumbs works just fine. If you’re dipping with forks, lay out a towel underneath—the chocolate can get messy!
Preparation Method
- Make the filling: In a medium mixing bowl, combine 8 oz (225g) softened cream cheese and 1/2 cup (120g) pumpkin puree. Beat with a hand mixer until smooth and creamy (about 2 minutes). The mixture should look light and fluffy—no lumps!
- Add 1 cup (120g) powdered sugar, 1 tsp (5ml) vanilla extract, 1.5 tsp (6g) pumpkin pie spice, and a pinch of salt. Mix again on low speed until fully incorporated, scraping down the sides. The filling will thicken up and become a scoopable dough.
- Chill the mixture for 20 minutes in the fridge. This makes shaping truffles much easier and less sticky. (If you skip chilling, you’ll end up with a gooey mess—learned that the hard way!)
- Prep a baking sheet with parchment or wax paper. Once the filling is chilled, use a cookie scoop or tablespoon to portion out balls (about 1 inch / 2.5 cm diameter). Roll gently between your palms to smooth. You should get 20–24 truffles.
- Freeze the shaped truffles for 20 minutes. This step is key for easy dipping and a crisp shell—don’t rush it!
- Meanwhile, melt 12 oz (340g) white chocolate or candy melts in a microwave-safe bowl, heating in 20-second bursts and stirring until smooth. (White chocolate can seize up if overheated—short bursts are safest.)
- Place 1.5 cups (45g) crispy rice cereal (or crushed graham crackers/vanilla wafers) in a shallow bowl.
- Using forks or dipping tools, dip each frozen truffle into the melted chocolate, letting excess drip off. Immediately roll or sprinkle with crispy rice cereal to coat. Place back on the prepared sheet.
- Decorate with orange and black sprinkles, crushed pecans, or a dusting of pumpkin pie spice if you like. Let truffles set at room temperature or refrigerate for 10 minutes until the chocolate is firm.
- Once set, transfer truffles to a serving platter. Enjoy immediately, or store as needed (see tips below).
Troubleshooting: If the filling is too soft to roll, chill longer or add a touch more powdered sugar. If chocolate thickens up, reheat briefly. Sensory cues—filling should be soft but not sticky; the chocolate shell should snap when cool. Efficiency tip: Set up a dipping station with all coatings and decorations within reach—makes assembly speedy!
Cooking Tips & Techniques
Let’s face it, truffles can get messy, but a few tricks make them foolproof:
- Chill and freeze the filling as directed. It keeps the shape and prevents melting when dipped in hot chocolate.
- Use high-quality chocolate or candy melts—cheap chocolate can clump or crack. If you’re using real white chocolate, add a little coconut oil (1 tsp / 5ml) for smoother dipping.
- Don’t overheat the chocolate. Microwave in short bursts and stir often; overheated chocolate seizes and turns grainy. If it happens, add a splash of milk and stir gently.
- Roll truffles with lightly damp hands if they’re too sticky. (Just a little water—otherwise, the coating won’t stick.)
- Work quickly when coating with crispy rice or cookie crumbs. The chocolate sets fast, so have coatings ready before you start dipping.
- If you’re making a big batch, keep half in the freezer while you dip the rest. This keeps each truffle firm and easy to handle.
- Personal fail: I once skipped the freezing step and ended up with pumpkin “puddles.” Learn from my mistake—chill, chill, chill!
Multitasking tip: While the filling chills, prep your coatings and melt the chocolate. Consistency is key—measure ingredients carefully and use a cookie scoop for uniform size. For extra crunch, double-coat with crispy rice cereal. The secret to success? Patience and a little practice. Even if they’re imperfect, they’ll taste amazing!
Variations & Adaptations
- Gluten-Free: Use gluten-free crispy rice cereal or graham crackers. Vegan cream cheese works for dairy-free truffles—just check your chocolate, too!
- Spicy Pumpkin: Add a pinch of cayenne or extra ginger to the filling for a subtle kick. Perfect for grown-up fall parties!
- Chocolate Pumpkin: Swap white chocolate for dark or milk chocolate coating for a richer flavor. You can even drizzle with both for a marbled effect.
- Nutty Crunch: Fold in finely chopped pecans or walnuts into the filling, or roll finished truffles in crushed nuts instead of crispy cereal.
- No-Bake Pumpkin Pie Bites: Skip the chocolate coating and simply roll in cinnamon-sugar or graham cracker crumbs for a lighter treat.
I’ve tried making these with sweet potato puree (when I ran out of pumpkin one Thanksgiving), and the result was surprisingly delicious—slightly sweeter, but just as creamy. For Halloween, you can use colored candy melts (orange or black) for a festive twist. If you want to make mini truffles for party favors, just use a smaller scoop and adjust chilling time. Customizing is half the fun!
Serving & Storage Suggestions
Serve your crispy pumpkin cheesecake truffles chilled or at cool room temperature for best texture. Arrange on a platter lined with parchment, scatter extra sprinkles, and watch them disappear! They pair beautifully with hot apple cider, coffee, or a glass of cold milk.
For parties, I love to stack them in mini cupcake liners or wrap them in cellophane bags for edible gifts. If you want to get fancy, drizzle a little melted chocolate over the top or add a pinch of flaky salt.
Store leftovers in an airtight container in the refrigerator for up to 5 days. They can be frozen for up to 1 month—just thaw in the fridge overnight before serving. Reheat is not recommended (the coating gets soggy), but honestly, they’re best enjoyed fresh. The flavors deepen after a day in the fridge—so making ahead is a smart move!
Nutritional Information & Benefits
Each truffle is about 120 calories, with 8g fat, 12g carbohydrate, and 2g protein (estimate for standard size). Pumpkin brings vitamin A, fiber, and a touch of potassium. Cream cheese provides calcium and protein, while crispy rice adds a satisfying crunch (and fun, let’s be honest!).
This recipe is naturally nut-free unless you add nuts for garnish. For gluten-free, check your cereal or cookie crumbs. Dairy-free versions work well with vegan cream cheese and chocolate. From a wellness perspective, these treats are all about balance—they’re rich, satisfying, and made with real ingredients you can feel good about. Enjoy in moderation, and share the joy!
Conclusion
These crispy pumpkin cheesecake truffles bring together everything I love about fall in a single, irresistible bite. They’re quick, festive, and guaranteed to make any party (or cozy night at home) a little sweeter. Don’t be afraid to tweak the recipe—add your own toppings, swap in different flavors, or get creative with coatings. That’s the beauty of homemade treats!
Personally, I love how these truffles combine creamy pumpkin cheesecake flavor with a crispy shell. They’re fun to make, even more fun to eat, and always a hit wherever I take them. So, what are you waiting for? Pin, share, comment below with your twist, or let me know how yours turn out. Happy truffle making—and may your fall be filled with delicious memories!
FAQs
Can I use pumpkin pie filling instead of pumpkin puree?
No, pumpkin pie filling is pre-sweetened and spiced. Use pure pumpkin puree for the best texture and flavor control in your crispy pumpkin cheesecake truffles.
How do I keep the truffles from sticking when rolling?
Chill the filling well before shaping, and use slightly damp hands. If it’s still sticky, add a bit more powdered sugar to firm up.
Can I make these ahead for a party?
Absolutely! Make them up to 2 days ahead and store in the fridge. They taste even better after a day as the flavors meld together.
What’s the best way to melt white chocolate?
Use a microwave-safe bowl, heating in 20-second bursts and stirring between each. Short bursts prevent overheating and clumping.
Are these truffles freezer-friendly?
Yes, freeze in a single layer, then transfer to a zip-top bag. Thaw in the fridge before serving for best texture.
Pin This Recipe!
Crispy Pumpkin Cheesecake Truffles

These no-bake truffles combine creamy pumpkin cheesecake filling with a crispy, crunchy coating for the ultimate fall party or Halloween treat. Quick to make and perfect for sharing, they’re festive, fun, and irresistibly delicious.
- Prep Time: 20 minutes
- Cook Time: 0 minutes
- Total Time: 40 minutes
- Yield: 20–24 truffles 1x
- Category: Dessert
- Cuisine: American
Ingredients
- 8 oz cream cheese, softened (full-fat recommended)
- 1/2 cup pumpkin puree (not pumpkin pie filling)
- 1 cup powdered sugar
- 1 tsp vanilla extract
- 1 1/2 tsp pumpkin pie spice
- 1/8 tsp salt
- 12 oz white chocolate or candy melts
- 1 1/2 cups crispy rice cereal (or crushed graham crackers/vanilla wafers)
- Orange and black sprinkles (optional)
- 1/4 cup crushed pecans or walnuts (optional, for garnish)
- Extra pumpkin pie spice (optional, for garnish)
Instructions
- In a medium mixing bowl, combine softened cream cheese and pumpkin puree. Beat with a hand mixer until smooth and creamy, about 2 minutes.
- Add powdered sugar, vanilla extract, pumpkin pie spice, and salt. Mix on low speed until fully incorporated, scraping down the sides as needed. The filling should be thick and scoopable.
- Chill the mixture in the refrigerator for 20 minutes to firm up.
- Line a baking sheet with parchment or wax paper. Use a cookie scoop or tablespoon to portion out 1-inch balls. Roll gently between your palms to smooth. You should get 20–24 truffles.
- Freeze the shaped truffles for 20 minutes to make dipping easier.
- Melt white chocolate or candy melts in a microwave-safe bowl, heating in 20-second bursts and stirring until smooth.
- Place crispy rice cereal (or crushed graham crackers/vanilla wafers) in a shallow bowl.
- Using forks or dipping tools, dip each frozen truffle into the melted chocolate, letting excess drip off. Immediately roll or sprinkle with crispy rice cereal to coat. Place back on the prepared sheet.
- Decorate with sprinkles, crushed nuts, or a dusting of pumpkin pie spice if desired. Let truffles set at room temperature or refrigerate for 10 minutes until the chocolate is firm.
- Serve chilled or at cool room temperature. Store leftovers in an airtight container in the refrigerator for up to 5 days, or freeze for up to 1 month.
Notes
For gluten-free truffles, use certified gluten-free crispy rice cereal or graham crackers. For dairy-free, substitute vegan cream cheese and dairy-free white chocolate. Chill and freeze the filling as directed for best results. Work quickly when coating with crispy rice cereal, as the chocolate sets fast. Truffles can be made ahead and stored in the fridge for up to 5 days or frozen for up to 1 month.
Nutrition
- Serving Size: 1 truffle
- Calories: 120
- Sugar: 10
- Sodium: 60
- Fat: 8
- Saturated Fat: 5
- Carbohydrates: 12
- Fiber: 0.5
- Protein: 2
Keywords: pumpkin truffles, cheesecake truffles, fall dessert, Halloween treat, no-bake, party food, pumpkin spice, easy dessert, crispy truffles, autumn recipe


