“Hey, did you bring the ice cream sandwiches?” That text popped up just as I was wrapping up a long afternoon of work, and honestly, I wasn’t feeling the usual run to the corner store for some packaged stuff. Instead, I grabbed a few basics from the fridge and pantry and started experimenting—because sometimes the best treats come from those “I really hope this works” moments in the kitchen.
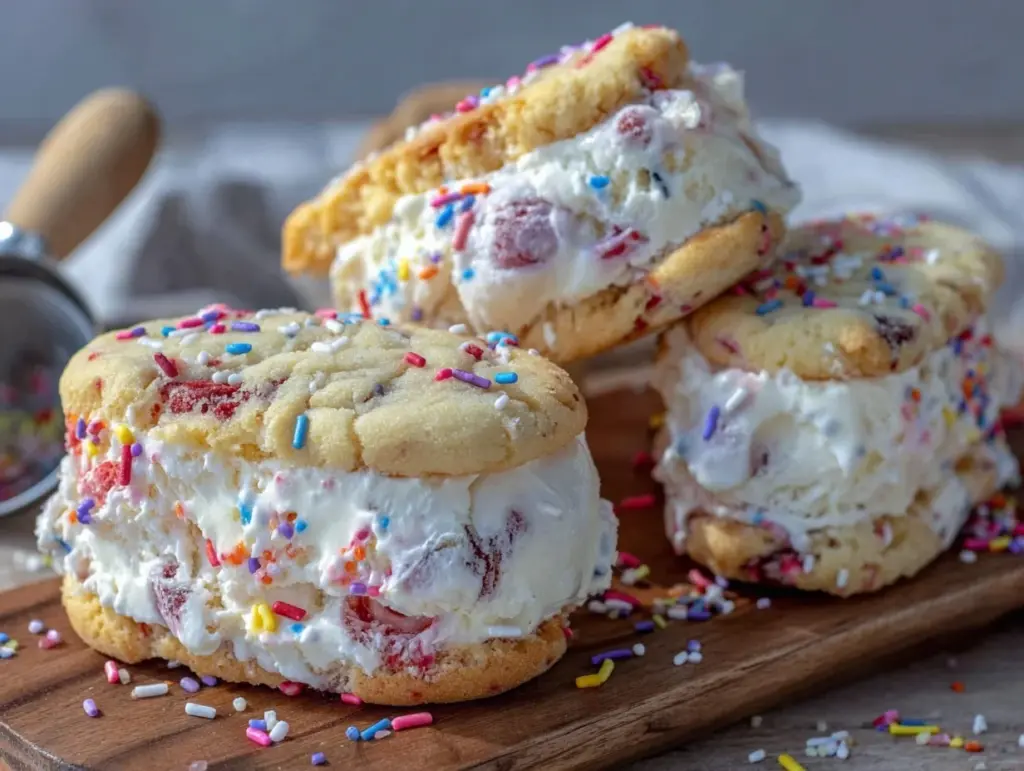
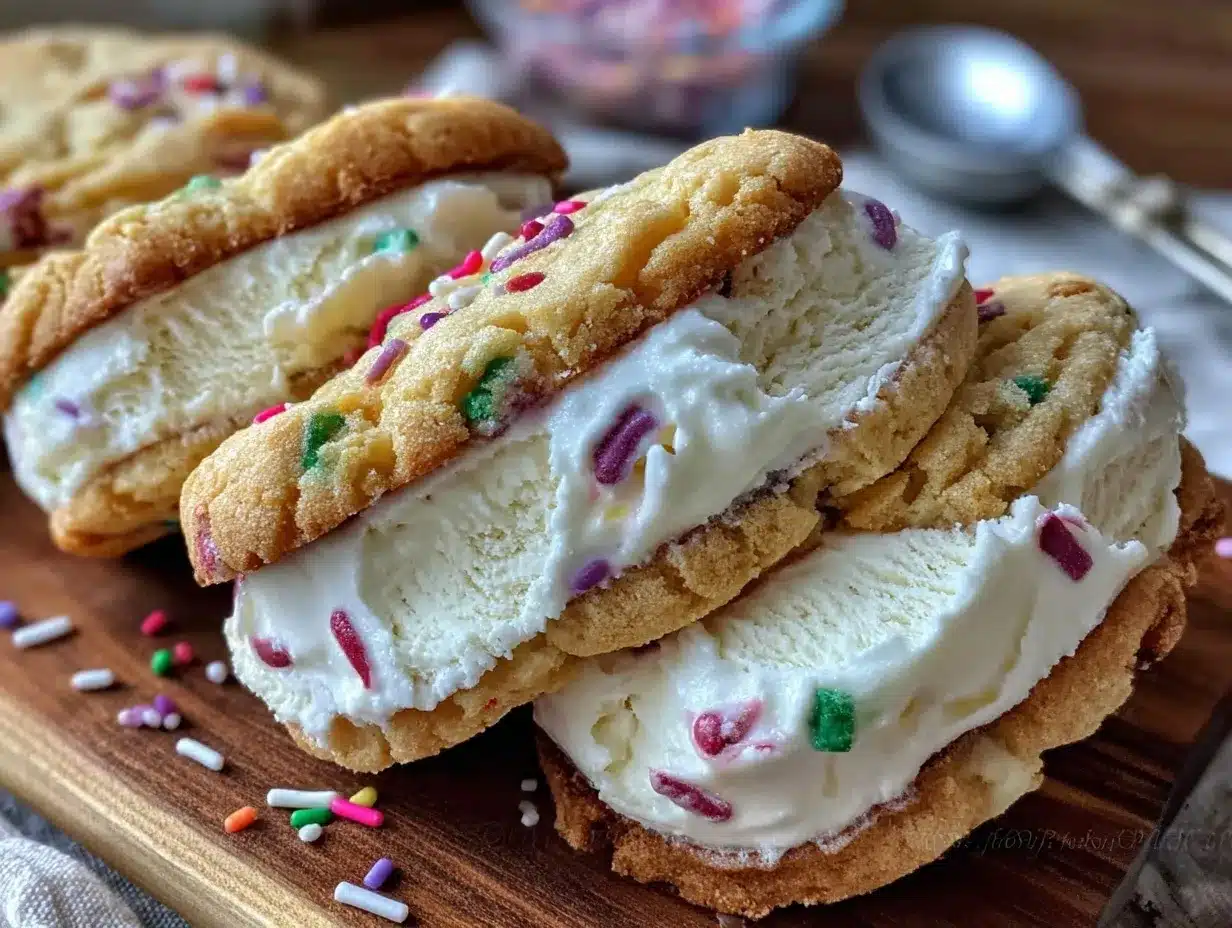
I’d never thought making creamy homemade vanilla ice cream sandwiches with sprinkles could be so straightforward and fun. The kitchen smelled like vanilla and sweet dough before I knew it, and those colorful sprinkles? They just made everything feel like a mini celebration, even if it was just me and my cat watching the sunset. No fancy equipment, no weird ingredients—just simple, nostalgic flavors that remind me of childhood fairs and sunny days.
What surprised me most was how quickly these came together, and the texture was spot on: soft cookies hugging that luscious vanilla cream, with the sprinkles adding a playful crunch. This recipe stuck with me not because it was perfect on the first try, but because it was easy to tweak and genuinely satisfying. So, if you’re craving a sweet break with a homemade touch, this might just become your new favorite treat too.
Why You’ll Love This Recipe
- Quick & Easy: Ready in under 30 minutes of active prep time — perfect for busy afternoons or last-minute dessert cravings.
- Simple Ingredients: No obscure pantry items here; you likely have everything on hand for this classic comfort.
- Perfect for Celebrations: Birthdays, casual gatherings, or just because — these ice cream sandwiches bring a smile every time.
- Crowd-Pleaser: Kids and adults alike will go nuts over the creamy vanilla center and colorful sprinkles.
- Unbelievably Delicious: The cookies have that tender chew, and the ice cream is rich but not overwhelming — just right.
This isn’t just another vanilla ice cream sandwich recipe. I’ve tested variations with different sprinkles and cookie thicknesses, and the trick of folding the sprinkles gently into the edges before freezing keeps them from flaking off everywhere. Plus, the homemade vanilla ice cream base is smoother and creamier than store-bought — thanks to a little patience and real vanilla bean paste.
If you’ve ever been skeptical about making ice cream at home, this recipe might change your mind. It’s the kind of treat that feels indulgent, but it’s pure comfort food reimagined with a homemade twist. Honestly, I find myself making these whenever friends drop by unexpectedly — no stress, just sweet moments.
What Ingredients You Will Need
This recipe uses simple, wholesome ingredients to deliver bold flavor and satisfying texture without the fuss. Most are pantry staples, with a couple of fresh items for the ice cream base. If you’re in a pinch, I’ve included some easy substitutions below.
- For the Cookies:
- All-purpose flour (1 ½ cups / 180 g) – for that tender chew
- Baking powder (1 tsp) – subtle lift without puffiness
- Salt (¼ tsp) – balances sweetness
- Unsalted butter (½ cup / 115 g), softened – I recommend Plugrá for creaminess
- Granulated sugar (⅓ cup / 65 g) – just enough sweetness
- Brown sugar (⅓ cup / 70 g), packed – adds moisture and depth
- Vanilla extract (1 tsp) – pure vanilla is key here
- Large egg (1), room temperature – helps bind and tenderize
- For the Ice Cream:
- Heavy cream (1 cup / 240 ml) – full-fat for creaminess
- Whole milk (1 cup / 240 ml) – balances richness
- Granulated sugar (¾ cup / 150 g) – sweetens the base
- Vanilla bean paste (1 tbsp) or pure vanilla extract (1 tsp) – real vanilla flavor
- Pinch of salt – enhances flavor
- For the Decorating:
- Rainbow sprinkles (½ cup / 75 g) – the fun, colorful crunch
If you want a gluten-free twist, almond flour works well for the cookies but expect a slightly nuttier flavor. For dairy-free, swap heavy cream and milk with coconut cream and almond milk; the texture is a bit different but still delicious. When it comes to sprinkles, I prefer brands like Wilton for their vibrant colors and candy shell crunch without bleeding colors.
Equipment Needed
- Mixing bowls – a medium and a large one for wet and dry ingredients
- Electric hand mixer or stand mixer – makes creaming the butter and sugar a breeze
- Measuring cups and spoons – precision matters for the cookies and ice cream
- Ice cream maker – I use a simple 1.5-quart machine, but no-churn methods can work too
- Baking sheet lined with parchment paper – for baking the cookies evenly
- Spatula and whisk – for combining ingredients smoothly
- Plastic wrap or airtight container – for freezing the sandwiches
If you don’t have an ice cream maker, you can still make this recipe using the no-churn method by whipping the cream separately and folding it into the sweetened condensed milk mixture before freezing. I’ve tried both, but the machine produces a smoother texture that’s worth the effort. Also, keeping your mixing bowls chilled helps when whipping the cream — a neat trick I picked up from another creamy recipe on the blog.
Preparation Method
- Make the Cookies: Preheat your oven to 350°F (175°C). In a bowl, whisk together the flour, baking powder, and salt. In another large bowl, cream the softened butter with granulated and brown sugar until fluffy (about 3-4 minutes). Add the egg and vanilla extract, beating until combined.
- Combine Dry and Wet: Gradually add the dry ingredients into the wet mixture, folding gently until just combined. Avoid overmixing to keep cookies tender.
- Shape and Bake: Scoop dough into tablespoon-sized balls, place them on a parchment-lined baking sheet about 2 inches apart, and flatten slightly with your palm. Bake for 10-12 minutes until edges are lightly golden but centers remain soft. Let cool completely on a wire rack.
- Prepare the Ice Cream Base: While cookies bake, whisk together the heavy cream, whole milk, sugar, vanilla bean paste, and a pinch of salt in a bowl until sugar dissolves. Chill the mixture in the fridge for at least 30 minutes (or overnight, if you can wait).
- Churn the Ice Cream: Pour the chilled mixture into your ice cream maker and churn according to manufacturer’s instructions (usually 20-25 minutes). Transfer the soft ice cream to a container and freeze for at least 2 hours to firm up.
- Assemble the Sandwiches: Scoop a generous tablespoon of ice cream onto the flat side of one cookie, then gently press another cookie on top to form a sandwich. Roll the edges in rainbow sprinkles for that festive flair. Place sandwiches on a tray and freeze for at least 1 hour before serving.
Pro tip: If your ice cream gets too hard in the freezer, let the sandwiches sit at room temperature for a few minutes before digging in. Also, when baking cookies, watch them closely after the 10-minute mark — ovens vary, and you want that perfect soft center.
Cooking Tips & Techniques
Making perfect ice cream sandwiches at home takes a little practice, but here are some tips I’ve gathered over multiple batches:
- Keep Ingredients Room Temperature: This helps the butter cream better with the sugars, leading to softer, chewier cookies.
- Don’t Overbake the Cookies: They’ll firm up as they cool. Overbaking leads to hard, dry cookies that don’t sandwich well.
- Chill Your Ice Cream Base Well: The colder the mixture before churning, the creamier the texture. I often prepare the base the night before.
- Use Vanilla Bean Paste: It gives a richer, more authentic vanilla flavor and those tiny black specs that look fancy but aren’t complicated to use.
- Handle the Ice Cream Quickly: When assembling, work fast so the ice cream doesn’t melt. Keep your hands cool or work with a cold spoon.
- Roll in Sprinkles Gently: Press too hard, and the sprinkles fall off. A light roll keeps them intact and pretty.
Honestly, I once tried swapping the vanilla bean paste for extract and ended up with a less vibrant flavor. Lesson learned! Also, multitasking by chilling the ice cream base while baking the cookies saves a ton of time. For a smoother ice cream, I recommend stirring the base every now and then while it chills to keep the sugar dissolved — it’s a small step that helps.
Variations & Adaptations
- Chocolate Chip Cookies: Swap the plain cookie dough for chocolate chip dough to add an extra layer of flavor. It’s a classic twist that pairs beautifully with vanilla ice cream.
- Fruit-Infused Ice Cream: Fold in fresh strawberry puree or blueberry compote into the ice cream base before churning for a fruity surprise.
- Dairy-Free Option: Use coconut cream and almond milk for a creamy vegan ice cream base, and replace butter in cookies with coconut oil.
- Sprinkle Mix-Up: Try crushed pistachios or mini chocolate chips instead of rainbow sprinkles for a more sophisticated look and taste.
- Seasonal Spice: Add a pinch of cinnamon or nutmeg to the cookie dough for a cozy fall vibe — reminds me a bit of the warm spices in that mulberry cobbler recipe I love.
I once swapped the sugar for maple syrup in the ice cream and ended up with a lovely, subtle twist — perfect if you want to try something a little different but still crave that creamy vanilla base. These tweaks keep the core idea intact but add fun personality depending on the occasion or mood.
Serving & Storage Suggestions
Serve your creamy homemade vanilla ice cream sandwiches with sprinkles chilled but not frozen rock hard — about 5 minutes out of the freezer is ideal. That way, the cookies are soft and the ice cream is perfectly scoopable.
They’re fantastic on their own or alongside a simple fruit salad or a glass of cold milk. For a grown-up touch, pair them with a cup of rich coffee or a scoop of strawberry cheesecake trifle for a layered dessert experience.
Store leftover sandwiches in an airtight container in the freezer for up to 5 days. When reheating, avoid microwaves (the ice cream will melt unevenly). Instead, let them sit at room temperature for 10 minutes or place in the fridge for a gentler thaw. Flavors tend to mellow and blend after a day, making them even more enjoyable.
Nutritional Information & Benefits
Each ice cream sandwich is roughly 250-300 calories, depending on the size of the cookies and ice cream scoop. The recipe uses real butter and full-fat dairy, so it’s rich but balanced by portion control.
Vanilla bean paste and pure vanilla extract add flavor without extra sugar, and the homemade base means you can control sweetness and avoid additives found in store-bought versions. The sprinkles add fun but use sparingly if watching sugar intake.
If you swap in almond flour or coconut milk, the recipe can be adapted for gluten-free or dairy-free diets, making it a versatile treat for different dietary needs. While it’s certainly a dessert, making it at home means you know exactly what’s inside — no mystery ingredients or preservatives.
Conclusion
This recipe for creamy homemade vanilla ice cream sandwiches with sprinkles is a little bit magic and a whole lot of fun. It’s approachable for cooks of all levels and offers a nostalgic joy that’s hard to beat. I love how it turns a few simple ingredients into a festive, creamy delight that’s perfect for whenever you need a pick-me-up or a sweet surprise for friends.
Feel free to tweak and make it your own — whether that’s swapping sprinkles for nuts or adding a dash of cinnamon to the cookies. The best part? It’s always worth the effort and brings smiles every time I make it. I’d love to hear how your batches turn out or if you’ve tried any fun adaptations!
Go ahead and give it a whirl — those homemade ice cream sandwiches might just become your favorite weekend ritual.
FAQs
- Can I make the ice cream without an ice cream maker?
Yes! Use the no-churn method by whipping heavy cream and folding it into sweetened condensed milk mixed with vanilla, then freeze until firm. - How do I keep the sprinkles from falling off the sandwiches?
Gently press the edges of the ice cream into the sprinkles and roll lightly to help them stick without crumbling. - Can I prepare these in advance?
Absolutely. Assemble the sandwiches and freeze them in an airtight container for up to 5 days. - What if my cookies turn out too hard?
Try reducing bake time slightly or adding a bit more brown sugar to increase moisture for softer cookies. - Are there any good substitutions for vanilla bean paste?
Pure vanilla extract works well, but vanilla bean paste adds extra depth and those pretty flecks in the ice cream.
Pin This Recipe!

Creamy Homemade Vanilla Ice Cream Sandwiches Easy 5-Step Recipe with Sprinkles

These creamy homemade vanilla ice cream sandwiches with sprinkles are quick and easy to make, featuring soft cookies and rich vanilla ice cream with a playful crunch from colorful sprinkles.
- Prep Time: 20 minutes
- Cook Time: 12 minutes
- Total Time: 3 hours 30 minutes
- Yield: 8 sandwiches
- Category: Dessert
- Cuisine: American
Ingredients
- All-purpose flour (1 ½ cups / 180 g)
- Baking powder (1 tsp)
- Salt (¼ tsp)
- Unsalted butter (½ cup / 115 g), softened
- Granulated sugar (⅓ cup / 65 g)
- Brown sugar (⅓ cup / 70 g), packed
- Vanilla extract (1 tsp)
- Large egg (1), room temperature
- Heavy cream (1 cup / 240 ml)
- Whole milk (1 cup / 240 ml)
- Granulated sugar (¾ cup / 150 g)
- Vanilla bean paste (1 tbsp) or pure vanilla extract (1 tsp)
- Pinch of salt
- Rainbow sprinkles (½ cup / 75 g)
Instructions
- Preheat your oven to 350°F (175°C). In a bowl, whisk together the flour, baking powder, and salt. In another large bowl, cream the softened butter with granulated and brown sugar until fluffy (about 3-4 minutes). Add the egg and vanilla extract, beating until combined.
- Gradually add the dry ingredients into the wet mixture, folding gently until just combined. Avoid overmixing to keep cookies tender.
- Scoop dough into tablespoon-sized balls, place them on a parchment-lined baking sheet about 2 inches apart, and flatten slightly with your palm. Bake for 10-12 minutes until edges are lightly golden but centers remain soft. Let cool completely on a wire rack.
- While cookies bake, whisk together the heavy cream, whole milk, sugar, vanilla bean paste, and a pinch of salt in a bowl until sugar dissolves. Chill the mixture in the fridge for at least 30 minutes (or overnight, if you can wait).
- Pour the chilled mixture into your ice cream maker and churn according to manufacturer’s instructions (usually 20-25 minutes). Transfer the soft ice cream to a container and freeze for at least 2 hours to firm up.
- Scoop a generous tablespoon of ice cream onto the flat side of one cookie, then gently press another cookie on top to form a sandwich. Roll the edges in rainbow sprinkles for that festive flair. Place sandwiches on a tray and freeze for at least 1 hour before serving.
Notes
If you don’t have an ice cream maker, use the no-churn method by whipping heavy cream and folding it into sweetened condensed milk mixed with vanilla, then freeze until firm. Keep ingredients at room temperature for softer cookies. Avoid overbaking cookies to maintain softness. Chill ice cream base well before churning for creamier texture. Roll sprinkles gently to prevent them from falling off. Let sandwiches sit at room temperature for a few minutes before serving if too hard.
Nutrition
- Serving Size: 1 ice cream sandwich
- Calories: 275
- Sugar: 20
- Sodium: 120
- Fat: 14
- Saturated Fat: 8
- Carbohydrates: 32
- Fiber: 1
- Protein: 4
Keywords: vanilla ice cream sandwiches, homemade ice cream, sprinkles, easy dessert, ice cream sandwich recipe, creamy vanilla ice cream, soft cookies


