Introduction
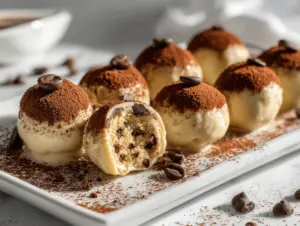
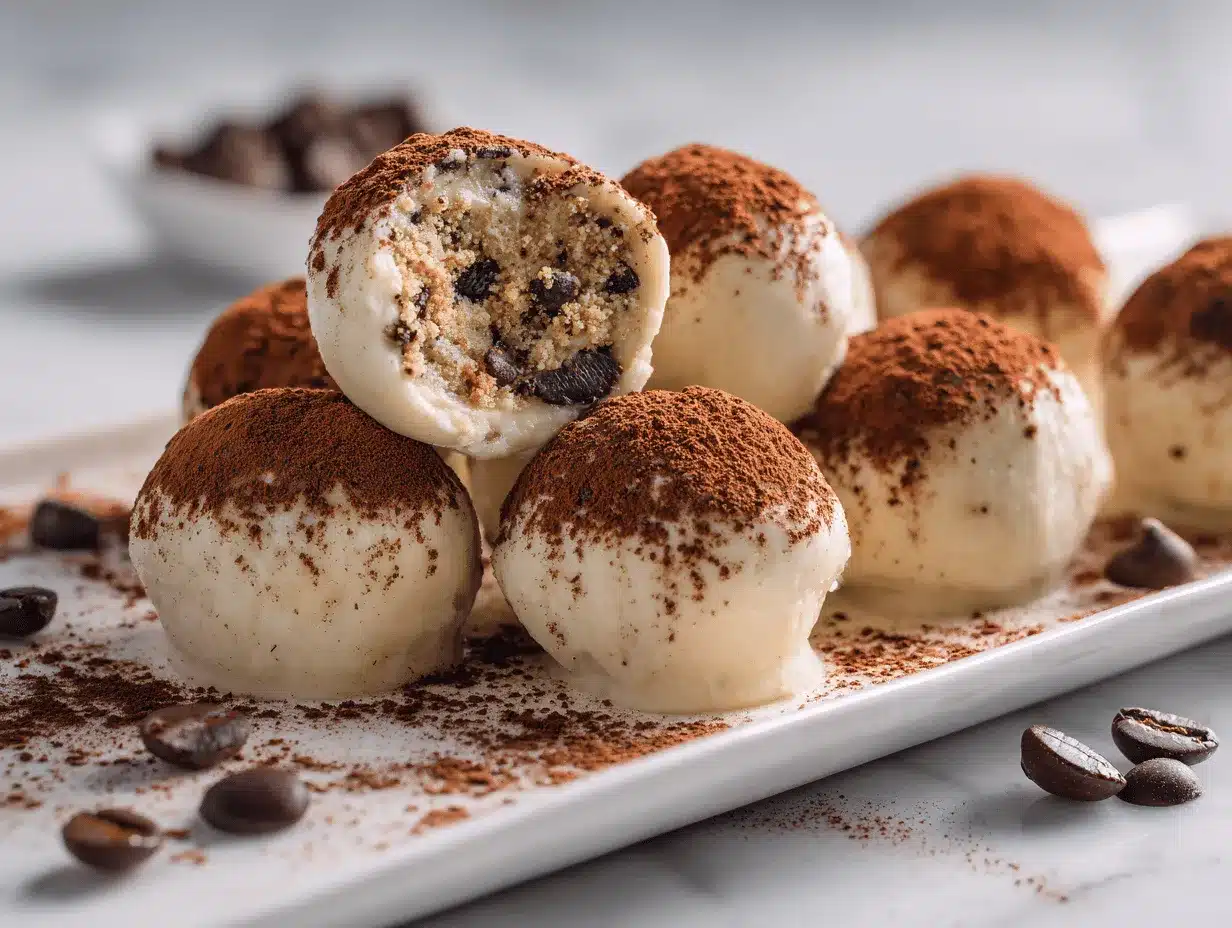
One bite of these tiramisu truffles, and I’m instantly transported to a bustling Italian café—creamy mascarpone, rich coffee, and a whisper of cocoa all wrapped up in a melt-in-your-mouth treat. The first time I whipped up a batch of tiramisu truffles, I was trying to impress my book club (and, let’s face it, I wanted something that looked fancier than my usual brownies). What I didn’t expect was how ridiculously simple these “fancy” truffles actually are to make. No baking, no stress, just pure indulgence.
Over the years, I’ve tweaked the recipe more times than I can count—sometimes adding a splash of amaretto, sometimes going all-in with chocolate chips. But at its heart, this recipe is all about that classic tiramisu magic: bold espresso, creamy mascarpone, and the perfect hit of cocoa. These tiramisu truffles are a hit at every party, and they’re especially loved by friends who claim they’re “not dessert people” (yeah, right). If you’re searching for an easy, decadent dessert that’ll make you look like a pastry chef, this is it. Plus, you don’t need fancy equipment or obscure ingredients—these truffles are as approachable as they are impressive.
I’ve made tiramisu truffles for everything from baby showers to New Year’s Eve, and they always disappear fast. Whether you’re catering to a crowd of dessert enthusiasts or just want to treat yourself to a little luxury, this tiramisu truffles recipe is your ticket to instant elegance—no Italian passport required!
Why You’ll Love This Recipe
If you’re looking for a dessert that’s as easy to make as it is luxurious, these tiramisu truffles are going to be your new obsession. Here’s why I always come back to this recipe (and why my friends beg for it at every gathering):
- Quick & Easy: Comes together in under 30 minutes (plus a little chill time). Perfect for last-minute get-togethers or when you need to whip up something impressive, fast.
- Simple Ingredients: No need to hunt down rare liqueurs or specialty flours—everything is easy to find, and you probably already have half the list on hand.
- Perfect for Fancy Occasions: These tiramisu truffles look like they came straight from a boutique bakery—ideal for parties, holiday spreads, or even as edible gifts.
- Crowd-Pleaser: Seriously, even folks who “don’t like tiramisu” end up sneaking a second one. Children and adults both love the creamy texture and the hint of coffee.
- Unbelievably Delicious: The blend of creamy mascarpone, bold coffee, and deep cocoa flavor is just next-level. It’s tiramisu, but in the most snackable, poppable form imaginable.
What makes these tiramisu truffles stand out from the endless sea of truffle recipes? For starters, it’s all about the balance—there’s enough coffee to give you that pick-me-up, but it doesn’t overpower the dreamy mascarpone. Plus, rolling each truffle in cocoa makes them look as elegant as they taste. This isn’t just another quick dessert—it’s a little moment of Italian-inspired luxury you can make with your own two hands.
Honestly, they’re the kind of treat that makes you pause for a second after the first bite. Rich, creamy, with just the right amount of sweetness—these tiramisu truffles are comfort food with a passport stamp. Whether you’re aiming to impress guests or just want to treat yourself, this recipe always delivers. No stress, all flavor, and a guaranteed spot on your “wow, I made that!” list.
What Ingredients You Will Need
This tiramisu truffles recipe uses just a handful of ingredients to create that classic, irresistible flavor. They’re mostly pantry staples (with a couple of fun upgrades) and easy to find at any grocery store. Here’s what you’ll need:
- Ladyfingers (Savoiardi cookies), 7 oz (200g): These give the truffles their signature texture and soak up the coffee flavor. Can’t find them? Use vanilla wafers or graham crackers in a pinch.
- Mascarpone cheese, 8 oz (225g), chilled: The creamy heart of tiramisu—don’t substitute with cream cheese if you want the true flavor, though it’ll work in a bind.
- Powdered sugar, 1/2 cup (60g): Adds a gentle sweetness and helps hold everything together. Sift it if clumpy.
- Espresso or strong brewed coffee, 1/4 cup (60ml), cooled: For that unmistakable tiramisu kick. Instant espresso powder works great, too.
- Dark chocolate, 3 oz (85g), finely chopped: Stirred into the mix for decadent, chocolatey bites. I love Ghirardelli or Lindt, but use your favorite.
- Cocoa powder, 1/4 cup (25g), for rolling: Dusts the truffles for a classic finish. Dutch-process or natural cocoa both work.
- Vanilla extract, 1 tsp: Rounds out the flavors—pure extract gives the best aroma.
- Optional: coffee liqueur (like Kahlúa), 1–2 tbsp: Adds extra depth for grown-up gatherings, but skip it if you’re serving kids.
- Pinch of salt: Just a touch makes the flavors pop (trust me, don’t skip it!).
Ingredient Tips & Substitutions:
- If you’re gluten-free, swap in gluten-free ladyfingers or crunchy almond biscotti.
- For a dairy-free version, try a thick vegan cream cheese and plant-based chocolate—texture will change slightly, but still delicious.
- In the summer, I sometimes add a little orange zest for a fresh twist (try it—so good!).
- Feel free to use milk chocolate if you prefer a sweeter bite, or even white chocolate for a softer flavor.
- If you love a boozy kick, go for the coffee liqueur. Otherwise, the coffee alone gives plenty of flavor.
Most of these ingredients have become permanent residents in my kitchen—especially mascarpone (I swear, it transforms everything into a treat). Don’t stress if you need to swap something out; tiramisu truffles are forgiving and always delicious!
Equipment Needed
Making tiramisu truffles doesn’t require a kitchen full of gadgets. Here’s what you’ll need:
- Food processor or blender: For pulsing the ladyfingers into fine crumbs. If you don’t have one, a zip-top bag and a rolling pin work in a pinch (just takes a bit more elbow grease).
- Medium mixing bowl: For combining all the luscious ingredients. Glass or stainless steel bowls are easiest for cleanup.
- Electric hand mixer or sturdy spoon: To blend the mascarpone and sugar. I’ve used both, and honestly, a wooden spoon works fine if you’re feeling old-school.
- Small cookie scoop or tablespoon: For portioning the truffles evenly. If you want perfectly round truffles, invest in a cookie scoop; if not, a spoon and your hands do the trick.
- Baking sheet or large plate: For setting the shaped truffles before rolling them in cocoa.
- Parchment paper: Prevents sticking and makes cleanup a breeze.
- Fine mesh sieve: For dusting the cocoa powder over the truffles—optional, but makes them look extra fancy.
When I first made these, I didn’t have a food processor, so I smashed the ladyfingers with a rolling pin (the kids loved helping). If you’re using a hand mixer, give your beaters a quick rinse after whipping the mascarpone to keep the mix fluffy. And don’t worry—fancy tools aren’t required, but a good cookie scoop is a game-changer for truffle-making days!
Preparation Method
-
Pulse the Ladyfingers:
Place 7 oz (200g) of ladyfingers in a food processor or blender. Pulse until they become fine crumbs—think sandy texture, not chunky. No food processor? Seal them in a zip-top bag and crush with a rolling pin.
Tip: Don’t over-process or you’ll get flour instead of crumbs! -
Prepare the Mascarpone Mixture:
In a medium mixing bowl, combine 8 oz (225g) chilled mascarpone cheese and 1/2 cup (60g) powdered sugar. Add a pinch of salt and 1 tsp vanilla extract. Use a hand mixer or sturdy spoon to blend until smooth and creamy.
Sensory cue: The mix should be glossy and hold soft peaks.
Note: Don’t overmix or the mascarpone can turn runny. -
Add the Coffee and Liqueur:
Pour in 1/4 cup (60ml) cooled espresso or strong coffee. Add 1–2 tbsp coffee liqueur if using. Mix until fully incorporated.
Warning: Make sure the coffee is at room temperature—hot coffee will melt the mascarpone! -
Combine with Ladyfinger Crumbs:
Add the ladyfinger crumbs and 3 oz (85g) finely chopped dark chocolate to the mascarpone mixture. Stir with a spatula until you have a thick, sticky dough.
Texture note: The dough should easily hold its shape but still feel soft when pressed. -
Chill the Dough:
Cover the bowl with plastic wrap and refrigerate for at least 30 minutes (or up to 2 hours). This makes shaping the truffles way easier.
Efficiency tip: In a rush? Pop the bowl in the freezer for 10–12 minutes. -
Shape the Truffles:
Line a baking sheet with parchment paper. Use a small cookie scoop or tablespoon to portion out the dough, then roll each portion between your palms to form balls, about 1 inch (2.5 cm) in diameter. Place them on the prepared sheet.
Troubleshooting: If the dough sticks to your hands, lightly dust them with cocoa powder. -
Roll in Cocoa Powder:
Place 1/4 cup (25g) cocoa powder in a shallow bowl. Roll each truffle in cocoa until evenly coated. For extra flair, sift cocoa powder over the tops using a fine mesh sieve.
Personal tip: Sometimes I roll half the truffles in grated chocolate for extra crunch! -
Chill and Serve:
Refrigerate the finished truffles for at least 1 hour before serving. This step helps the flavors meld and the texture set perfectly.
Serving note: Truffles are best served slightly chilled but not icy cold.
That’s it—you’re ready to wow your guests with homemade tiramisu truffles! Clean your hands between batches for neater truffles, and don’t stress about perfection; a little rustic charm just adds to the homemade magic.
Cooking Tips & Techniques
After baking (and occasionally flubbing) more than a few batches of tiramisu truffles, I’ve picked up some tricks that make the process smoother every time:
- Don’t Overmix Mascarpone: It’s tempting to keep mixing for extra creaminess, but mascarpone can split and get runny if overworked. Mix just until smooth and stop.
- Keep Everything Cold: The dough shapes better when chilled. If your kitchen is warm, chill your mixing bowl and utensils ahead of time. Warm hands? Rinse them in cold water before rolling.
- Use the Right Coffee: Freshly brewed espresso gives the best flavor, but instant espresso powder dissolved in hot water works great. Avoid flavored or sweetened coffees, which can overpower the classic tiramisu taste.
- Be Gentle with Ladyfingers: Pulse, don’t pulverize! Too fine and the crumbs won’t absorb the liquid as well, which can make your dough dense and sticky.
- Multitasking Made Easy: While the dough chills, set up your rolling station—parchment paper, cocoa, and scoop. This makes the final steps a breeze.
- Consistency is Key: If your dough feels too soft to roll, chill it longer. Still too sticky? Add a tablespoon of extra ladyfinger crumbs at a time until it firms up. If it’s too dry, add a splash more coffee or mascarpone.
- Don’t Stress About Perfection: My first truffles looked lumpy, but no one cared—they tasted incredible. A little imperfection is part of the charm.
I once tried to rush the chilling step and ended up with sticky, misshapen blobs (still delicious, just not “Pinterest-pretty”). Letting the dough set properly is worth the wait. These little details make all the difference between good and “oh-my-gosh, can I have the recipe?”
Variations & Adaptations
Tiramisu truffles are a dream for flavor tweaking—here are some of my favorite ways to switch things up:
- Gluten-Free Version: Swap the ladyfingers for your favorite gluten-free cookies or almond biscotti. The texture changes a bit but stays melt-in-your-mouth good.
- Vegan Adaptation: Use a thick vegan cream cheese (like Kite Hill) in place of mascarpone and dairy-free dark chocolate. Add a splash of coconut cream for extra richness.
- Mocha Madness: Stir in 2 tsp instant espresso powder to the dough and use chocolate sprinkles for rolling. Perfect for coffee lovers!
- Seasonal Berry Swirl: Add a spoonful of raspberry or strawberry jam to the mascarpone mixture (and a little less coffee to compensate). It gives a fruity tang that’s lovely in summer.
- Nutty Crunch: Fold in 1/4 cup (30g) finely chopped toasted hazelnuts or almonds for texture.
- Different Coatings: Roll in crushed pistachios, white chocolate shavings, or even freeze-dried berries for a colorful dessert tray.
I’ve made a boozy adult-only batch with extra Kahlúa for my husband’s birthday, and a kid-friendly version with mini chocolate chips and zero liqueur. Honestly, the best part is how flexible this tiramisu truffles recipe is—so don’t be afraid to play with flavors based on your mood or what’s in the pantry!
Serving & Storage Suggestions
Tiramisu truffles are at their best when served cool, with a dusting of cocoa and a little flourish on a pretty platter. Here’s how I like to present and store them:
- Serving Temp: Slightly chilled is perfect—not rock hard, but cool and creamy. Set them out 10–15 minutes before serving for the ideal bite.
- Presentation: Arrange on a cake stand or in mini cupcake liners for a high-end look. They’re gorgeous piled in a pyramid and dusted with extra cocoa.
- Pairings: Serve alongside espresso, dessert wine, or even a glass of Prosecco for a true Italian experience. If you’re at brunch, a cup of strong coffee does the trick.
- Storage: Store in an airtight container in the fridge for up to 5 days. Place parchment between layers to prevent sticking.
- Freezing: These freeze surprisingly well! Lay in a single layer, freeze until solid, then transfer to a zip-top bag. Thaw overnight in the fridge before serving.
- Reheating: No need—these are meant to be chilled, not warmed. If they’ve been in the freezer, just let them rest in the fridge to regain their creamy texture.
- Flavor Note: The coffee and cocoa flavors deepen after a day or so in the fridge—so they’re even better the next day (if you can wait that long!).
Honestly, I think they taste even more decadent after a night in the fridge—so making them ahead for parties is a total win.
Nutritional Information & Benefits
Let’s break down what’s inside each delicious tiramisu truffle (approximate per truffle based on a batch of 20):
- Calories: 90
- Fat: 5g
- Carbohydrates: 9g
- Protein: 1g
- Sugar: 5g
The mascarpone adds calcium and a touch of protein, while the dark chocolate brings antioxidants and that satisfying “treat yourself” factor. Using real coffee instead of artificial flavor keeps things natural, and you can easily adjust the sugar if you want to lighten things up. If you’re gluten-free or dairy-free, the suggested swaps make these truffles accessible for most diets. Just note: they do contain dairy and gluten unless adapted. From a wellness perspective, I like to think of these as little bites of joy—rich, satisfying, and perfect for portion control. And hey, everyone needs a little decadence sometimes!
Conclusion
If you’re craving something that feels straight out of a fancy dessert shop but doesn’t require hours in the kitchen, these tiramisu truffles are for you. They’re easy, endlessly customizable, and always a crowd-pleaser. I love how each bite brings that classic tiramisu flavor—creamy, coffee-kissed, with a hint of chocolate—all wrapped up in a perfect little sphere. And, let’s be honest, they look downright stunning on a party platter.
Don’t be afraid to play around with flavors or coatings—this is the kind of recipe that loves a personal twist. Honestly, I make these whenever I want to treat myself or impress a roomful of friends. If you try this tiramisu truffles recipe, let me know how it goes in the comments! Share your unique adaptations, or snap a picture for Pinterest—your dessert table will thank you. Here’s to more joy, more chocolate, and more moments worth celebrating!
FAQs
How long do tiramisu truffles last in the fridge?
Stored in an airtight container, they’ll stay fresh and creamy for up to 5 days. Separate layers with parchment to keep them from sticking together.
Can I make tiramisu truffles ahead of time?
Absolutely! In fact, they taste even better after a day in the fridge as the flavors blend. Perfect for prepping before parties or gifting.
What can I use instead of ladyfingers?
If you can’t find ladyfingers, vanilla wafers, shortbread, or even graham crackers work well. For gluten-free, try almond biscotti or a sturdy gluten-free cookie.
Are tiramisu truffles safe for kids?
Yes—just skip the coffee liqueur. The coffee flavor will still be present, but it won’t contain alcohol. You can even use decaf coffee for a milder taste.
Can I freeze tiramisu truffles?
Absolutely! Freeze in a single layer, then transfer to a zip-top bag. Thaw overnight in the fridge before serving. They’ll keep for up to 2 months this way.
Pin This Recipe!

Tiramisu Truffles
These easy tiramisu truffles capture all the classic flavors of tiramisu—creamy mascarpone, bold coffee, and rich cocoa—in a decadent, no-bake bite-sized treat. Perfect for fancy parties or whenever you want to impress with minimal effort.
- Prep Time: 20 minutes
- Cook Time: 0 minutes
- Total Time: 1 hour 50 minutes
- Yield: 20 truffles 1x
- Category: Dessert
- Cuisine: Italian
Ingredients
- 7 oz (200g) ladyfingers (Savoiardi cookies)
- 8 oz (225g) mascarpone cheese, chilled
- 1/2 cup (60g) powdered sugar
- 1/4 cup (60ml) espresso or strong brewed coffee, cooled
- 3 oz (85g) dark chocolate, finely chopped
- 1/4 cup (25g) cocoa powder, for rolling
- 1 tsp vanilla extract
- 1–2 tbsp coffee liqueur (like Kahlúa), optional
- Pinch of salt
Instructions
- Place ladyfingers in a food processor or blender and pulse until fine crumbs form. Alternatively, crush in a zip-top bag with a rolling pin.
- In a medium mixing bowl, combine chilled mascarpone cheese, powdered sugar, pinch of salt, and vanilla extract. Blend with a hand mixer or sturdy spoon until smooth and creamy. Do not overmix.
- Add cooled espresso or strong coffee and coffee liqueur (if using) to the mascarpone mixture. Mix until fully incorporated.
- Add ladyfinger crumbs and finely chopped dark chocolate to the bowl. Stir until a thick, sticky dough forms.
- Cover the bowl with plastic wrap and refrigerate for at least 30 minutes (or up to 2 hours) to firm up the dough.
- Line a baking sheet with parchment paper. Use a small cookie scoop or tablespoon to portion the dough, then roll each portion into 1-inch balls and place on the sheet.
- Place cocoa powder in a shallow bowl. Roll each truffle in cocoa until evenly coated. Optionally, sift extra cocoa over the tops with a fine mesh sieve.
- Refrigerate the finished truffles for at least 1 hour before serving. Serve slightly chilled.
Notes
For best results, keep all ingredients cold and avoid overmixing the mascarpone. If the dough is too sticky, chill longer or add extra ladyfinger crumbs. Truffles can be made ahead and taste even better after a day in the fridge. For gluten-free or dairy-free adaptations, see ingredient notes. Store in an airtight container in the fridge for up to 5 days or freeze for up to 2 months.
Nutrition
- Serving Size: 1 truffle
- Calories: 90
- Sugar: 5
- Sodium: 20
- Fat: 5
- Saturated Fat: 3
- Carbohydrates: 9
- Fiber: 1
- Protein: 1
Keywords: tiramisu truffles, no-bake dessert, Italian dessert, mascarpone, coffee, party dessert, easy truffles, chocolate truffles, holiday dessert, edible gift