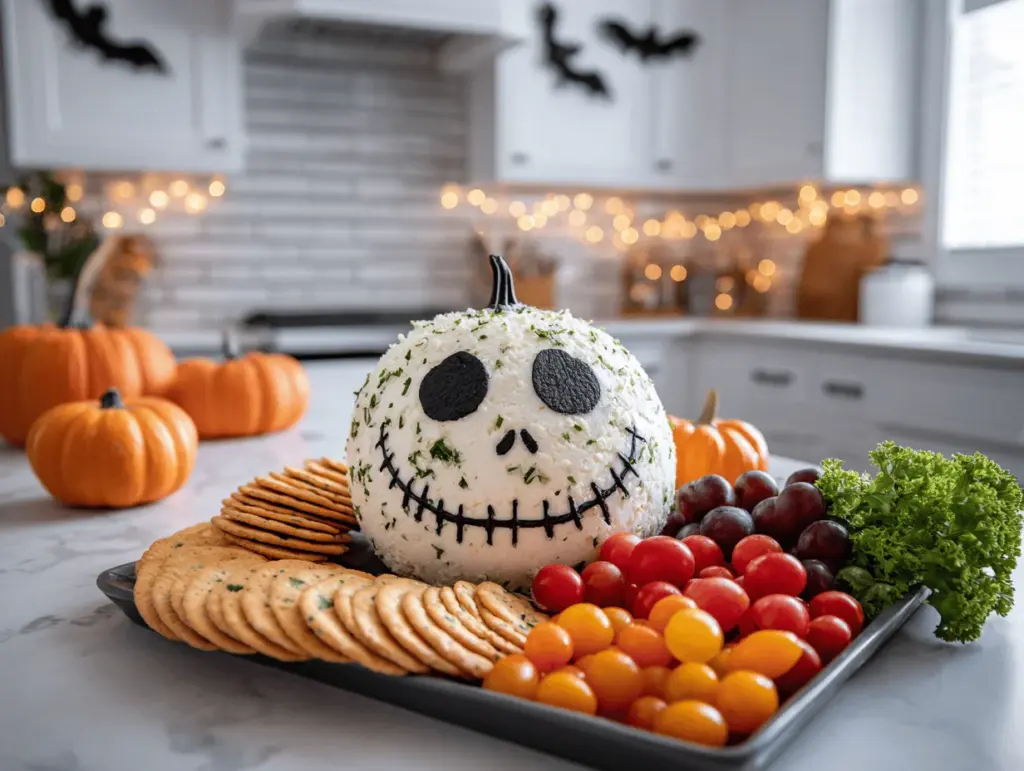
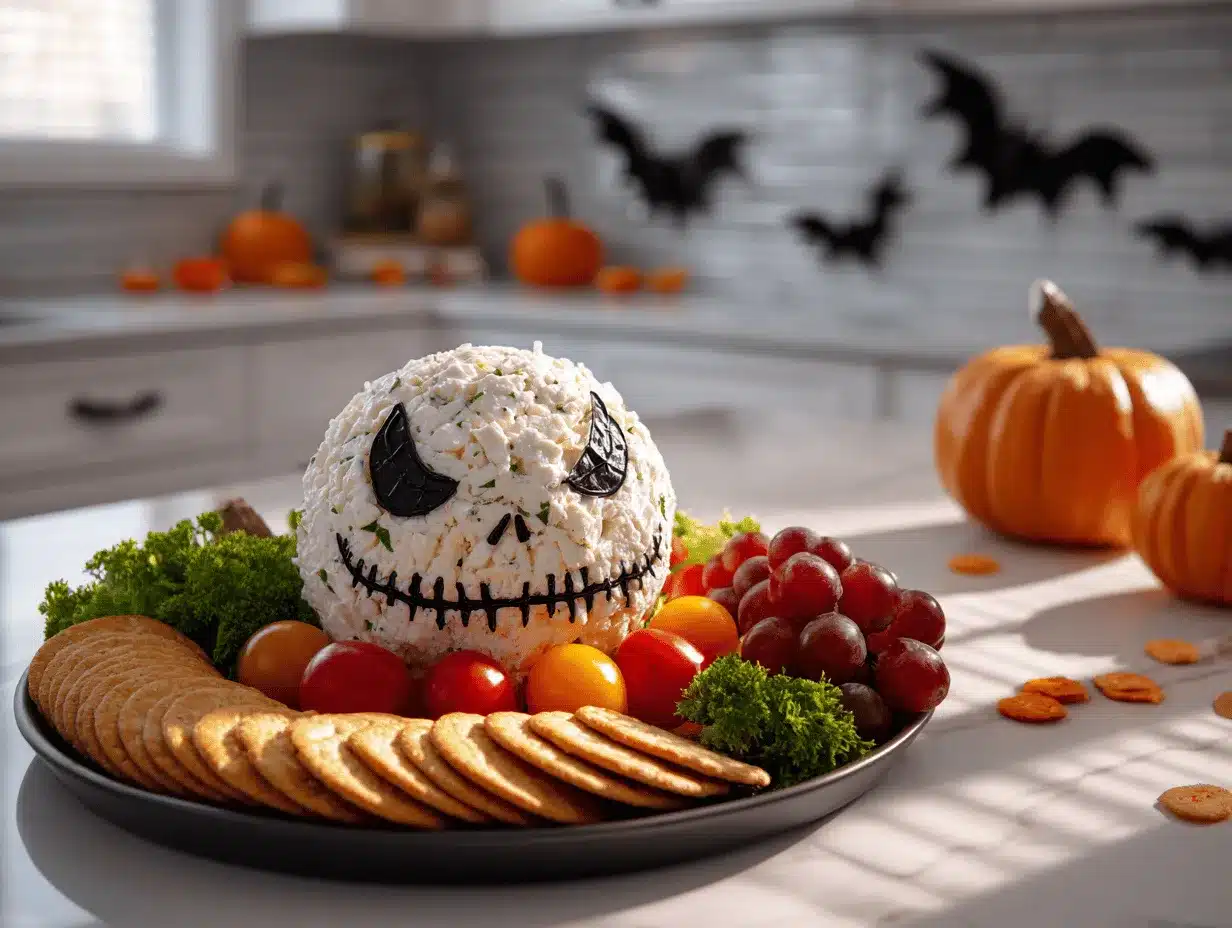
The first time I plopped a Skellington cheese ball appetizer in the middle of my Halloween spread, my guests gasped, giggled, and immediately pulled out their phones. Honestly, that moment is what every home entertainer lives for. The creamy, savory cheese ball shaped into Jack Skellington’s grinning face is equal parts spooky and adorable—plus, it disappears faster than you can say “trick or treat!”
Halloween parties are my jam. I go all out on the snacks, but the Skellington cheese ball appetizer has become my signature. There’s something about that sharp, tangy cheese, the crisp black olive “stitches,” and the way it sits perfectly atop a plate of crunchy crackers that just works. I first made it for my niece’s costume party—she’s obsessed with “The Nightmare Before Christmas”—and now, it’s the dish everyone begs for as soon as October rolls around.
Beyond the wow factor, this cheese ball is a breeze to put together. You don’t need fancy tools or chef-level skills, just a little creativity and a steady hand. I’ve tweaked and tasted my way to cheese ball perfection (I mean, someone had to do the hard work, right?). So, whether you’re a Halloween superfan or just want to impress your guests with a showstopping centerpiece, this Skellington cheese ball appetizer is your ticket to party legend status. Let’s get spooky—and snacky—together!
Why You’ll Love This Skellington Cheese Ball Appetizer
After making this Skellington cheese ball appetizer more times than I can count (seriously, it’s a tradition now), I can vouch for its foolproof deliciousness and crowd appeal. Here’s why you’ll probably become obsessed too:
- Quick & Easy: You can whip this up in about 20 minutes (plus chilling time). No complicated steps—just mix, shape, and decorate!
- Simple Ingredients: Most of what you need is probably already in your kitchen—cream cheese, cheddar, a few spices, and some olives for the face.
- Perfect for Parties: This is a total showstopper for Halloween bashes, family movie nights, or even as a fun after-school snack.
- Crowd-Pleaser: Kids and adults alike can’t resist the creamy, savory combo. Plus, who doesn’t love a good themed snack?
- Unbelievably Delicious: The flavor is rich and tangy, with just the right amount of seasoning. It’s creamy, but the cheddar adds a little bite.
What really sets this recipe apart is the way the cheese ball holds its shape (no saggy Jack faces here!) while staying ultra spreadable. I use a blend of sharp cheddar and cream cheese—after a lot of trial and error, this combo gives you that perfect texture. Plus, making Jack Skellington’s face is easier than it looks (and even if it’s a little “wonky,” it just adds to his charm!).
This isn’t your average cheese ball—it’s a memory-maker. It’s the dish your friends will talk about next year. And, honestly, it’s a little bit of edible art. So, if you’re looking for something that’s as fun to make as it is to eat, the Skellington cheese ball appetizer is about to become your Halloween MVP.
What Ingredients You Will Need
This Skellington cheese ball appetizer comes together with easy, everyday ingredients—plus a few fun extras for decorating. Here’s what you’ll need to create your own Jack Skellington masterpiece:
- For the Cheese Ball:
- 2 (8 oz / 225g each) blocks cream cheese, softened (full-fat is best for structure and flavor)
- 2 cups (200g) sharp cheddar cheese, freshly grated (I love using aged white cheddar for color and zing)
- 1/4 cup (60ml) sour cream (helps with creaminess)
- 1 tablespoon Worcestershire sauce (adds depth and umami)
- 1 teaspoon garlic powder
- 1/2 teaspoon onion powder
- 1/2 teaspoon salt (adjust to taste)
- 1/4 teaspoon black pepper
- 1/4 teaspoon smoked paprika (optional, but gives subtle warmth)
- For the Decoration:
- 6-8 jumbo black olives (for the eyes, nose, and mouth stitches)
- 1 small piece of red bell pepper or sun-dried tomato (optional, for a little “bloody” smile if you want)
- Thin pretzel sticks or black tortilla chips (for added facial details or for serving)
- For Serving:
- Assorted crackers (I like round water crackers for that “gravestone” vibe)
- Vegetable sticks (carrots, celery, and cucumber slices are always a win)
Ingredient tips from my kitchen: I always grate the cheddar fresh—it melts into the cream cheese more smoothly and gives a brighter flavor. If you want a spicier kick, toss in a pinch of cayenne or swap in pepper jack for half the cheddar. For a milder version, use Monterey Jack instead. If you need this to be gluten-free, check your Worcestershire sauce and crackers—there are plenty of safe options out there! And if you’re dairy-free, I’ve tested this with vegan cream cheese and cheddar, and it works (just chill it a little longer to firm up).
Honestly, the best part about this recipe is how forgiving it is—if you’re out of something, there’s probably a swap that’ll work just as well.
Equipment Needed
- Mixing bowls: I like to use one large bowl for mixing the cheese ball and a small one for prepping the decorations.
- Hand mixer or sturdy spatula: A hand mixer makes quick work of blending the cheeses, but a wooden spoon and some elbow grease will do just fine.
- Plastic wrap: Essential for shaping and chilling the cheese ball without sticking.
- Sharp knife: For slicing olives into facial features. A small paring knife is ideal for the details.
- Serving plate or platter: Go for black or white for a real Halloween pop, but any large plate works.
- Optional: Cookie scoop or ice cream scoop for perfect portioning before shaping.
If you don’t have a hand mixer (been there!), just let your cream cheese soften a bit longer and mix by hand. For the olive slicing, I once used kitchen scissors in a pinch—they work surprisingly well! And if you’re worried about cleanup, line your platter with parchment for easy transfer and less mess.
Budget tip: Dollar stores usually have all the basics—no need for fancy gadgets. Just make sure your knife is sharp for those Skellington “stitches.”
How to Make the Skellington Cheese Ball Appetizer
- Mix the Cheese Base:
- In a large mixing bowl, combine 2 blocks (16 oz / 450g) of softened cream cheese, 2 cups (200g) of freshly grated sharp cheddar, 1/4 cup (60ml) sour cream, 1 tablespoon Worcestershire sauce, 1 teaspoon garlic powder, 1/2 teaspoon onion powder, 1/2 teaspoon salt, 1/4 teaspoon black pepper, and 1/4 teaspoon smoked paprika (if using).
- Beat with a hand mixer on medium speed until everything is smooth and evenly combined—about 2-3 minutes. If mixing by hand, use a sturdy wooden spoon and really mash it together.
- Prep note: If the mixture seems too soft, add a bit more grated cheese. If it’s too stiff, a splash more sour cream helps.
- Shape the Cheese Ball:
- Scoop the cheese mixture onto a large sheet of plastic wrap. Gather the wrap around the cheese and form it into a rough ball shape (think: big snowball).
- For a true “Skellington” look, flatten the bottom slightly and elongate the ball a bit to make a head shape. Don’t stress about perfection—imperfections are part of the charm!
- Wrap tightly and refrigerate for at least 2 hours (or up to overnight) to firm up.
- Prepare the Decorations:
- While the cheese ball chills, slice the jumbo black olives into thin rounds and “half-moons” for the eyes, small pieces for the nose, and long strips for the stitched mouth. If you want a “bloody” smile, slice a bit of red bell pepper or sun-dried tomato.
- Tip: I like to sketch out Jack’s face on parchment first, just to get a feel for the proportions.
- Assemble the Skellington Face:
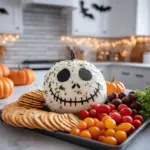
- Unwrap the chilled cheese ball and place it on your serving platter.
- Using your olive slices, create two large oval “eyes” near the top third of the ball. Add a couple of tiny olive pieces for the nose just below.
- For the mouth, arrange a curved line of olive strips across the lower third of the ball, then add small “stitch” marks perpendicular to the line. Use pretzel sticks for even more dramatic “stitch” effects if you like.
- Add any red bell pepper for extra Halloween flair.
- Prep warning: If your kitchen is warm, work quickly so the cheese doesn’t soften too much. If it does, pop it back in the fridge for 15 minutes.
- Serve:
- Surround Jack with an assortment of crackers and veggie sticks. Add black tortilla chips or more olives for spooky color contrast.
- Serve chilled but not ice-cold—let it sit out for 10-15 minutes for the best spreadable texture.
Personal tip: If you’re making this ahead, decorate the face just before serving so the olives stay glossy and dark. And don’t stress if your Jack looks a little goofy—mine sometimes does, and everyone loves it even more.
Cooking Tips & Techniques
After plenty of Halloween cheese ball adventures (and a few comical mishaps), I’ve picked up a handful of tricks to guarantee your Skellington cheese ball appetizer is both easy and impressive:
- Room Temperature Matters: Let your cream cheese sit out for at least 30 minutes before mixing. It blends much smoother and won’t leave chunky bits.
- Freshly Grate Your Cheese: Pre-shredded cheese contains anti-caking agents, so it doesn’t mix as smoothly. Grating your own cheddar gives you that perfect texture.
- Chill Long Enough: It’s tempting to rush, but chilling for at least 2 hours (preferably overnight) helps the flavors meld and the ball keeps its shape better.
- Keep It Neat: Wet your hands slightly when shaping the cheese—less stickiness, more control!
- Decoration Placement: Use toothpicks to gently press olives and peppers into place. If you mess up, just smooth the cheese and try again. Jack’s face is forgiving!
- Serving Temperature: Too cold, and it’s hard to spread; too warm, and it’ll get soft. Aim for “cool room temp.”
I once tried skipping the chill time (rookie mistake), and Jack’s face started to droop by the time guests arrived—lesson learned! Also, don’t overmix the cheese or it’ll get gluey. Just blend until creamy and stop. Multitasking tip: Prep your decorations while the cheese ball chills, so assembly is a breeze.
Consistency is key: stick to the recipe the first time, and then tweak to your taste for future parties. It’s honestly hard to mess up, but these little tricks make it foolproof.
Variations & Adaptations
One of my favorite things about the Skellington cheese ball appetizer is how easy it is to customize. Here are a few fun twists I’ve tried (and loved):
- Spicy Jack: Add 2 tablespoons of diced jalapeños, a pinch of cayenne, and swap in pepper jack cheese for a fiery kick. Great for adult parties!
- Herb & Garlic Version: Mix in 2 tablespoons of finely chopped chives, parsley, and a minced garlic clove for a fresh, savory spin. This is especially good with veggie dippers.
- Vegan & Dairy-Free: Use plant-based cream cheese and shredded vegan cheddar. It’s a little softer, so chill for an extra hour and decorate just before serving.
- Nutty Crunch: Roll the cheese ball in finely chopped pecans or walnuts before decorating for a textural contrast. (Don’t forget to check for nut allergies!)
- Smoked Salmon Jack: Fold in 1/4 cup (60g) chopped smoked salmon and a squeeze of lemon for a grown-up, sophisticated twist—sort of like a Halloween bagel spread!
You can also play with the face—use strips of roasted red pepper for the mouth, or swap in green olives for an even wackier Skellington. I once tried a Tex-Mex version with taco seasoning and a layer of black bean puree for “hair”—it was a hit! The recipe is super forgiving, so don’t be afraid to get creative based on your crowd’s preferences and dietary needs.
Serving & Storage Suggestions
I like to serve my Skellington cheese ball appetizer slightly chilled, surrounded by an army of crackers, pretzels, and colorful veggie sticks. For the best presentation, use a big black or slate platter to make Jack’s white face really pop. Add a few fake spiders or mini pumpkins for extra Halloween flair—you know, go all out!
Pair it with sparkling apple cider or a Halloween-themed punch for a complete party vibe. It also goes great alongside a bowl of chili or a spooky charcuterie board.
Storage: If you have leftovers (rare, but it happens), wrap the cheese ball tightly in plastic wrap and store in the fridge for up to 4 days. The flavors actually get better after a day or two. For longer storage, you can freeze the undecorated cheese ball for up to a month—just thaw in the fridge overnight and decorate fresh before serving.
To re-serve, let it sit at room temperature for about 15 minutes before guests dig in. If the decorations get a little “melty,” replace them with fresh olives or peppers for round two. Trust me, the flavor just keeps getting better!
Nutritional Information & Benefits
Each serving (about 2 tablespoons) of the Skellington cheese ball appetizer has roughly 90 calories, 7g fat, 2g carbs, and 4g protein. It’s gluten-free if you use the right dippers, and you can easily make it nut-free or dairy-free with the swaps above.
The main health perks come from the protein and calcium in the cheese, plus the probiotics in cream cheese. Pair with veggie sticks for extra fiber and crunch. Of course, it’s still a party appetizer, so enjoy in moderation—but I find it way more satisfying than most store-bought dips.
Allergen note: Contains dairy, and may contain nuts if you use nut coatings. Always double-check your ingredients for party guests with dietary restrictions. Personally, I love that it’s filling enough to keep me from overdoing it on the sweets later!
Conclusion
If you’re looking for that one Halloween dish everyone will talk about (and beg you to make again), the Skellington cheese ball appetizer is it. It’s easy, make-ahead, and totally customizable—plus, it makes your party table look downright magical.
Don’t be afraid to put your own spin on Jack’s face or the cheese blend. The best part is seeing everyone’s reactions when you bring him out. For me, this recipe is a reminder that food should be fun—especially on Halloween!
So grab your cream cheese, channel your inner Tim Burton, and give this a try. If you make it, I’d love to hear your twists (and see your Jack faces!)—drop a comment or share your creations online. Happy haunting, and happy snacking!
Frequently Asked Questions
How far in advance can I make the Skellington cheese ball appetizer?
You can make the cheese ball up to 2 days in advance. Just wrap it tightly in plastic wrap and decorate the face right before serving for the best appearance.
Can I freeze the cheese ball?
Yes! You can freeze the undecorated cheese ball for up to a month. Thaw overnight in the fridge, then decorate with olives and peppers before serving.
What’s the best way to shape the cheese ball?
Use plastic wrap to help form it into a smooth ball, then flatten the bottom and elongate a bit to mimic Jack’s head. Wet hands make shaping easier and less sticky.
Are there nut-free and gluten-free options?
Absolutely! Just skip any nut coatings and use gluten-free crackers or veggie sticks for dipping. Double-check your Worcestershire sauce as some brands contain gluten.
How can I make this recipe dairy-free?
Use plant-based cream cheese and vegan shredded cheddar. It’ll be a bit softer, so chill extra long and decorate just before serving. The flavor is still deliciously spooky!
Pin This Recipe!
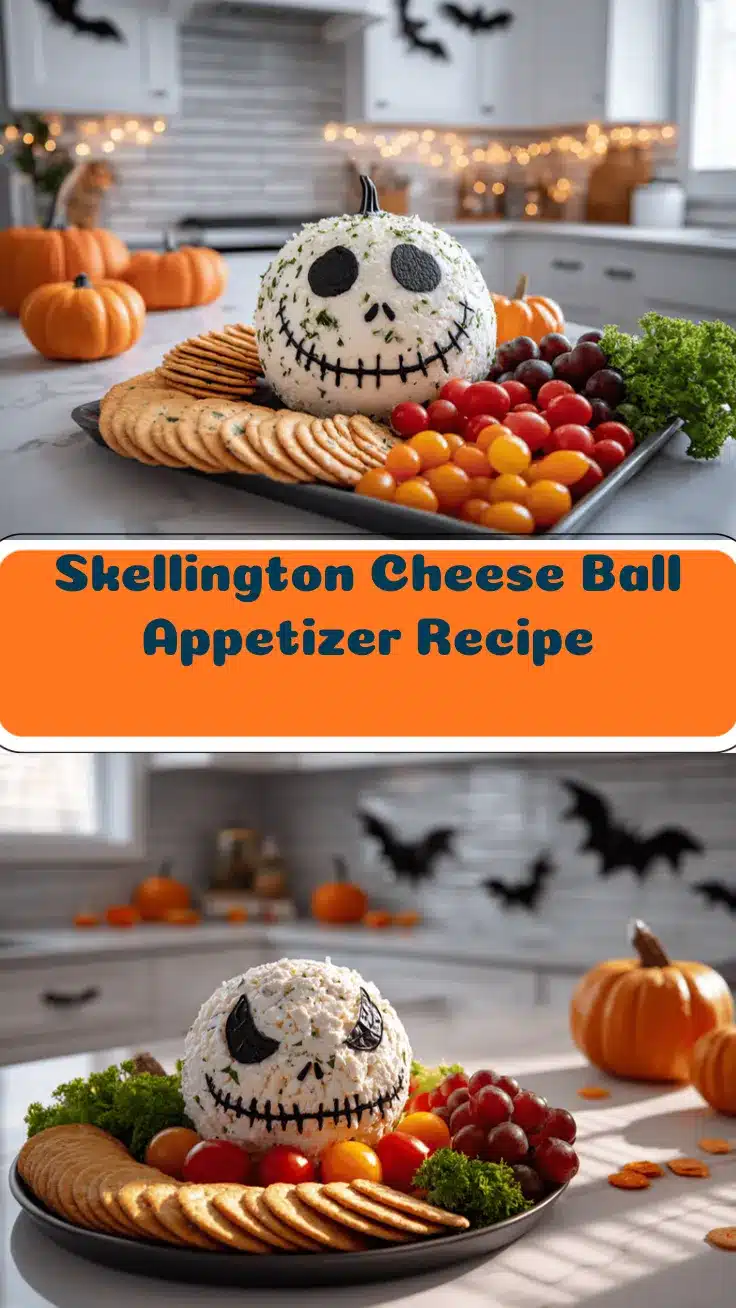
Skellington Cheese Ball Appetizer – Easy Halloween Party Showstopper
This Skellington cheese ball appetizer is a creamy, savory party centerpiece shaped like Jack Skellington’s face. It’s quick to make, crowd-pleasing, and perfect for Halloween gatherings or themed movie nights.
- Prep Time: 20 minutes
- Cook Time: 0 minutes
- Total Time: 2 hours 20 minutes (includes chilling)
- Yield: 12 servings 1x
- Category: Appetizer
- Cuisine: American
Ingredients
- 2 (8 oz) blocks cream cheese, softened (full-fat recommended)
- 2 cups sharp cheddar cheese, freshly grated
- 1/4 cup sour cream
- 1 tablespoon Worcestershire sauce
- 1 teaspoon garlic powder
- 1/2 teaspoon onion powder
- 1/2 teaspoon salt (adjust to taste)
- 1/4 teaspoon black pepper
- 1/4 teaspoon smoked paprika (optional)
- 6–8 jumbo black olives (for decoration: eyes, nose, mouth stitches)
- 1 small piece red bell pepper or sun-dried tomato (optional, for decoration)
- Thin pretzel sticks or black tortilla chips (optional, for decoration or serving)
- Assorted crackers (for serving)
- Vegetable sticks (carrots, celery, cucumber, for serving)
Instructions
- In a large mixing bowl, combine softened cream cheese, grated cheddar, sour cream, Worcestershire sauce, garlic powder, onion powder, salt, black pepper, and smoked paprika (if using).
- Beat with a hand mixer on medium speed until smooth and evenly combined, about 2-3 minutes. If mixing by hand, use a sturdy wooden spoon.
- Scoop the cheese mixture onto a large sheet of plastic wrap. Gather the wrap around the cheese and form it into a ball, flattening the bottom and elongating slightly for a head shape.
- Wrap tightly and refrigerate for at least 2 hours (or up to overnight) to firm up.
- While chilling, slice black olives into rounds and strips for eyes, nose, and mouth. Prepare any red bell pepper or sun-dried tomato for extra decoration.
- Unwrap the chilled cheese ball and place on a serving platter. Use olive slices to create Jack Skellington’s eyes, nose, and stitched mouth. Add pretzel sticks or red pepper if desired.
- Surround with crackers and veggie sticks. Serve chilled but not ice-cold; let sit at room temperature for 10-15 minutes before serving for best texture.
Notes
For best results, use freshly grated cheddar and full-fat cream cheese. Chill thoroughly before decorating to ensure the cheese ball holds its shape. Decorate just before serving for the glossiest look. Easily adapt for gluten-free or dairy-free diets by swapping crackers and cheeses. Store leftovers tightly wrapped in the fridge for up to 4 days.
Nutrition
- Serving Size: About 2 tablespoons
- Calories: 90
- Sugar: 1
- Sodium: 180
- Fat: 7
- Saturated Fat: 4
- Carbohydrates: 2
- Protein: 4
Keywords: Halloween, cheese ball, appetizer, party food, Jack Skellington, Nightmare Before Christmas, easy, make-ahead, vegetarian, holiday, spooky, themed snack