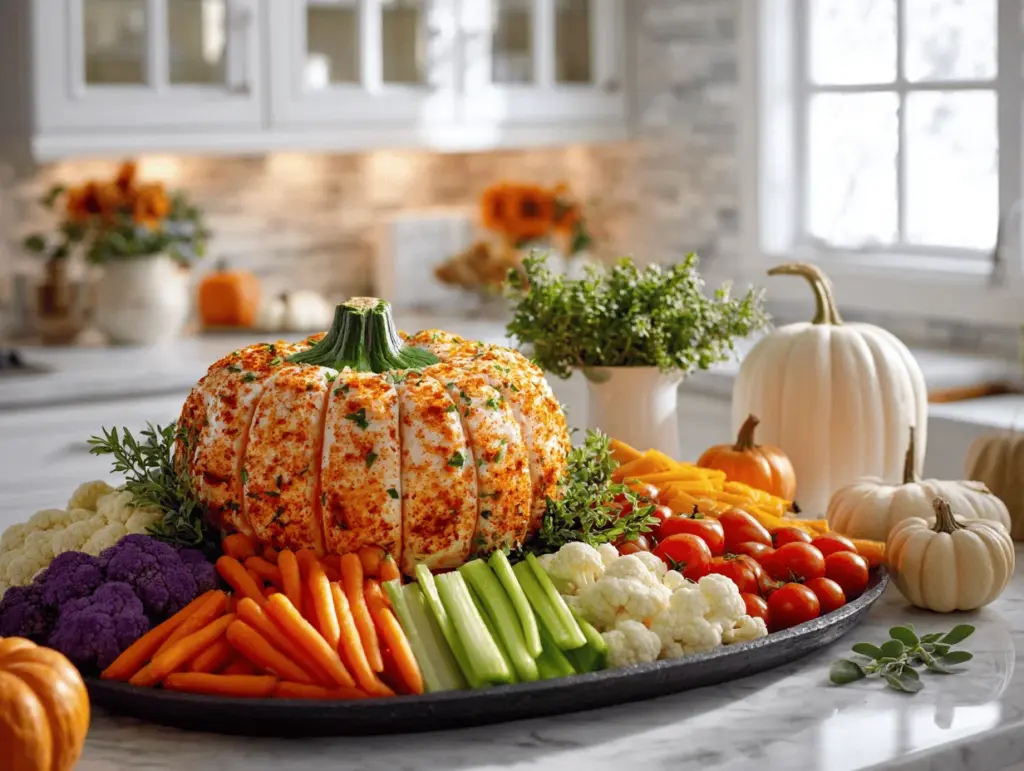
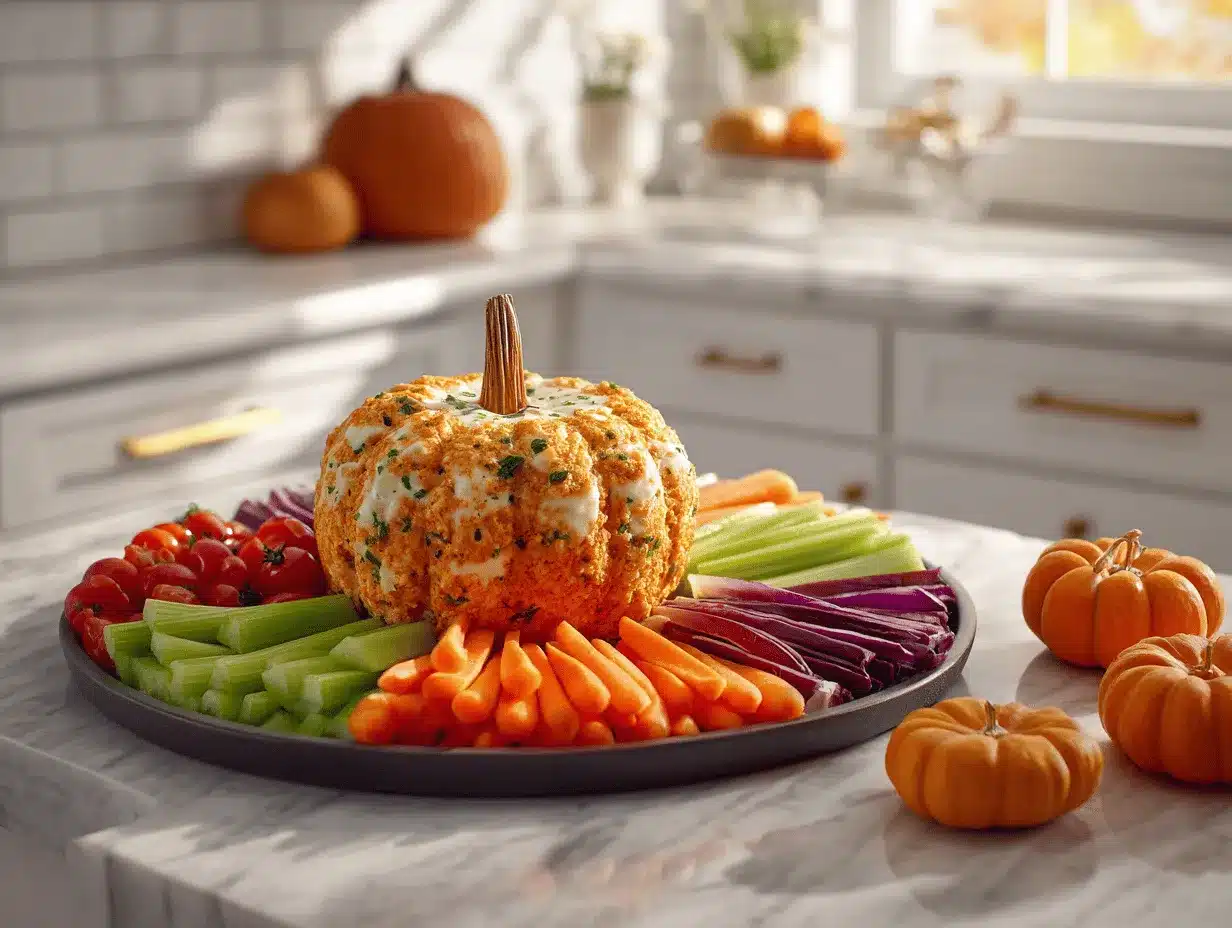
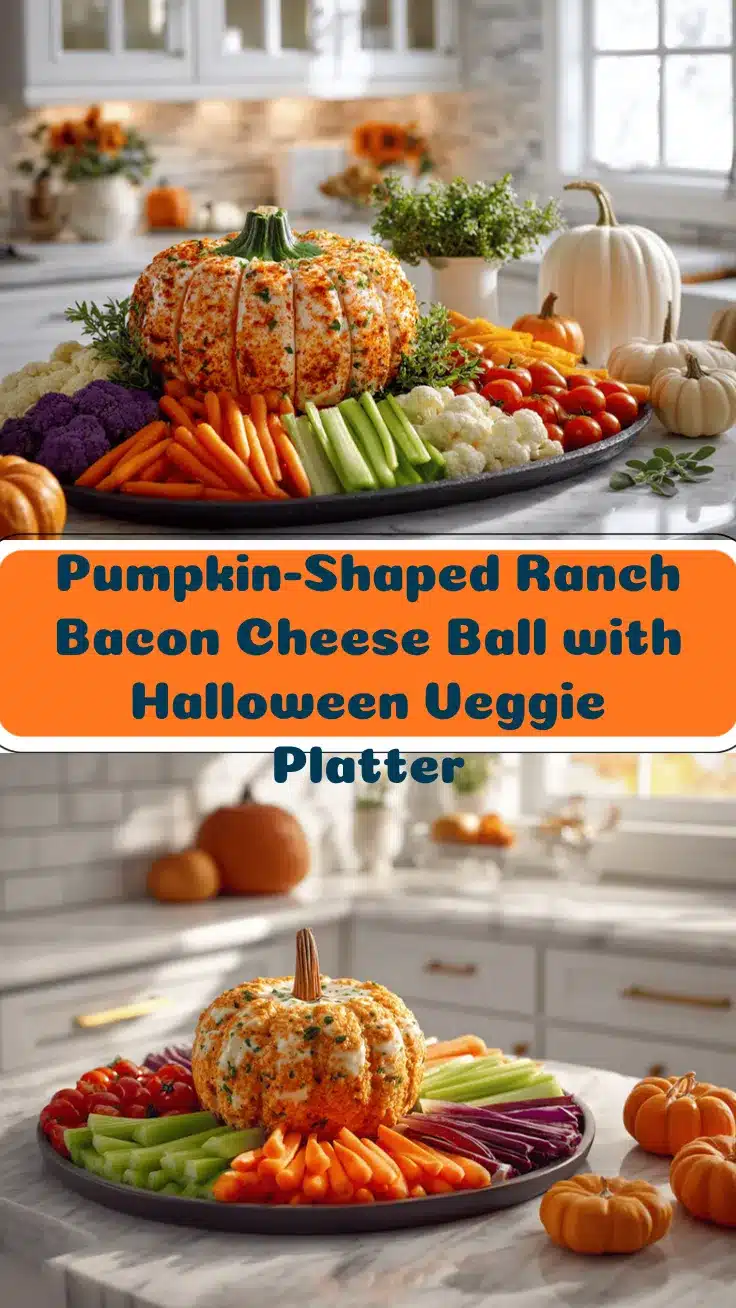
The first time I made this pumpkin-shaped ranch bacon cheese ball for Halloween, I was honestly just looking for something crowd-pleasing that wouldn’t melt under a sea of tiny goblin hands. The moment I set it down—sparked with crispy bacon, cheddar, and a playful “pumpkin” disguise—my friends lit up. You could smell the smoky bacon and tangy ranch before you even saw the orange, pumpkiny orb nestled among crunchy veggies. It’s the kind of festive centerpiece that pulls everyone to the snack table, whether you’re seven or seventy.
This cheese ball isn’t just about looks (although, let’s face it, it’s adorable). It packs a savory punch thanks to real bacon, ranch seasoning, sharp cheddar, and a little crunch from green onions. I love how the creamy base, spiked with ranch, is balanced by the salty, smoky bacon and the freshness of the veggies you serve alongside. It’s a snack you’ll want to keep dipping into—whether you’re the host or just there for the snacks.
I’ve tested and tweaked this Halloween cheese ball more times than I can count, from too-soft versions that slumped to the ones that turned out rock-hard (trust me, don’t skimp on softening the cream cheese first). Now, it’s the showstopper at every spooky gathering. It’s ideal for Halloween parties, friendly potlucks, or anytime you want a playful, delicious appetizer that makes people grin before they even take a bite. Plus, it’s secretly easy, make-ahead friendly, and endlessly customizable—if you’re feeding picky eaters or want to sneak in some extra veggies, you totally can.
If you’re searching for the ultimate Halloween veggie platter centerpiece that tastes as good as it looks, this pumpkin-shaped ranch bacon cheese ball is about to become your new go-to. I promise, it’s not just festive—it’s downright irresistible.
Why You’ll Love This Pumpkin-Shaped Ranch Bacon Cheese Ball Recipe
After making this ranch bacon cheese ball for multiple Halloweens, birthday parties, and even a random Tuesday (because why not?), I can tell you it’s a recipe that consistently wins hearts (and bellies). Whether you’re a seasoned entertainer or just looking to wow your family, here’s why you’ll fall in love with this pumpkin-shaped showpiece:
- Quick & Easy: Comes together in about 20 minutes (not counting chill time). Just mix, shape, roll, and you’re done! It’s perfect for last-minute party prep or when you want a fuss-free appetizer.
- Simple Ingredients: Every ingredient is easy to find—most are probably already in your fridge. No wild goose chases at specialty stores (unless you want to get fancy).
- Perfect for Halloween and Fall Gatherings: This cheese ball shines as a Halloween centerpiece but also fits right in at autumn potlucks, Friendsgiving, or family movie nights. It screams “festive” without being fussy.
- Crowd-Pleaser: I’ve never seen leftovers—kids and adults both keep coming back for more. The creamy, savory, ranch-forward flavor is universally loved. Plus, the bacon. Need I say more?
- Unbelievably Delicious: It’s not just cute. The combination of ranch, bacon, cheddar, and green onion gives you a punch of flavor in every bite. It’s rich but balanced, and the fresh veggie dippers lighten things up.
This cheese ball stands out from the rest thanks to one little trick: blending the bacon into the mixture and coating the outside for double the smoky goodness (seriously, don’t skip the bacon on the outside). And shaping it into a pumpkin? That’s just pure Halloween magic. It’s easier than you think, and you don’t need any special skills—just a bit of plastic wrap and a rubber band.
What I love most is how this recipe brings people together. It’s the type of snack that disappears before dinner’s even started, and you’ll catch people sneaking bites when they think no one’s looking. If you want a recipe that’s both stunning and seriously tasty, this is it. It’s comfort food with a playful twist, and it turns any get-together into a celebration.
What Ingredients You Will Need
This pumpkin-shaped ranch bacon cheese ball uses simple, everyday ingredients to create a flavor-packed, creamy, and crave-worthy appetizer. Most of these are pantry or fridge staples—handy when you’re whipping up a last-minute Halloween treat! Here’s what you’ll need:
- Cream Cheese (16 oz / 450 g, softened): This is your base—smooth, creamy, and holds the whole thing together. I prefer full-fat for the richest flavor, but you can use light if you want to lighten it up.
- Shredded Sharp Cheddar Cheese (2 cups / 200 g): The sharper, the better! It adds tang and color. Pre-shredded cheese works, but shredding your own melts better into the mixture.
- Ranch Seasoning Mix (1 packet, about 1 oz / 28 g): This is where the magic happens. Hidden Valley is my go-to, but store brand works fine. If you prefer homemade, mix dried dill, parsley, garlic powder, and onion powder.
- Cooked Bacon (8 slices, chopped or crumbled): Real bacon is key. You want half mixed in, half for rolling the outside. I like to cook it extra crispy for best texture. You can use turkey bacon if you want to cut the fat a bit.
- Green Onions (2-3, thinly sliced): These add freshness and color. If you don’t have green onions, a tablespoon of chives works too.
- Worcestershire Sauce (1 teaspoon / 5 mL): It gives a little umami depth—don’t skip it!
- Freshly Ground Black Pepper (1/4 teaspoon / 1 g): Adds a gentle kick. Taste and add more if you like it peppery.
- Paprika or Smoked Paprika (2 teaspoons / 4 g): For rolling and that classic pumpkin color. Smoked paprika adds extra depth, but regular works fine.
- Bell Pepper Stem or Pretzel Rod (for decoration): Use the top/stem from a green bell pepper or a thick pretzel stick to mimic a pumpkin stem.
For the Halloween Veggie Platter:
- Baby Carrots: Classic dippers and add pumpkin color vibes.
- Cucumber Slices: For crunch and freshness.
- Celery Sticks: Adds a crisp contrast.
- Mini Bell Peppers: Slice into strips for extra color.
- Cherry Tomatoes: Great for a pop of sweetness.
- Radishes or Snap Peas (optional): For a little extra zing and color variety.
Ingredient Tips: If you’re missing something, don’t stress. Swap cheddar for Colby Jack, use store-bought bacon bits (not my first choice, but they work in a pinch), or try a dairy-free cream cheese if needed. I’ve even used Greek yogurt in a pinch to replace part of the cream cheese for a lighter version. This recipe is all about flexibility—make it work for you!
Equipment Needed
You don’t need a fancy kitchen to pull off this pumpkin-shaped ranch bacon cheese ball. Here’s what makes it easiest (plus some alternatives):
- Mixing Bowl: A medium or large bowl works best for combining all your ingredients. Stainless steel or glass is ideal, but I’ve made it in a plastic bowl plenty of times.
- Hand Mixer or Sturdy Spoon: A hand mixer makes it super smooth, but elbow grease with a wooden spoon works fine if you don’t mind a little workout.
- Plastic Wrap: Essential for shaping the cheese ball and getting that pumpkin look. You could use parchment paper, but plastic wrap makes shaping easier.
- Rubber Bands or Kitchen Twine: These help you create the pumpkin “ridges.” If you don’t have either, you can use strips of plastic wrap or even twist ties.
- Baking Sheet or Large Plate: For chilling and serving the cheese ball. I use a rimmed baking sheet so nothing slides off.
- Sharp Knife: For chopping bacon, green onions, and slicing veggies.
- Cheese Grater: If you’re shredding your own cheese (totally worth it for flavor and meltiness).
Equipment Notes: If you’re on a budget, dollar store mixing bowls and spatulas work just fine—I’ve used them in a pinch! Just be sure to wash everything well, especially if you’re prepping bacon or onions. Rubber bands can be reused—give them a good clean and stash them for next time you want to make a shaped cheese ball!
Preparation Method
-
Soften the Cream Cheese (5-10 minutes):
Let 16 oz (450 g) of cream cheese sit at room temperature until softened. Don’t try to rush this in the microwave (it gets weirdly runny). Softened cream cheese blends smoother and holds its shape better.
-
Mix the Base (5 minutes):
In your mixing bowl, combine the softened cream cheese, 2 cups (200 g) shredded sharp cheddar, 1 packet ranch seasoning (1 oz/28 g), 1 teaspoon (5 mL) Worcestershire sauce, and 1/4 teaspoon (1 g) black pepper. Use a hand mixer on medium speed or a sturdy wooden spoon to blend everything until super creamy and well-combined.
Tip: Scrape down the sides so you don’t get clumps of unblended cream cheese hiding out.
-
Fold in the Mix-Ins (2 minutes):
Stir in 4 slices of chopped, cooked bacon (save the rest for rolling) and 2-3 sliced green onions. Mix gently so you don’t lose all the bacon in one spot. If you want extra flavor, toss in a pinch of smoked paprika here too.
-
Shape the Cheese Ball (5 minutes):
Spoon the mixture onto a large sheet of plastic wrap. Gather the plastic around it to form a rough ball. Twist the plastic at the top and tuck under. Don’t stress about perfection—it’ll be covered later!
To make the pumpkin shape, take 3-4 rubber bands or kitchen twine and wrap them around the wrapped cheese ball, spacing evenly to create “ridges.” It’ll look a bit like a pumpkin after chilling. Place the wrapped, banded ball on a plate or baking sheet.
-
Chill (at least 2 hours, up to overnight):
Chill the wrapped cheese ball in the fridge for at least 2 hours. This lets the flavors meld and the shape firm up. Overnight is even better—just don’t skip this step or it’ll be too soft to shape.
-
Unwrap and Decorate (5 minutes):
Carefully remove the cheese ball from the fridge, unwrap the plastic, and gently remove the rubber bands or twine. If the ridges aren’t deep enough, you can nudge them a bit with a knife or your finger.
Roll the cheese ball in a mixture of remaining bacon, 2 teaspoons (4 g) paprika or smoked paprika, and a bit more cheddar if you want more color. Press gently so the coating sticks.
-
Add the Pumpkin Stem:
Press a bell pepper stem (or pretzel rod) into the top for that classic pumpkin look. If you’re using a pretzel, just break to length and stick it in the center.
-
Assemble the Halloween Veggie Platter:
Place your pumpkin cheese ball in the center of a large platter. Arrange baby carrots, cucumber slices, celery sticks, mini bell pepper strips, and cherry tomatoes around it. I like to alternate colors in “rays” around the pumpkin for the most eye-catching effect.
-
Serve and Enjoy:
Let the cheese ball sit at room temp for about 15 minutes before serving so it’s easy to dip. Serve with plenty of fresh veggies and some sturdy crackers or pretzel sticks if you like.
Troubleshooting: If your cheese ball is too soft, pop it back in the fridge. Too stiff? Let it rest out a bit longer before serving. If it cracks, just pat it back together—no one will notice under that bacon coating!
Cooking Tips & Techniques
- Don’t Rush the Chilling: I’ve tried shortcuts, but if the cheese ball isn’t firm enough, it’ll sag or flatten—especially when you add the “pumpkin” stem. Two hours minimum in the fridge is a must (overnight is even better).
- Get That Pumpkin Shape: Use at least three rubber bands for defined pumpkin ridges. Don’t make them too tight—just enough to leave impressions. If you forget this step, don’t worry; you can use the side of a spatula to gently press in ridges after chilling.
- Bacon Matters: Use freshly cooked, crispy bacon for the best crunch and flavor. Bacon bits work in a pinch, but the real thing elevates the cheese ball. Pat bacon dry with paper towels to avoid greasy spots.
- Blend Well, But Don’t Overwork: Overmixing can make the cheese ball dense. Mix until just combined for the fluffiest texture.
- Rolling Without Mess: Place the bacon and paprika coating on a rimmed plate and gently roll the cheese ball to coat. Use your hands if needed—it’s a little messy, but worth it for an even finish!
- Serving Success: Let the cheese ball warm up slightly before serving for the best scoopability. I usually set it out about 10-15 minutes before guests arrive.
- Multitasking: You can cook the bacon, chop veggies, and prep the platter while the cheese ball chills. It makes assembly feel way less hectic at party time.
- Personal Fails & Fixes: Once, I used low-fat cream cheese and forgot to chill long enough—it turned into a cheese “puddle.” Learned my lesson: if using light cream cheese, chill at least 4 hours and keep the platter cold. And if your pumpkin stem falls off, just plop it back in—no one’s judging!
Variations & Adaptations
This pumpkin-shaped ranch bacon cheese ball is endlessly customizable. Here are some fun ways to switch it up (and a few I’ve personally tried):
- Vegetarian Version: Skip the bacon and add extra chopped green onions, roasted red peppers, or sun-dried tomatoes for a flavor boost. Smoked paprika gives you that “bacon-y” vibe without meat.
- Gluten-Free: The cheese ball itself is naturally gluten-free! Just be sure to serve with gluten-free crackers or extra veggies (like snap peas or jicama sticks) for dipping.
- Spicy Kick: Mix in a diced jalapeño or a pinch of cayenne pepper to the base. I love adding a little hot sauce for grown-up parties—it’s subtle but addictively good.
- Kid-Friendly: Leave out the green onions or use a milder cheese if you’re serving picky eaters. You can even shape mini cheese balls for single servings (just skip the pumpkin ridges).
- Dairy-Free: Use plant-based cream cheese and cheddar shreds. I’ve made it with Kite Hill vegan cream cheese and Daiya cheddar for a friend with dairy allergies; it still turned out creamy and held its shape well.
- Seasonal Adaptations: For Thanksgiving, roll in chopped pecans and swap paprika for a sprinkle of cinnamon and nutmeg. For Christmas, add dried cranberries and use chive “ribbons” for a festive look.
Personal twist: One year, I mixed in a little chipotle powder and served the cheese ball with blue corn tortilla chips—everyone raved about the smoky heat. The possibilities are endless, so don’t be afraid to experiment!
Serving & Storage Suggestions
This pumpkin-shaped ranch bacon cheese ball is best served slightly chilled, surrounded by a rainbow of crunchy veggies. Here’s how to serve and store it for maximum wow factor and freshness:
- Serving Temperature: Take the cheese ball out of the fridge 10-15 minutes before serving. This softens it just enough for easy dipping but keeps it firm and pumpkin-shaped. Don’t let it sit out more than 2 hours (especially if it’s warm inside).
- Presentation: Place the cheese ball in the center of a large platter or wooden board. Fan out baby carrots, cucumber rounds, celery sticks, mini bell pepper strips, and cherry tomatoes. For extra color, add some purple cauliflower or radishes. Crackers, breadsticks, or pretzel rods are great sides if you want something more substantial.
- Storage: Leftovers (if you have any) will keep in an airtight container in the fridge for up to 4 days. The bacon stays crunchiest if you store the cheese ball uncovered for the first hour, then cover tightly.
- Freezing: You can freeze the uncoated cheese ball (without bacon or paprika on the outside) for up to 1 month. Thaw in the fridge overnight, then roll in bacon and paprika before serving. The texture may be a bit softer, but it still tastes great.
- Reheating: No reheating needed—this cheese ball is meant to be served cold or at room temp. If it gets too firm after chilling, just let it rest on the counter for a bit before serving.
- Flavor Development: The flavors actually get better as it sits. I think it’s best on day two, after a night in the fridge. The ranch and bacon meld together, making every bite a little more savory and rich.
Nutritional Information & Benefits
This pumpkin-shaped ranch bacon cheese ball recipe is rich, creamy, and packed with flavor—but also brings some nutritional perks, especially when paired with a vibrant veggie platter.
- Estimated Nutrition (per serving, based on 12 servings): About 210 calories, 5g protein, 18g fat, 3g carbs. (This can vary depending on cheese type, bacon, and serving size.)
- High in Protein & Calcium: Thanks to the cream cheese and cheddar, you get a decent dose of protein and bone-supporting calcium in every bite.
- Low in Carbs: Great for low-carb or keto diets, especially when served with veggies instead of crackers.
- Dietary Considerations: Naturally gluten-free (just double-check your ranch seasoning and dippers). For dairy-free, swap in plant-based cheeses as noted above.
- Allergens: Contains dairy and may contain soy (in ranch seasoning). Bacon can include nitrites/nitrates. Always check ingredient labels if you’re serving guests with allergies.
Honestly, pairing this cheese ball with loads of crunchy, colorful veggies is my favorite way to “balance” the richness. You get all the fun of a decadent party snack, plus a big hit of fiber and vitamins from your veggie platter. Win-win!
Conclusion
If you want an appetizer that’s festive, foolproof, and guaranteed to make your Halloween table pop, this pumpkin-shaped ranch bacon cheese ball is the one. It’s as fun to make as it is to eat—perfect for getting kids involved, impressing guests, or just treating yourself to something a little quirky and a lot delicious. Plus, it’s endlessly customizable, so you can tweak it to fit your flavor cravings or dietary needs.
This is one of my favorite recipes to bring to fall gatherings, and I always love seeing the smiles (and the empty platter) at the end of the night. I hope you’ll make it your own—try new mix-ins, change up the dippers, and don’t be afraid to get creative with the pumpkin shape.
Let me know in the comments if you give this pumpkin-shaped ranch bacon cheese ball a try—or if you have your own Halloween cheese ball tips! If you love it, share with friends or pin for later—your party will thank you. Happy haunting and happy snacking!
Frequently Asked Questions
How far in advance can I make the pumpkin-shaped ranch bacon cheese ball?
You can make the cheese ball up to two days in advance. Just keep it wrapped tightly in the fridge. Wait to roll it in bacon and paprika until right before serving for the freshest flavor and best texture.
What can I use instead of bacon?
If you want a vegetarian version, skip the bacon and add more green onions, roasted red peppers, or sun-dried tomatoes. Smoked paprika also gives a nice smoky flavor without the meat.
Can I use store-bought ranch dip instead of seasoning mix?
I wouldn’t recommend it, as ranch dip is too runny and will make the cheese ball too soft. Stick with the dry seasoning mix or use homemade dry ranch blend for best results.
What’s the best way to get the pumpkin shape?
Wrap the cheese ball in plastic wrap and use 3-4 rubber bands or twine to create gentle “ridges.” Chill well, then gently remove the bands and decorate. If needed, reshape the ridges with your fingers or a spatula after unwrapping.
Can I freeze the cheese ball?
Yes, you can freeze the uncoated (no bacon or paprika yet) cheese ball for up to one month. Thaw overnight in the fridge, then roll in bacon and paprika just before serving. The texture may be a bit softer, but it’ll still taste great!
Pin This Recipe!
Pumpkin-Shaped Ranch Bacon Cheese Ball Recipe for Halloween Veggie Platter

This festive pumpkin-shaped ranch bacon cheese ball is a crowd-pleasing, make-ahead appetizer perfect for Halloween parties and fall gatherings. Packed with smoky bacon, sharp cheddar, ranch seasoning, and green onions, it’s as delicious as it is adorable, and makes a stunning centerpiece for any veggie platter.
- Prep Time: 20 minutes
- Cook Time: 10 minutes (for bacon)
- Total Time: 2 hours 30 minutes (includes chilling time)
- Yield: 12 servings 1x
- Category: Appetizer
- Cuisine: American
Ingredients
- 16 oz (2 packages) cream cheese, softened
- 2 cups shredded sharp cheddar cheese
- 1 packet (1 oz) ranch seasoning mix
- 8 slices cooked bacon, chopped or crumbled (divided: half for mix, half for coating)
- 2–3 green onions, thinly sliced
- 1 teaspoon Worcestershire sauce
- 1/4 teaspoon freshly ground black pepper
- 2 teaspoons paprika or smoked paprika (for coating)
- Bell pepper stem or pretzel rod (for decoration)
- Baby carrots (for serving)
- Cucumber slices (for serving)
- Celery sticks (for serving)
- Mini bell peppers, sliced (for serving)
- Cherry tomatoes (for serving)
- Radishes or snap peas (optional, for serving)
Instructions
- Let the cream cheese sit at room temperature until softened (5-10 minutes).
- In a mixing bowl, combine softened cream cheese, shredded cheddar, ranch seasoning, Worcestershire sauce, and black pepper. Mix with a hand mixer or sturdy spoon until creamy and well combined.
- Fold in half of the chopped bacon (4 slices) and the sliced green onions. Mix gently.
- Spoon the mixture onto a large sheet of plastic wrap. Gather the plastic around to form a rough ball, twisting the top and tucking under.
- Wrap 3-4 rubber bands or kitchen twine around the wrapped cheese ball to create pumpkin-like ridges. Place on a plate or baking sheet.
- Chill in the refrigerator for at least 2 hours, or up to overnight, until firm.
- Remove from fridge, unwrap the plastic, and gently remove rubber bands or twine. Adjust ridges if needed.
- Roll the cheese ball in a mixture of the remaining bacon and paprika (and extra cheddar if desired) to coat the outside.
- Press a bell pepper stem or pretzel rod into the top to mimic a pumpkin stem.
- Place the cheese ball in the center of a large platter. Arrange baby carrots, cucumber slices, celery sticks, mini bell pepper strips, cherry tomatoes, and any other desired veggies around it.
- Let sit at room temperature for 10-15 minutes before serving for best texture. Serve with veggies, crackers, or pretzel sticks.
Notes
For best results, use full-fat cream cheese and freshly cooked, crispy bacon. Chill the cheese ball thoroughly to maintain its shape. For a vegetarian version, omit bacon and add extra green onions or roasted red peppers. The cheese ball can be made up to 2 days in advance; roll in bacon and paprika just before serving. Serve with plenty of fresh veggies for dipping.
Nutrition
- Serving Size: About 2.5 oz cheese ball with veggies per serving
- Calories: 210
- Sugar: 1
- Sodium: 400
- Fat: 18
- Saturated Fat: 9
- Carbohydrates: 3
- Protein: 5
Keywords: Halloween, cheese ball, ranch, bacon, appetizer, party, fall, pumpkin, veggie platter, make-ahead, gluten-free, savory, snack