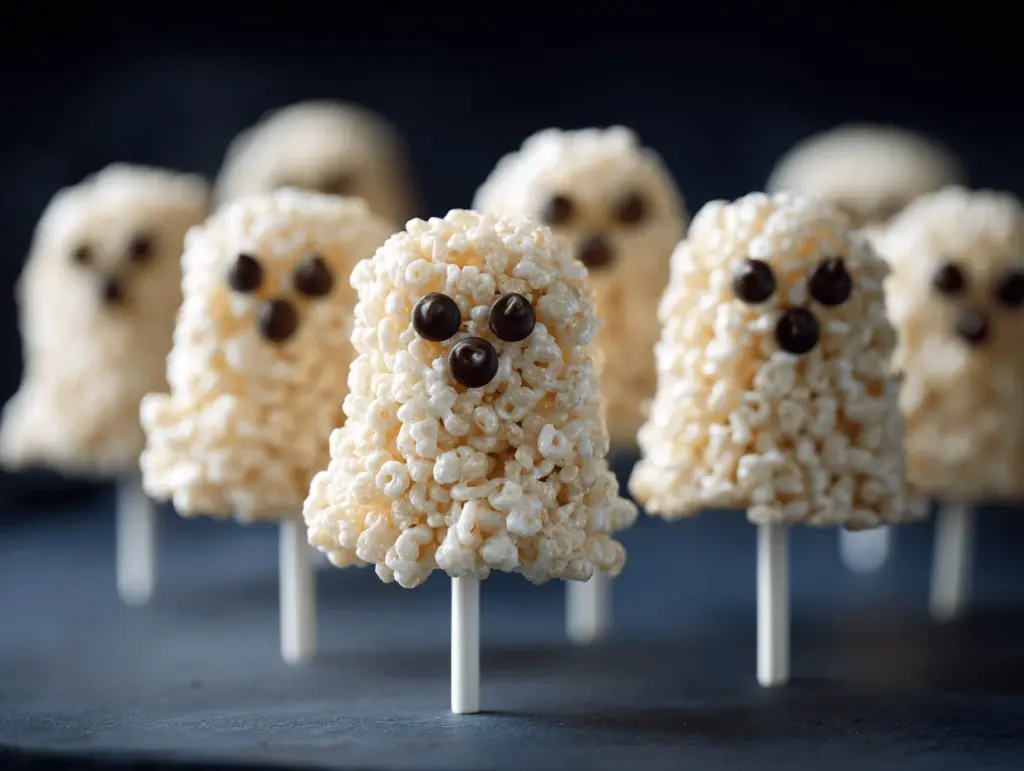
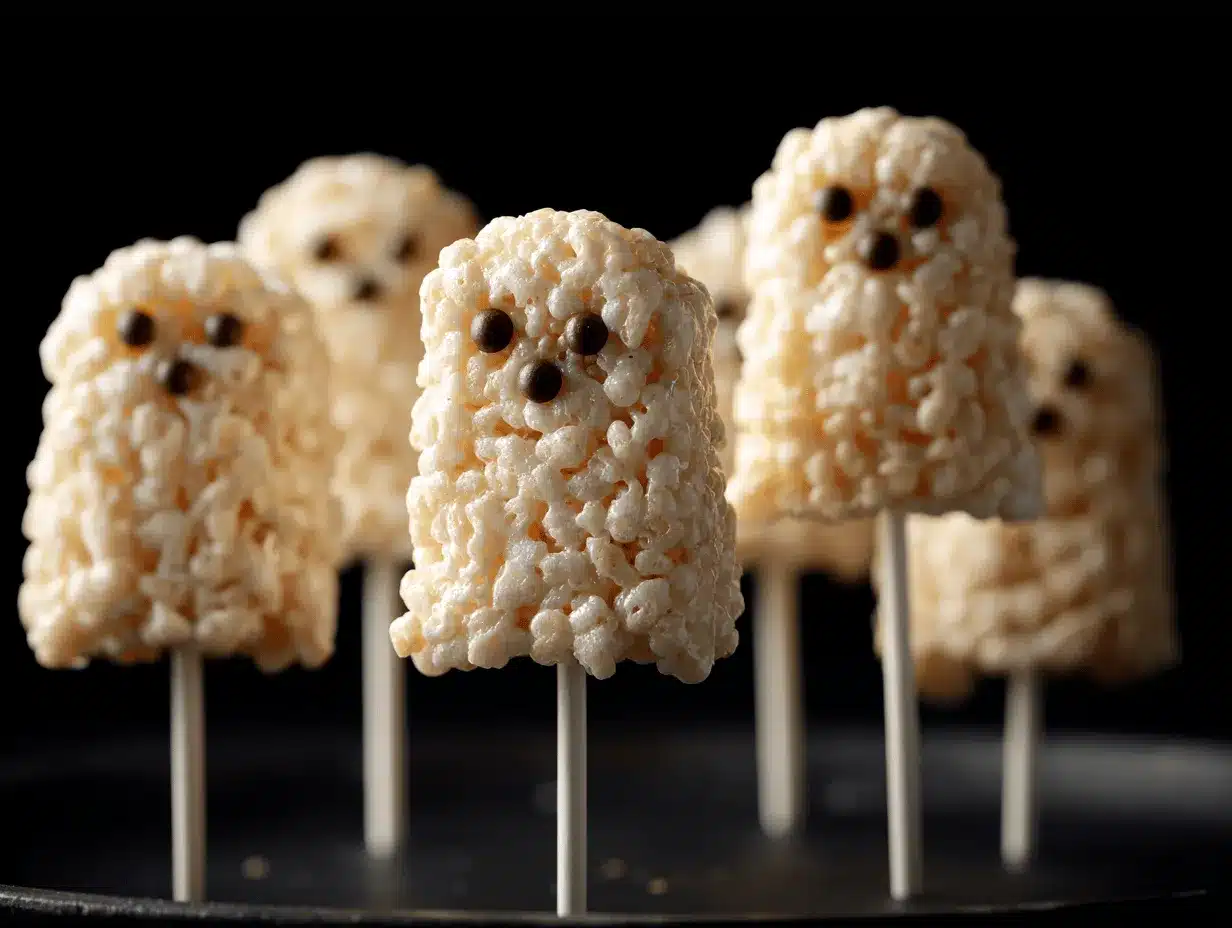
The crunch of gooey marshmallow, the sweet snap of white chocolate, and those adorable little ghost faces staring back at you—honestly, who can resist Halloween Ghost Rice Krispies Treats Pops? The first time I made these, I was looking for a spooky treat that wouldn’t send me scrambling for fancy ingredients. I wanted something easy, mess-friendly (well, mostly), and absolutely Instagram-worthy. These ghost pops nailed it.
It all started during a Halloween party prep panic. My youngest had insisted on “spooky snacks” for her class, and let’s just say my piping skills are, um, a work in progress. But the beauty of these Halloween Ghost Rice Krispies Treats Pops is that they’re supposed to look a little wonky—ghosts aren’t perfect, right? That means every pop, lopsided smile and all, is its own little masterpiece. Plus, kids absolutely lose their minds when they see these on a platter. They’re great for parties, trick-or-treating handouts, or cozy family movie nights when you want something festive but easy.
I’ve tinkered with this recipe more times than I can count (marshmallow to cereal ratio experiments were involved!), and it’s now my go-to for October gatherings. Halloween Ghost Rice Krispies Treats Pops aren’t just cute—they’re chewy, crunchy, and dangerously snackable. Whether you’re a seasoned baker or a kitchen rookie, you’ll find these a breeze to make. So grab your marshmallows, let’s get a little sticky, and bring some haunted fun to your next Halloween bash!
Why You’ll Love This Recipe
- Spooky-Cute Vibes: These Halloween Ghost Rice Krispies Treats Pops are festive, fun, and guaranteed to make everyone smile. The little faces are just too cute to spook.
- Super Simple Ingredients: No fancy pantry raids here—just classic Rice Krispies, marshmallows, butter, and a bit of white chocolate. That’s it!
- Perfect for Parties: Whether you’re hosting a classroom bash, neighborhood gathering, or cozy night in, these pops are a guaranteed hit. They travel well and don’t need refrigeration.
- Kid-Friendly and Interactive: Get the little ones involved in shaping the ghosts and piping faces. It’s a sticky, silly project everyone will love (and maybe even remember next year!).
- Customizable: You can tweak the faces, drizzle with more chocolate, or add colored sprinkles for extra flair. There’s no wrong way to make a ghost pop!
- Make-Ahead Magic: These treats keep well for a few days, so you can prep ahead and focus on other party fun.
What really sets my Halloween Ghost Rice Krispies Treats Pops apart is the double-dip in white chocolate for that extra “ghostly” look and a satisfying crunch. Unlike the basic cereal bar, these pops are shaped by hand (your fingerprints give each ghost its own little personality) and then perched on lollipop sticks for easy snacking. Honestly, I’ve never seen a tray of these last more than five minutes at any party. My family’s favorite part? The wonky, goofy faces that come out every time—perfect for making memories and giggles.
If you’re tired of the same old cookies and cupcakes, these ghost pops are your ticket to something new, memorable, and totally achievable. They’re the kind of treat you’ll crave every October, and your friends will beg you to bring next year!
What Ingredients You Will Need
This recipe keeps things simple, using pantry staples and a couple of fun add-ons for that “spooky” effect. Here’s everything you’ll need for the best Halloween Ghost Rice Krispies Treats Pops:
- For the Rice Krispies Base:
- 6 cups (150g) Rice Krispies cereal (classic or store brand both work well)
- 10 oz (280g) mini marshmallows (about one standard bag)
- 4 tbsp (56g) unsalted butter (use salted butter if you like a hint of salt)
- 1/2 tsp vanilla extract (optional, but adds a cozy flavor)
- Pinch of salt (optional, especially if using salted butter)
- For Decorating:
- 12 oz (340g) white chocolate chips or melting wafers (brands like Ghirardelli or Merckens melt super smooth)
- Mini chocolate chips or black decorating gel (for ghost eyes and mouths)
- Lollipop sticks or popsicle sticks (about 12-16, depending on ghost size)
- Optional Extras:
- Sprinkles (orange, black, or purple for extra Halloween flair)
- Edible candy eyes (for a fun, cartoony look)
- Coconut oil or vegetable shortening (1-2 tsp, helps thin the chocolate if needed)
If you need to make these gluten-free, grab a certified gluten-free crispy rice cereal. Dairy-free? Swap butter for vegan margarine and use dairy-free white chocolate. I’ve had success with Enjoy Life and Trader Joe’s vegan chips. For nut-free environments, double-check your labels (especially the chocolate chips).
Honestly, the key is fresh marshmallows—they make everything stickier and chewier. If your marshmallows are a little stale, pop them in the microwave for 10 seconds before melting. Don’t stress about brands—just go with what’s easy to find at your local store or what your kids will eat by the fistful when your back’s turned!
Equipment Needed
- Large saucepan or nonstick pot: For melting butter and marshmallows. I love my trusty nonstick Dutch oven, but any big pot will do.
- Wooden spoon or heatproof silicone spatula: Makes stirring sticky marshmallow mixtures way easier (and cleanup less of a nightmare).
- 9×13 inch (23×33 cm) baking pan: For pressing and cooling the treats. Use a rimmed baking sheet if you want thinner ghosts.
- Parchment paper or wax paper: To stop everything from sticking. Seriously, don’t skip this step.
- Microwave-safe bowl or double boiler: For melting white chocolate. I usually go with the microwave for speed.
- Lollipop sticks or popsicle sticks: You’ll need these for the “pop” effect—if you’re short, use sturdy paper straws.
- Small piping bag or zip-top bag: For decorating faces. Snip a tiny corner for a DIY piping tip.
- Sharp knife or kitchen scissors: For cutting the treats into ghost shapes. If you have a ghost-shaped cookie cutter, even better!
If you’re new to melting chocolate, a silicone spatula helps you scrape every last bit (and makes washing up less painful). Parchment is a lifesaver for easy lifting and less mess. On a budget? Dollar store lollipop sticks and parchment work just fine. Just be gentle with the pops so the sticks don’t poke through. Pro tip: soak sticky utensils in hot water right after use—it saves you from chiseling hardened marshmallow off later!
Preparation Method
- Prep your workspace: Line a 9×13-inch (23×33 cm) pan with parchment paper, leaving some overhang for easy lifting. Set out your lollipop sticks, white chocolate, and decorations so you’re ready to go. (Trust me, once your hands are sticky, you won’t want to fumble for supplies.)
- Melt the butter and marshmallows: In a large saucepan over low heat, melt 4 tbsp (56g) unsalted butter. Add 10 oz (280g) mini marshmallows and stir constantly until smooth and fully melted, about 3-4 minutes. (If you see any browning, lower the heat! Burnt marshmallow is not the vibe.)
- Add vanilla and cereal: Remove the pot from heat. Stir in 1/2 tsp vanilla extract and a pinch of salt (if using). Immediately add 6 cups (150g) Rice Krispies cereal and fold together quickly with a buttered spatula. The mix will get sticky fast—work quickly for best results.
- Press and cool: Scrape the mixture into your lined pan. Press down gently with buttered hands or another sheet of parchment. Don’t press too hard; you want the treats to stay light and chewy. Let cool for 30-45 minutes at room temperature.
- Cut and shape ghosts: Lift the slab out of the pan using the parchment. Use a sharp knife to cut into rectangles or rough ghost-like shapes (about 1.5×3 inches / 4×8 cm works well). For rounder bottoms, pinch the base and pull into a teardrop shape—nobody expects perfect ghosts!
- Insert sticks: Gently insert a lollipop stick into the base of each ghost. If the treats start to crack, warm the end of the stick slightly in hot water first.
- Melt the white chocolate: Place 12 oz (340g) white chocolate chips in a microwave-safe bowl. Microwave in 30-second bursts, stirring between each, until melted and smooth (usually 1-2 minutes total). If it’s too thick, stir in 1-2 tsp coconut oil or shortening.
- Dip your ghosts: Holding each pop by the stick, dip the top and sides into the melted white chocolate, letting excess drip off. Set on parchment to dry. For an extra “ghostly” look, spoon a little extra chocolate over the top and let it drip down.
- Add faces: Before the chocolate sets completely, press in mini chocolate chips for eyes and mouths, or use black decorating gel once set for more detailed faces. Each ghost will have its own “personality”—embrace the quirks!
- Let set and serve: Allow the pops to set at room temperature (about 30 minutes). Once firm, arrange on a platter or stand them up in a foam block for a haunted display!
If your chocolate gets clumpy, stir in a splash of oil and keep the bowl warm. Got sticky hands? Butter or oil your palms before shaping ghosts. And if the ghosts stick to the pan, slide a thin spatula underneath to loosen. Don’t worry if they’re a little lopsided—imperfection is the secret ingredient!
Cooking Tips & Techniques
- Work Fast with Marshmallows: The marshmallow mixture firms up quickly, so have your cereal measured and ready to go before melting. I learned this the hard way—scrambling for my cereal while my marshmallows turned to cement. It’s a sticky lesson!
- Use Buttered Hands: When pressing and shaping, rub a little butter or oil on your hands. It keeps the mixture from gluing itself to your fingers and makes shaping ghosts so much easier.
- Warm the Knife: For cleaner cuts, run your knife under hot water and wipe dry between slices. This keeps the treats from tearing and helps you get smoother edges.
- Customize Chocolate Consistency: White chocolate can be finicky. If it’s too thick, stir in a teaspoon of coconut oil or shortening. Thin chocolate coats the ghosts nicely without clumping.
- Let Kids Decorate: If you’re making these with kids, set up a “ghost factory” assembly line. One person shapes, one dips, another adds faces. It makes cleanup easier and lets everyone get creative.
- Don’t Over-Press: Pressing the cereal mixture too firmly makes for dense, hard treats. Just press enough to shape; leave a little air for that classic crispy-chewy texture.
- Chill to Set Faster: If you’re in a rush, pop the dipped pops in the fridge for 10-15 minutes. Just don’t leave them in too long—condensation can make the chocolate spotty.
Common mistakes? Pressing too hard, overheating the chocolate, or waiting too long to add the faces (the chocolate sets fast). If you end up with a few ghosts that look more like blobs, just call them “mystery monsters”—nobody will complain once they taste them. Timing is everything, but honestly, once you get the hang of it, you’ll be ghost-popping like a pro in no time!
Variations & Adaptations
- Gluten-Free Ghost Pops: Use certified gluten-free crispy rice cereal and double-check your marshmallow and white chocolate brands. I’ve made this for friends with celiac, and nobody could tell the difference.
- Dairy-Free/Vegan Pops: Swap butter for vegan margarine and use dairy-free white chocolate chips (like Enjoy Life). Vegan marshmallows work, but melt a bit slower—give them time and stir gently.
- Chocolate Ghosts: Dip the pops in melted dark or milk chocolate for a “shadow ghost” effect. Add a drizzle of orange candy melts for a Halloween twist.
- Sprinkle Fun: Before the chocolate sets, sprinkle orange, purple, or black nonpareils on top for a festive pop of color.
- Flavored Ghosts: Stir a little orange or lemon zest into the melted marshmallow for a subtle citrus kick. It’s a fun surprise and works great for adults who want something a little different.
- Nut-Free Adaptation: The base recipe is nut-free, just check your chocolate and marshmallow labels if allergies are a concern.
One year, I made “monster” pops by adding candy eyes and swirling two chocolates together. They were adorable and just as easy. You can even skip the sticks and serve as classic squares—just drizzle chocolate and add faces. The options are endless, so don’t be afraid to get creative!
Serving & Storage Suggestions
These Halloween Ghost Rice Krispies Treats Pops are at their best served at room temperature. Arrange them upright in a foam block (think spooky graveyard!), or lay them on a platter lined with parchment for easy grabbing. If you want to get extra festive, tie a little orange ribbon around each stick.
Pair these pops with mugs of hot cocoa, apple cider, or your favorite fall punch—perfect for chilly nights and movie marathons. They also play well alongside a spread of pumpkin cookies and caramel apples for a full-on Halloween dessert bar.
To store, layer pops between sheets of parchment in an airtight container. They’ll stay fresh for 3-4 days at room temperature. For longer storage, freeze (uncoated) pops in a zip-top bag for up to a month, then dip and decorate once thawed. If you need to re-crisp, a few minutes at room temp will do the trick—just don’t microwave or the chocolate may melt.
Honestly, the flavors deepen a bit after a day—if you can resist eating them all right away! They’re sturdy enough for lunchboxes or party treat bags, too.
Nutritional Information & Benefits
Each Halloween Ghost Rice Krispies Treats Pop is about 180-220 calories, depending on chocolate coating. You’ll get a good dose of quick energy from the rice cereal and marshmallows, plus a touch of calcium from the white chocolate.
These pops are nut-free with the right ingredients, and can easily be made gluten-free or dairy-free for dietary needs. The recipe contains marshmallows (often with gelatin), butter, and chocolate, so watch for allergens if needed.
I love that these treats are portion-controlled and not too heavy, making them perfect for parties where everyone wants to sample a little of everything. As with all sweets, moderation is key—these are a fun, festive indulgence you can feel good about sharing.
Conclusion
Halloween Ghost Rice Krispies Treats Pops are a total crowd-pleaser—cute, spooky, and oh-so-delicious. They’re quick to make, easy to customize, and guaranteed to bring smiles (and a few giggles) to your next Halloween gathering.
Don’t be afraid to put your own spin on the ghosts—add sprinkles, colored chocolate, or silly faces. The best part is seeing everyone’s creativity come out! I make these every October, and they’ve become a tradition my family looks forward to as much as pumpkin carving.
If you try these Halloween Ghost Rice Krispies Treats Pops, let me know how they turned out! Leave a comment, share a picture, or tell me about your wildest ghost designs. Happy haunting and happy snacking—may your treats be sweet and your ghosts delightfully spooky!
FAQs
How far in advance can I make Halloween Ghost Rice Krispies Treats Pops?
You can make them up to 3 days ahead and store them in an airtight container at room temperature. For longer storage, freeze the undipped pops, then decorate before serving.
Can I use regular marshmallows instead of mini marshmallows?
Yes! Just chop them into smaller pieces for even melting—about 40 large marshmallows equals one 10oz bag of minis.
What’s the best way to melt white chocolate without burning it?
Microwave in 30-second bursts, stirring between each. If you’re nervous, use a double boiler on low heat for more control.
How do I keep the treats from sticking to my hands?
Rub a little butter or oil on your hands before shaping. You can also use parchment paper to press and shape the mixture.
Can I make these without lollipop sticks?
Absolutely! Just cut into bars or ghost shapes, decorate as usual, and serve as classic Rice Krispies treats—no sticks required.
Pin This Recipe!

Halloween Ghost Rice Krispies Treats Pops
These Halloween Ghost Rice Krispies Treats Pops are chewy, crunchy, and coated in white chocolate for a spooky-cute party treat. Easy to make, kid-friendly, and perfect for Halloween gatherings or classroom parties.
- Prep Time: 20 minutes
- Cook Time: 5 minutes
- Total Time: 1 hour 15 minutes
- Yield: 12-16 pops 1x
- Category: Dessert
- Cuisine: American
Ingredients
- 6 cups Rice Krispies cereal (about 150g)
- 10 oz mini marshmallows (about one standard bag, 280g)
- 4 tbsp unsalted butter (56g)
- 1/2 tsp vanilla extract (optional)
- Pinch of salt (optional, especially if using salted butter)
- 12 oz white chocolate chips or melting wafers (340g)
- Mini chocolate chips or black decorating gel (for ghost eyes and mouths)
- Lollipop sticks or popsicle sticks (about 12-16)
- Sprinkles (optional, orange, black, or purple)
- Edible candy eyes (optional)
- 1–2 tsp coconut oil or vegetable shortening (optional, to thin chocolate)
Instructions
- Line a 9×13-inch pan with parchment paper, leaving overhang for easy lifting. Set out lollipop sticks, white chocolate, and decorations.
- In a large saucepan over low heat, melt butter. Add mini marshmallows and stir constantly until smooth and melted, about 3-4 minutes.
- Remove from heat. Stir in vanilla extract and salt if using. Immediately add Rice Krispies cereal and fold together quickly with a buttered spatula.
- Scrape mixture into lined pan. Press down gently with buttered hands or parchment. Let cool for 30-45 minutes at room temperature.
- Lift slab out of pan using parchment. Cut into rectangles or ghost-like shapes (about 1.5×3 inches). Pinch base for a teardrop shape if desired.
- Gently insert a lollipop stick into the base of each ghost. If treats crack, warm the end of the stick in hot water first.
- Place white chocolate chips in a microwave-safe bowl. Microwave in 30-second bursts, stirring between each, until melted and smooth. Stir in coconut oil or shortening if needed to thin.
- Holding each pop by the stick, dip the top and sides into melted white chocolate, letting excess drip off. Set on parchment to dry. Spoon extra chocolate over the top for a ghostly look if desired.
- Before chocolate sets, press in mini chocolate chips for eyes and mouths, or use black decorating gel once set for more detailed faces.
- Allow pops to set at room temperature (about 30 minutes). Once firm, arrange on a platter or stand upright for serving.
Notes
Work quickly with the marshmallow mixture as it firms up fast. Butter or oil your hands for easier shaping. Thin white chocolate with coconut oil if needed. Let kids help decorate for extra fun. For gluten-free, use certified gluten-free cereal. For dairy-free, use vegan butter and dairy-free white chocolate. Store in an airtight container at room temperature for up to 3-4 days.
Nutrition
- Serving Size: 1 pop
- Calories: 200
- Sugar: 18
- Sodium: 90
- Fat: 7
- Saturated Fat: 4
- Carbohydrates: 34
- Protein: 2
Keywords: Halloween, Rice Krispies, treats, ghost pops, party, white chocolate, kid-friendly, easy, no-bake, spooky, marshmallow, classroom, dessert