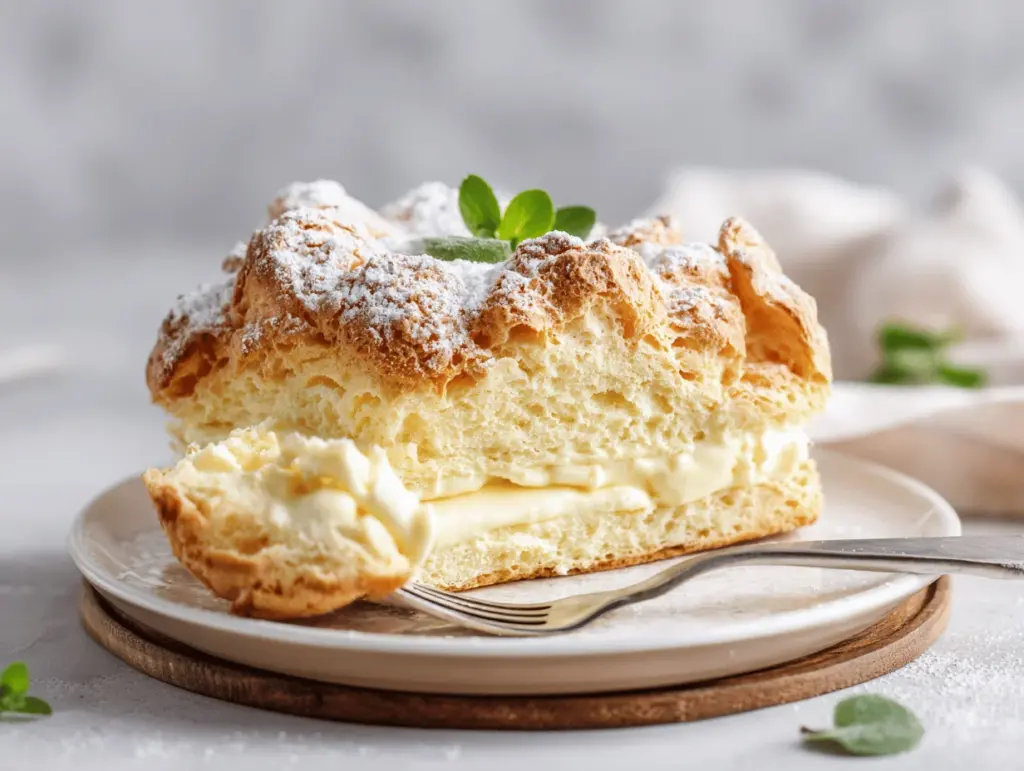
The first time I made Karpatka cream cake, the whole kitchen filled with the scent of vanilla and warm pastry, and honestly, it felt like a little piece of Poland had landed right on my countertop. You know the kind of dessert that looks fancy but tastes like home? That’s exactly what this Polish choux pastry delight delivers. The name “Karpatka” actually comes from the Carpathian Mountains, and once you see the golden, craggy top dusted with powdered sugar, you’ll get why. It’s like a sweet, edible mountain range that hides the silkiest, fluffiest cream filling underneath.
I stumbled on this recipe when I was searching for something special yet not too complicated for a Sunday family dinner. After a few tweaks, lots of taste tests, and a few (okay, maybe more than a few) failed attempts at the perfect cream, I nailed it. The best part? Everyone who’s tried it says it’s pure comfort and nostalgia—whether they grew up in Poland or not. Plus, if you’re like me and love a dessert that’s both impressive and totally doable, this Karpatka cream cake recipe is about to become your new favorite.
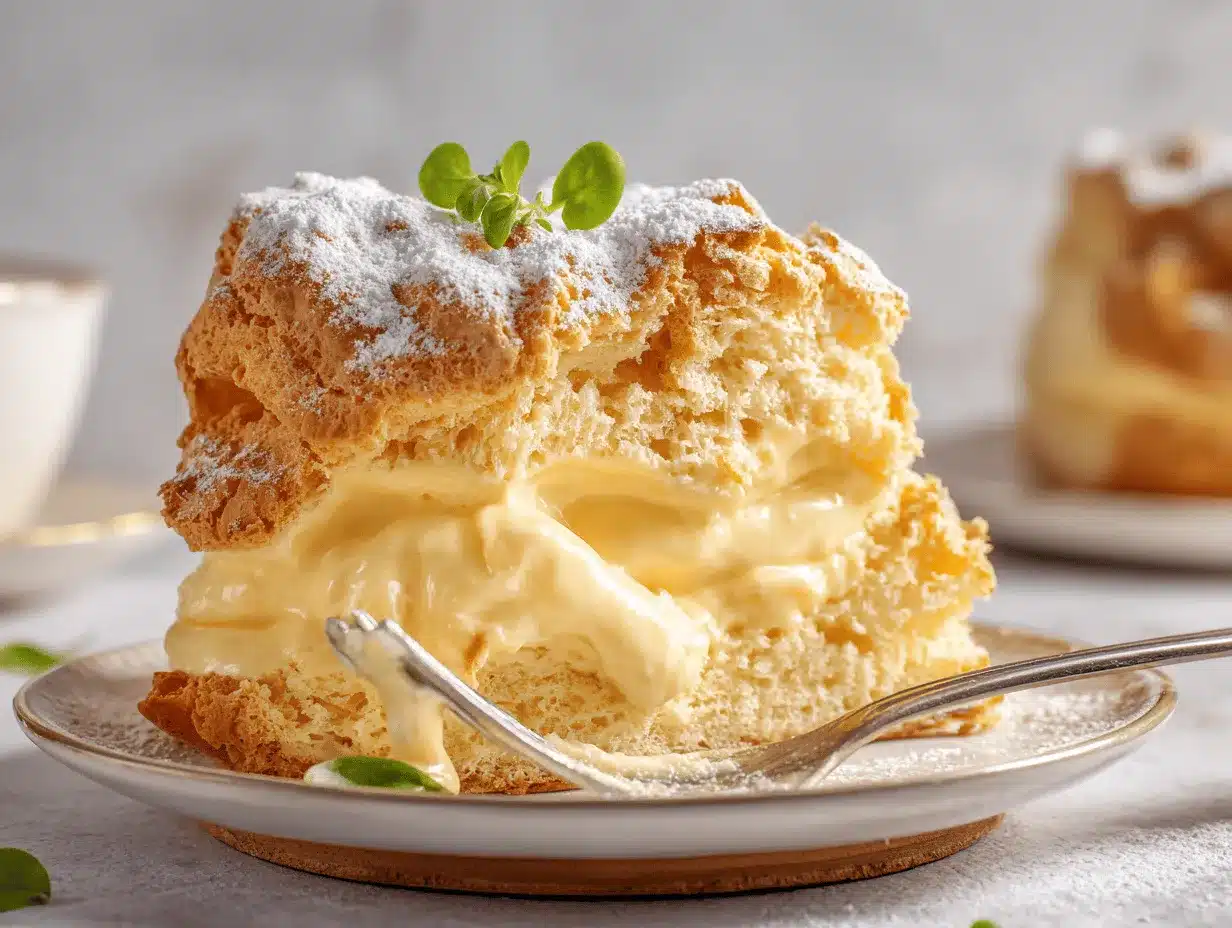
It’s not just about the flavor—though that’s a huge plus. This cake is a celebration of textures: crispy, airy pastry with a creamy, custardy filling that’s not too sweet. Whether you’re looking for a showstopper for a birthday, a holiday, or just a reason to celebrate the everyday, Karpatka hits every note. And let’s face it, who can say no to a slice of cloud-like cream sandwiched between golden layers? I’ve made this recipe at least a dozen times now, and it never lasts more than a day in my house. If you’ve been searching for a unique dessert that combines tradition, comfort, and that wow factor, grab your whisk—Karpatka is calling your name.
Why You’ll Love This Karpatka Cream Cake Recipe
Let me tell you, after making this cake for birthdays, potlucks, and even lazy Sunday afternoons, I can say with confidence: Karpatka is a crowd-pleaser with zero pretension. Here’s why you’ll fall head over heels for this Polish dessert:
- Quick & Easy: No elaborate techniques—just basic cooking know-how needed. The choux pastry comes together faster than you’d think, and the cream filling is almost foolproof.
- Simple Ingredients: All you need are pantry basics: eggs, butter, flour, milk, and sugar. No trips to specialty stores, and definitely no hard-to-find ingredients.
- Perfect for Any Occasion: Whether it’s a family dinner, a special holiday, or just because you feel like baking, Karpatka fits right in. It looks like you spent hours on it, but it’s secretly stress-free.
- Crowd-Pleaser: Both kids and adults always reach for seconds. There’s something about the creamy filling and pillowy pastry that just makes people happy.
- Unbelievably Delicious: The flavor combo is a dream. That subtle vanilla cream with the light, golden pastry—each bite is sweet, but not too sweet. It’s comfort food at its finest.
What sets this Karpatka cream cake apart from the rest? For starters, I use a little trick of blending the choux pastry dough longer to get those signature mountain peaks, and I add an extra splash of vanilla to the cream for maximum flavor. Plus, my recipe strikes the perfect balance: not too rich, not too bland, just right. And hey, if you’ve ever felt intimidated by choux pastry, don’t worry—I’ve got all the step-by-step tips to get you there.
If you’re searching for a dessert that makes you close your eyes and savor that first bite, this is it. Karpatka is the kind of cake that brings people together, sparks conversation, and makes you feel like you’re sitting at a family table, even if you’re just having it with coffee on a quiet afternoon. It’s special without being fussy, and it’s the kind of recipe you’ll want to return to again and again.
What Ingredients You Will Need
This Karpatka cream cake recipe is all about simple, honest ingredients coming together to make something magical. Even if your pantry’s running low, you’ll probably have most of these staples ready to go. Here’s what you’ll need:
- For the Choux Pastry Layers:
- 1 cup (240 ml) water
- 1/2 cup (115 g) unsalted butter (cubed for easy melting)
- 1 cup (130 g) all-purpose flour (sifted for best texture)
- 1/4 tsp salt
- 4 large eggs (room temperature—this makes a difference!)
- For the Vanilla Cream Filling:
- 2 cups (480 ml) whole milk (you can use 2% in a pinch, but whole milk gives the best creaminess)
- 1/2 cup (100 g) granulated sugar
- 1/4 cup (32 g) cornstarch (this helps thicken the cream without making it heavy)
- 2 large egg yolks
- 1 large egg
- 1 tbsp pure vanilla extract (I go for Nielsen-Massey if I can—it really boosts the flavor)
- 1/2 cup (115 g) unsalted butter, softened
- Pinch of salt
- For Assembly & Garnish:
- Powdered sugar (for dusting—don’t skip this, it’s classic!)
Ingredient Tips & Substitutions:
- If you need to make it gluten-free, swap in a 1:1 gluten-free flour blend for the choux pastry.
- Dairy-free? Use plant-based butter and your favorite non-dairy milk (though the flavor will shift a bit).
- I’ve tried using brown sugar in the cream for a deeper flavor—it’s not traditional, but it’s tasty.
- For extra flair, add a tiny pinch of lemon zest to the cream. Trust me; it gives a fresh pop that’s subtle but so good.
- Don’t use margarine in place of butter for the choux—it just doesn’t puff up the same.
Honestly, these ingredients are humble, but together they become something that feels like a celebration. If you’re new to choux pastry, don’t worry. The process is easier than you think, and I’ll walk you through every step. (And if you want to get creative, check out the variations section below!)
Equipment Needed
You don’t need a fancy kitchen setup to make Karpatka cream cake—just a few basics and a couple of trusty pans. Here’s what I use every time:
- Medium Saucepan: For making the choux pastry dough and the cream filling. Any heavy-bottomed pan works; I use my old stainless steel one.
- Mixing Bowls: At least two—one for eggs, one for flour. Glass or metal is fine.
- Electric Mixer or Hand Mixer: For beating eggs into the dough and whipping up the cream. A stand mixer makes life easier, but a handheld does the job too.
- Whisk: Essential for smooth custard. A balloon whisk is my go-to.
- 9×13-inch (23×33 cm) Baking Pan: For baking the pastry layers. You can use two pans if you have them, but I usually bake one after another if I’m short on pans.
- Parchment Paper: Keeps the pastry from sticking. (I’ve skipped it before and regretted it—cleanup is so much harder!)
- Offset Spatula or Butter Knife: For spreading cream and pastry evenly.
- Sifter or Fine Mesh Strainer: For dusting powdered sugar on top—makes it look extra pretty.
- Cooling Rack: Helps pastry cool without getting soggy on the bottom. If you don’t have one, just use a clean kitchen towel on the counter.
Equipment Tips:
- If you don’t own a hand mixer, you can mix by hand—just be prepared to get a little workout!
- Baking pans can be swapped for a rimmed baking sheet if you want thinner layers—just keep an eye on bake time.
- Keep your whisk clean between steps—bits of dough or egg can mess up the cream texture.
- For budget-friendly pans, I love Wilton or USA Pan—both last through lots of baking without warping.
Preparation Method
-
Prep Your Pan and Ingredients:
- Line a 9×13-inch (23×33 cm) baking pan with parchment paper. Preheat your oven to 400°F (200°C). Crack eggs into a bowl to warm up a bit—room temp eggs make choux rise better.
-
Make the Choux Pastry:
- In a medium saucepan, combine 1 cup (240 ml) water, 1/2 cup (115 g) butter, and 1/4 tsp salt. Bring to a gentle boil over medium heat.
- Remove from heat, dump in 1 cup (130 g) flour all at once, and stir fast with a wooden spoon until the dough pulls away from the sides. It’ll look thick and glossy.
- Let it cool for 5 minutes (so you don’t scramble the eggs next).
-
Beat in the Eggs:
- Add eggs one at a time, beating well after each. A hand mixer helps, but you can do it by hand—it just takes some muscle. The dough should become smooth, shiny, and slightly stretchy.
- If it looks curdled at first, don’t panic—keep beating, and it’ll come together!
-
Bake the Layers:
- Spread half the dough evenly in the prepared pan. Use a spatula to make little peaks and valleys—this gives that mountain look.
- Bake for 20-25 minutes, until puffed and golden brown (it should look craggy and feel crisp).
- Remove and cool completely. Repeat with the second half of the dough for the top layer.
- Don’t open the oven early or your pastry might collapse!
-
Make the Cream Filling:
- In your saucepan, whisk together 2 cups (480 ml) milk, 1/2 cup (100 g) sugar, and 1/4 cup (32 g) cornstarch. Add a pinch of salt.
- In a separate bowl, whisk 2 yolks and 1 whole egg. Slowly pour some warm milk mixture into the eggs (tempering), then pour the eggs back into the saucepan.
- Cook over medium heat, whisking constantly, until thick and pudding-like—about 5-7 minutes. Remove from heat and stir in 1 tbsp vanilla.
- Cool for 10 minutes, then beat in 1/2 cup (115 g) softened butter until silky. If you want extra-smooth cream, strain it through a fine mesh sieve.
-
Assemble the Cake:
- Place one choux layer, craggy side down, on a platter. Spread the cooled cream filling all over, edge to edge.
- Top with the second choux layer, craggy side up for that mountain look.
- Chill in the fridge for at least 2 hours—this helps the cream set and flavors meld.
-
Finish and Serve:
- Just before serving, dust generously with powdered sugar. Slice with a serrated knife for clean pieces.
- If your kitchen is warm, keep leftovers chilled—Karpatka cream cake is best when cold or just slightly cool.
Troubleshooting: If your pastry collapses, it’s probably underbaked—pop it back in for a few more minutes. If the cream looks lumpy, whisk like crazy or run it through a sieve. And if your layers stick, blame the lack of parchment (I learned that the hard way!).
Cooking Tips & Techniques
After a few rounds of trial and error (and a couple of panicked “is this ruined?” moments), I’ve picked up some tricks for Karpatka success.
- Don’t Rush the Choux: Let the dough cool a few minutes before adding eggs or you’ll get scrambled eggs instead of smooth pastry. Trust me, I’ve been there—it’s not pretty.
- Peaks Matter: When spreading the choux in the pan, use your spatula to create jagged peaks and valleys. This gives your cake that signature “mountain” look. Flat pastry just isn’t as fun.
- Steam Is Your Friend: Don’t open the oven door during baking! Choux pastry needs steam to puff up. If you peek too soon, your pastry may collapse and lose its shape.
- Temperature Check: Make sure your eggs are room temperature. Cold eggs can shock the dough and make it harder to blend.
- Custard Consistency: When making the filling, patience is key. Keep whisking over medium heat—don’t crank it up or you’ll risk burning the bottom. The cream should be thick enough to coat a spoon, but not so thick it’s gluey.
- Cream Lumps? If your cream gets lumpy, don’t panic—just whisk vigorously or strain it. I’ve saved a few batches this way!
- Chill Time: The longer the Karpatka sits in the fridge, the better it sets and the easier it is to slice. Overnight chilling is ideal, but a couple of hours will do in a pinch.
- Multitasking: While the first pastry layer bakes, start prepping your cream. That way, everything comes together faster and you’re not stuck waiting.
- Consistency Counts: For the best results, use a kitchen scale to measure flour and butter. Small changes can make a big difference with choux pastry.
And remember, even if your choux isn’t picture-perfect, it’ll still taste amazing. (Some of my best Karpatka cakes looked a little “rustic”—no complaints from my family!)
Variations & Adaptations
One of the best things about Karpatka cream cake is how flexible it is. Whether you need to adjust for allergies or just want to try something new, here are my favorite ways to switch it up:
- Gluten-Free Karpatka: Substitute a 1:1 gluten-free flour blend for the all-purpose flour in the choux pastry. I’ve tried King Arthur’s blend and it works beautifully—just don’t skip the sifting step.
- Chocolate Karpatka: Add 2 tablespoons of unsweetened cocoa powder to the flour before mixing it into the choux. For the filling, stir in a handful of chopped dark chocolate while the cream is still warm. Chocolate mountains, anyone?
- Lemon or Berry Filling: For a spring twist, add a teaspoon of lemon zest to the cream, or fold in a half cup of fresh raspberries or blueberries. The tartness is a great contrast to the sweet pastry.
- Dairy-Free: Use plant-based butter and non-dairy milk throughout. The flavor will be a bit different, but you’ll still get that dreamy texture.
- Mini Karpatka: Bake the choux pastry in muffin tins for individual “mountains.” These are adorable for parties—I’ve brought them to a baby shower and they disappeared in minutes.
I once swapped the vanilla extract for almond and added a layer of sliced peaches—totally not traditional, but it was a hit at a summer picnic. Don’t be afraid to experiment and make Karpatka your own!
Serving & Storage Suggestions
Karpatka cream cake is best served cold or slightly cool, so keep it in the fridge until you’re ready to cut those perfect, creamy slices. Here’s how I serve and store it for maximum enjoyment:
- Serving: Use a sharp, serrated knife to slice—wipe between cuts for neat pieces. Dust with extra powdered sugar just before serving for that classic snowy look.
- Presentation: I love serving Karpatka on a rustic wooden board or a pretty cake stand. It’s lovely on its own, but you can add a few fresh berries or a sprig of mint if you’re feeling fancy.
- Pairings: Karpatka goes beautifully with a hot cup of coffee, black tea, or even a light dessert wine. If you’re serving at brunch, try it with a tart fruit salad.
- Storage: Store leftovers in an airtight container in the fridge for up to 3 days. The pastry will soften a bit over time, but the flavors meld and the cake gets even creamier.
- Freezing: You can freeze Karpatka, though the texture is best when fresh. Wrap slices tightly in plastic wrap and foil, and freeze for up to a month. Thaw overnight in the fridge before serving.
- Reheating: If you want to take the chill off, let slices sit at room temperature for 10-15 minutes. I don’t recommend microwaving—it makes the cream runny.
Honestly, Karpatka rarely lasts long enough to worry about storage in my house, but these tips will help if you somehow have leftovers!
Nutritional Information & Benefits
Here’s the lowdown on what you’re enjoying in each slice of Karpatka cream cake (based on 12 servings):
- Calories: ~320
- Protein: 6 g
- Carbohydrates: 32 g
- Fat: 18 g
- Fiber: 1 g
- Sugar: 16 g
Karpatka isn’t what I’d call a “diet” dessert, but it does have some perks. Eggs and milk give a nice protein boost, and you can lighten things up by using low-fat milk or a sugar substitute if needed. The choux pastry is naturally nut-free (unless you add almond extract). For those with gluten or dairy allergies, check the substitutions above. I love that this dessert satisfies a sweet tooth without being over-the-top rich—a little goes a long way, and it always feels like a treat!
Conclusion
There’s a reason Karpatka cream cake is a beloved classic in Polish kitchens—and now, hopefully, yours too. With its crisp, golden pastry, dreamy vanilla cream, and that signature mountain look, it’s the kind of dessert that feels both nostalgic and totally fresh each time you make it. You can stick to the traditional flavors or play with your own twists, and it’ll always get rave reviews.
I genuinely love this recipe because it brings my family together, sparks conversations about our favorite sweets, and makes even an ordinary day feel a little more special. If you’re ready to try something new or bring a little European magic to your table, Karpatka is the way to go. Share your creations in the comments below or tag me on your favorite social platform—I’d love to see your mountains of cream!
Go ahead—grab your whisk, sprinkle some sugar, and let this Polish delight become your next baking adventure. Happy baking, friends!
FAQs about Karpatka Cream Cake
What does Karpatka mean and why is it called that?
Karpatka means “Carpathian Mountain cake” in Polish. The craggy, golden top of the choux pastry is said to look like the peaks of the Carpathian Mountains, especially when dusted with powdered sugar.
Can I make Karpatka cream cake ahead of time?
Absolutely! In fact, Karpatka is even better after chilling for several hours or overnight. The cream sets up and the flavors meld together for a perfect slice.
What’s the best way to get clean slices?
A sharp, serrated knife is key. Wipe the blade between cuts to keep the cream filling neat and prevent sticking.
Can I use store-bought custard or pudding for the filling?
You can in a pinch, but homemade cream filling really makes a difference. The flavor and texture are so much better. If you do use store-bought, pick one with real vanilla and no artificial flavors.
Is Karpatka cream cake suitable for people with allergies?
With a few tweaks, yes! Use gluten-free flour for the pastry and dairy-free milk and butter for the filling. Always double-check ingredient labels for allergens.
Pin This Recipe!

Karpatka Cream Cake

Karpatka Cream Cake is a classic Polish dessert featuring crisp, golden choux pastry layers filled with a silky vanilla custard cream. This showstopping cake is surprisingly easy to make and delivers a comforting, nostalgic flavor with a signature mountain-like appearance.
- Prep Time: 30 minutes
- Cook Time: 50 minutes
- Total Time: 3 hours
- Yield: 12 servings 1x
- Category: Dessert
- Cuisine: Polish
Ingredients
- 1 cup (240 ml) water
- 1/2 cup (115 g) unsalted butter, cubed
- 1 cup (130 g) all-purpose flour, sifted
- 1/4 tsp salt
- 4 large eggs, room temperature
- 2 cups (480 ml) whole milk
- 1/2 cup (100 g) granulated sugar
- 1/4 cup (32 g) cornstarch
- 2 large egg yolks
- 1 large egg
- 1 tbsp pure vanilla extract
- 1/2 cup (115 g) unsalted butter, softened
- Pinch of salt
- Powdered sugar, for dusting
Instructions
- Line a 9×13-inch (23×33 cm) baking pan with parchment paper. Preheat oven to 400°F (200°C). Crack eggs into a bowl to bring to room temperature.
- In a medium saucepan, combine water, 1/2 cup butter, and 1/4 tsp salt. Bring to a gentle boil over medium heat.
- Remove from heat, add flour all at once, and stir quickly until dough pulls away from sides and looks thick and glossy. Let cool for 5 minutes.
- Add eggs one at a time, beating well after each addition until dough is smooth, shiny, and slightly stretchy.
- Spread half the dough evenly in the prepared pan, creating peaks and valleys with a spatula. Bake for 20-25 minutes until puffed and golden brown. Cool completely. Repeat with remaining dough for the second layer.
- In a saucepan, whisk together milk, sugar, cornstarch, and a pinch of salt. In a separate bowl, whisk egg yolks and whole egg. Temper eggs with some warm milk mixture, then return all to saucepan.
- Cook over medium heat, whisking constantly, until thick and pudding-like (about 5-7 minutes). Remove from heat and stir in vanilla. Cool for 10 minutes, then beat in softened butter until silky. Strain if desired for extra smoothness.
- Place one choux layer, craggy side down, on a platter. Spread cooled cream filling evenly over the layer. Top with second choux layer, craggy side up.
- Chill assembled cake in the fridge for at least 2 hours to set.
- Before serving, dust generously with powdered sugar. Slice with a serrated knife and serve cold or slightly cool.
Notes
Let the choux dough cool before adding eggs to avoid scrambling. Create peaks in the dough for the signature mountain look. Chill the cake well before slicing for clean pieces. For gluten-free or dairy-free adaptations, see ingredient tips. The cake is best served cold and can be made a day ahead.
Nutrition
- Serving Size: 1 slice (1/12 of cake)
- Calories: 320
- Sugar: 16
- Sodium: 180
- Fat: 18
- Saturated Fat: 11
- Carbohydrates: 32
- Fiber: 1
- Protein: 6
Keywords: Karpatka, Polish cream cake, choux pastry, vanilla custard, Polish dessert, easy cake, European dessert, holiday dessert, comfort food, traditional Polish recipe


