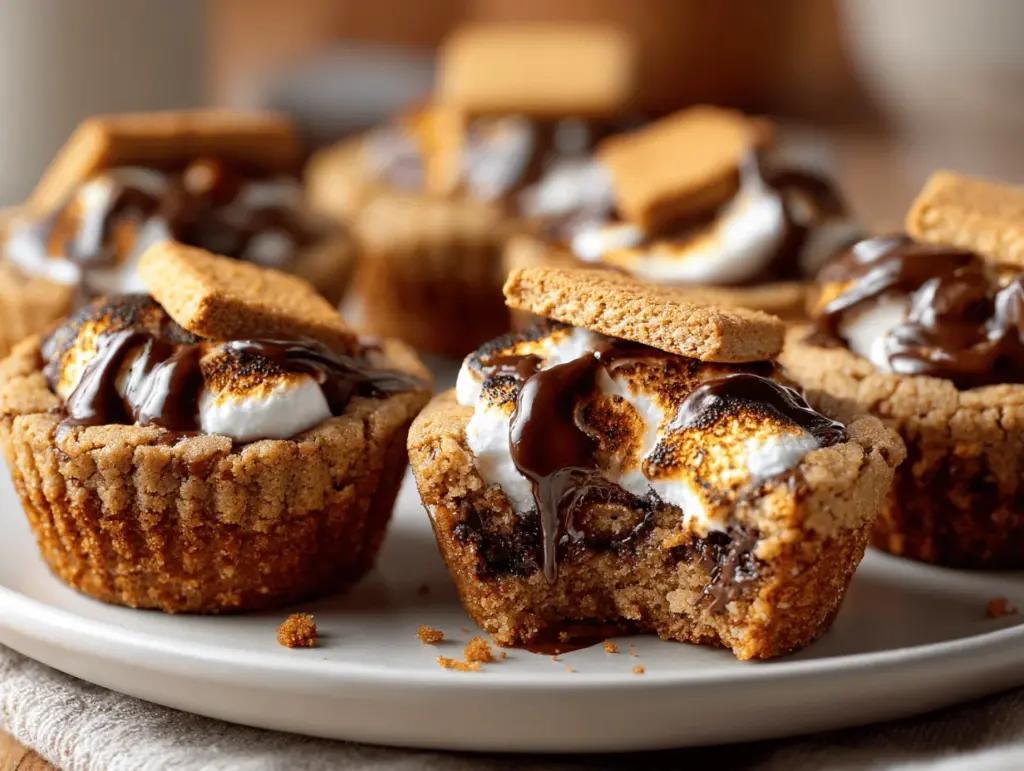
The first time I bit into a gooey, melty peanut butter s’mores cookie cup, I swear I heard angels sing (or maybe that was just my happy taste buds). Imagine: golden, chewy peanut butter cookies hugging a pocket of creamy chocolate and toasty marshmallow—basically, summer campfire magic meets classic bake sale charm. These peanut butter smores cookie cups aren’t just ridiculously easy, they’re also one of those desserts that make you feel like you’ve pulled off a little kitchen miracle with just six ingredients.
I stumbled upon this idea on a rainy weekend, craving all the sweet nostalgia of s’mores but without the hassle of a fire pit (and, let’s be real, without smelling like smoke for hours). After a few test batches—some stickier than others—I finally nailed the perfect ratio: just enough peanut butter cookie to cradle the chocolate and marshmallow, but not so much that it overpowers that classic s’mores flavor combo. The result? A handheld treat that’s part cookie, part candy, and 100% irresistible.
Why do I love this recipe so much? It’s fast, family-friendly, and you don’t need a grocery cart full of fancy stuff. Honestly, it’s perfect for last-minute gatherings, bake sales, or just when you want something over-the-top delicious with minimal effort. Whether you’re baking with kids, treating yourself after a long day, or looking for that next “wow” dessert for Pinterest, these peanut butter smores cookie cups deliver every single time. If you’re ready to turn simple ingredients into a crowd-pleasing treat, you’re in the right place—and yes, I’ve eaten way too many of these while “testing” for you!
Why You’ll Love This Peanut Butter Smores Cookie Cup Recipe
- Quick & Easy: You can whip up these peanut butter smores cookie cups in under 30 minutes, start to finish. No chilling dough, no fancy equipment, and barely any cleanup. Perfect for when you need dessert—now.
- Only 6 Ingredients: Seriously, you likely have everything in your pantry already. The ultimate low-effort, high-reward treat.
- Perfect for Every Occasion: These cookie cups are a hit at birthday parties, potlucks, and even as a sweet lunchbox surprise. I’ve brought them to backyard BBQs, and there’s never a crumb left.
- Kid and Adult Approved: The combo of peanut butter, chocolate, and marshmallow gets rave reviews from everyone—my picky niece even asked for the recipe!
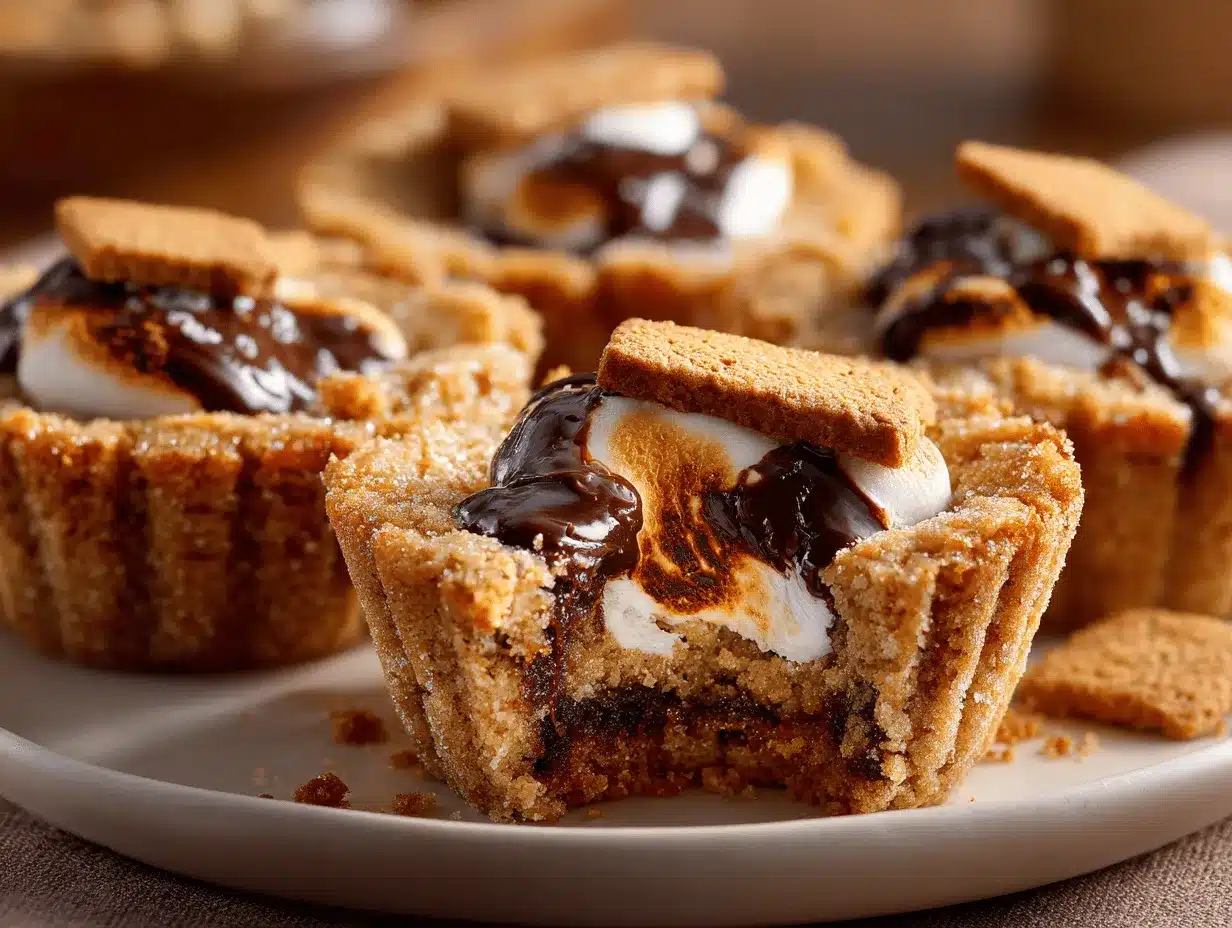
- Unbelievable Texture: You get a chewy, tender cookie shell with a molten, gooey center. Trust me, it’s as dreamy as it sounds.
What sets this peanut butter smores cookie cup recipe apart? I blend the peanut butter with just enough sugar and egg to keep the cookie base soft, not crumbly. And instead of just plopping in a marshmallow, I broil it for a golden, toasty finish—just like real s’mores. The chocolate melts into the warm cookie, making every bite taste like a mini dessert adventure.
Honestly, it’s not just about the flavor (even though that’s amazing). There’s something about the way these cookie cups look—cute, golden, and a little messy—that makes them feel special but approachable. They’re comfort food with a twist, the kind of treat that makes you want to slow down and savor every bite. Whether you’re baking for a crowd or just for yourself, these peanut butter smores cookie cups will make you the hero of dessert time—every single time.
What Ingredients You Will Need
This peanut butter smores cookie cup recipe is all about big flavor from simple, everyday ingredients. You won’t need to hunt down anything fancy—just a handful of classics that work together like magic.
- Creamy Peanut Butter (1 cup / 250g) – The star of the show! I usually go with Jif or Skippy for a smooth, classic flavor. Chunky works if you want extra texture, but creamy is my go-to for cookie cups.
- Granulated Sugar (1 cup / 200g) – Sweetens the cookie base and helps create that chewy texture. You can swap in half brown sugar for a slightly deeper flavor (I do this sometimes when I want a caramel note).
- Large Egg (1, room temperature) – Binds everything together. If you forget to take it out early, just soak it in warm water for a few minutes (learned that one the hard way).
- Miniature Chocolate Bars (about 12, like Hershey’s Minis / 120g) – You need one for each cookie cup. I’ve tried dark, milk, and even cookies & cream—each adds its own twist. Break larger bars into pieces if needed.
- Large Marshmallows (12) – Cut in half for a perfect fit. Mini marshmallows work in a pinch, just pile them up until the cup is full.
- Fine Sea Salt (A pinch, optional) – Totally optional, but that tiny sprinkle on top brings out the peanut butter flavor and balances the sweetness. I skip it sometimes if I’m sharing with little kids.
Ingredient Tips: For the peanut butter, avoid natural or “just peanuts” types—they’re too oily and can make the cookie cups fall apart. Regular creamy peanut butter holds everything together best. If you need these gluten-free, double-check your chocolate bars and marshmallows (most are, but always check labels). For a dairy-free version, use dairy-free chocolate and vegan marshmallows.
Substitutions are totally welcome here: swap in almond butter for a nutty twist, or stuff with caramel-filled chocolate for a gooier center. You can even toss in a few mini chocolate chips if you want extra chocolate in each bite. I’ve experimented with all sorts of combos, and honestly, this recipe is super forgiving!
Equipment Needed
- Mini Muffin Pan (24-cup or two 12-cup pans) – Nonstick works wonders, but you can also use a regular muffin tin for larger cups (adjust baking time as needed).
- Mixing Bowl – Medium size is perfect for stirring everything together by hand. No need for a stand mixer here.
- Small Cookie Scoop or Spoon – Helps portion out the dough evenly. I’ve used a tablespoon in a pinch—no fancy tools required.
- Rubber Spatula – Great for scraping every bit of dough from the bowl (don’t leave any behind—trust me!).
- Cooling Rack – Speeds up cooling and keeps the bottoms from getting soggy. If you don’t have one, just slide the cookie cups (in the pan) onto a folded kitchen towel.
- Butter Knife – For loosening the cookie cups from the pan if they stick a little. Metal or plastic both work fine.
I’ve made these peanut butter smores cookie cups with both cheap and pricier muffin pans—honestly, as long as you grease the pan well, you’ll be fine. If you don’t have a mini muffin pan, make six jumbo cookie cups in a regular pan (bake a few minutes longer). For easy cleanup, line the pan with mini parchment circles or use a nonstick spray.
How to Make Peanut Butter Smores Cookie Cups
- Prep Your Pan: Preheat your oven to 350°F (175°C). Grease a 24-cup mini muffin tin with nonstick spray or a little softened butter. If you only have a 12-cup pan, just bake in batches.
- Make the Dough: In a medium mixing bowl, combine 1 cup (250g) creamy peanut butter and 1 cup (200g) granulated sugar. Stir well until smooth and glossy—about 1 minute. Add 1 large egg and mix until fully incorporated. The dough will be thick and a little sticky; that’s exactly what you want!
- Portion and Shape: Use a small cookie scoop or tablespoon to drop about 1 tablespoon (20g) of dough into each muffin cup. Gently press each mound down to form a shallow well in the center—think mini “nests” for the chocolate and marshmallow.
- Bake the Cookie Cups: Bake in the preheated oven for 10-12 minutes, until the edges look set and just golden. Don’t overbake! The centers will look a little soft, but they’ll firm up as they cool.
- Add the Chocolate: Immediately after removing from the oven, gently press a miniature chocolate bar piece into the center of each cookie cup. The heat will start to melt the chocolate—yum!
- Top with Marshmallow: Place half a large marshmallow, cut side down, on top of each chocolate bar. If you’re using mini marshmallows, pile 3-4 on top to cover the chocolate.
- Broil for Toasty Tops (Optional but Awesome): Turn on your oven’s broiler and pop the muffin pan back in for 1-2 minutes, just until the marshmallows are golden and puffed. Watch closely—marshmallows can go from perfect to scorched in a flash! If you don’t have a broiler, use a kitchen torch or skip this step for a classic gooey finish.
- Cool and Remove: Let the cookie cups cool in the pan for at least 10 minutes (they’ll be very soft at first). Run a butter knife around the edges to loosen, then gently pop them out onto a cooling rack.
- Finish and Serve: Sprinkle a pinch of sea salt on top if you like. Serve warm for ultra-melty centers, or let them cool completely for a firmer, chewy treat.
Troubleshooting: If the cookie cups stick a bit, don’t panic—just run a knife around the edges and nudge them out gently. If your marshmallows aren’t browning, try moving the pan closer to the broiler. For best results, don’t overbake—the centers should look slightly underdone when you pull them out.
Cooking Tips & Techniques
- Don’t Overmix: Stir the dough until just combined. Overmixing can make the cookie cups tough instead of tender.
- Use a Cookie Scoop: This keeps the size even, so all your peanut butter smores cookie cups bake at the same rate.
- Watch the Broiler: Marshmallows brown fast (ask me how many I’ve burned…). Never leave them unattended while toasting!
- Let Them Cool: The cookie cups will be fragile straight from the oven. Letting them cool makes removing them way easier (and less messy).
- Customize the Chocolate: Milk, dark, or even caramel-filled bars all work. I love using mini peanut butter cups for a double PB twist.
If you’re baking with kids, let them press the chocolate and marshmallows into the cups—it’s the fun part! And if you run into sticky dough, just wet your fingers a bit before pressing it into the muffin tin. For extra neat edges, wipe the muffin pan’s rim before broiling the marshmallows (I’ve learned this the hard way—sticky marshmallow is no joke to clean).
For a crisper base, try baking an extra minute, but be careful not to overdo it. And if your cookie cups collapse a little after cooling, that’s totally normal—just more room for gooey filling!
Variations & Adaptations
- Gluten-Free Option: This recipe is naturally gluten-free if you use gluten-free chocolate and marshmallows. Double-check your labels just to be safe.
- Nut-Free Swap: Use sunflower seed butter instead of peanut butter for a school-safe, allergy-friendly treat. The flavor’s a little earthier, but still delicious.
- Chocolate Lover’s Version: Use dark chocolate squares and add a sprinkle of mini chocolate chips to the dough before baking. I’ve even tried Nutella instead of chocolate bars—super rich and decadent.
- Seasonal Twist: For a fall vibe, sprinkle a little cinnamon into the dough or top with a pumpkin-flavored marshmallow. In the summer, add a thin slice of banana under the chocolate for a PB-banana s’mores cup. It’s wild.
- Vegan Adaptation: Swap in plant-based egg replacer, vegan marshmallows, and dairy-free chocolate. The result is just as gooey and satisfying.
One of my favorite spins? I once made these with almond butter and a dark chocolate-coconut bar tucked inside—every bite tasted like a candy bar and a campfire treat rolled into one. Don’t be afraid to switch it up based on what you have or your personal cravings!
Serving & Storage Suggestions
These peanut butter smores cookie cups are best served slightly warm, straight from the oven when the chocolate and marshmallow are at their gooey best. I love piling them on a pretty cake stand with extra marshmallows scattered around for a playful look—perfect for a party or family movie night.
Pair them with a tall glass of milk, hot chocolate, or even coffee for grown-ups. For a full-on dessert spread, serve alongside fresh berries or a scoop of vanilla ice cream (trust me, the combo is outrageous).
To store, let the cookie cups cool completely, then place in an airtight container. They’ll keep at room temperature for up to 3 days, or in the fridge for up to a week. If you want to freeze, wrap each cup in plastic wrap and store in a zip-top bag—just thaw at room temp and reheat in the microwave for 10-15 seconds for that melty marshmallow magic.
Over time, the flavors meld and get even more craveable. The cookie base softens a bit, and the marshmallow stays chewy. If you like a slightly firmer cookie cup, just let them cool uncovered for an hour after baking.
Nutritional Information & Benefits
Each peanut butter smores cookie cup (out of 24) clocks in at about 130 calories, with 5g fat, 16g carbs, and 2g protein. They’re naturally gluten-free if you check your brands, and can be made dairy-free with a few swaps.
The peanut butter adds a punch of protein and healthy fats, helping you feel satisfied (at least until you reach for another one!). Marshmallows and chocolate are all about joy and nostalgia, and you can tweak the sugar to suit your needs. Just a heads-up: these do contain peanuts, eggs, and dairy (unless adapted), so check with your crowd for allergies.
From a wellness angle, I see these cookie cups as a treat that brings people together and makes dessert time feel special—sometimes, that’s the best kind of “nutrition.”
Conclusion
Peanut butter smores cookie cups are my go-to when I want a dessert that’s fun, fast, and guaranteed to make people smile. With just six ingredients and a few easy steps, you get all the gooey, nostalgic flavors of a campfire s’more—no flames required. They’re easy to adapt, impressive to serve, and honestly, I just love how they turn simple pantry staples into something totally magical.
Give them a try and don’t be shy about making them your own—swap in your favorite chocolate or nut butter, or get creative with toppings. If you bake these, I’d love to hear how they turned out or see your spins on the recipe. Drop a comment, share a photo, or let me know your best cookie cup tip!
Happy baking—and remember, sometimes the best desserts are the ones that make you feel like a kid again.
Frequently Asked Questions
Can I make peanut butter smores cookie cups ahead of time?
Absolutely! Bake and assemble them as directed, then store in an airtight container. Reheat in the microwave for 10-15 seconds before serving to get the marshmallow nice and gooey again.
What if I don’t have a mini muffin pan?
No problem. Use a regular muffin tin and make larger cookie cups—just increase the baking time by 2-3 minutes and watch for doneness.
Can I use crunchy peanut butter instead of creamy?
Yes! Crunchy peanut butter adds a bit more texture to the cookie cups. Just make sure to press the dough firmly into the cups so they hold together.
Are these peanut butter smores cookie cups gluten-free?
They can be! The main ingredients are naturally gluten-free, but always check your chocolate and marshmallow brands for hidden gluten.
How do I keep the cookie cups from sticking to the pan?
Make sure to grease the pan really well, and let the cups cool for at least 10 minutes before removing. Running a butter knife around the edges helps pop them out cleanly.
Pin This Recipe!

Peanut Butter Smores Cookie Cups
These easy peanut butter smores cookie cups combine chewy peanut butter cookies with gooey chocolate and toasted marshmallow for a nostalgic, crowd-pleasing treat. With just six ingredients and minimal prep, they’re perfect for parties, bake sales, or a quick family dessert.
- Prep Time: 10 minutes
- Cook Time: 12 minutes
- Total Time: 25 minutes
- Yield: 24 cookie cups 1x
- Category: Dessert
- Cuisine: American
Ingredients
- 1 cup creamy peanut butter (Jif or Skippy recommended, 250g)
- 1 cup granulated sugar (200g)
- 1 large egg, room temperature
- 12 miniature chocolate bars (such as Hershey’s Minis, about 120g)
- 12 large marshmallows, cut in half
- Pinch of fine sea salt (optional, for topping)
Instructions
- Preheat oven to 350°F (175°C). Grease a 24-cup mini muffin tin with nonstick spray or softened butter.
- In a medium mixing bowl, combine peanut butter and sugar. Stir until smooth and glossy, about 1 minute.
- Add the egg and mix until fully incorporated. The dough will be thick and sticky.
- Using a small cookie scoop or tablespoon, drop about 1 tablespoon of dough into each muffin cup. Gently press down to form a shallow well in the center.
- Bake for 10-12 minutes, until edges are set and just golden. Centers will look soft.
- Immediately after removing from oven, gently press a miniature chocolate bar piece into the center of each cookie cup.
- Top each with half a large marshmallow, cut side down (or 3-4 mini marshmallows).
- Optional: Broil for 1-2 minutes until marshmallows are golden and puffed. Watch closely to avoid burning.
- Let cookie cups cool in the pan for at least 10 minutes. Run a butter knife around edges to loosen, then gently remove to a cooling rack.
- Sprinkle with a pinch of sea salt if desired. Serve warm for gooey centers or let cool for a firmer treat.
Notes
For best results, use regular creamy peanut butter (not natural). Let cookie cups cool before removing from the pan to prevent breaking. Customize with different chocolates or nut butters. For a vegan version, use plant-based egg replacer, vegan marshmallows, and dairy-free chocolate. Store in an airtight container at room temperature for up to 3 days or freeze for longer storage.
Nutrition
- Serving Size: 1 cookie cup
- Calories: 130
- Sugar: 13
- Sodium: 60
- Fat: 5
- Saturated Fat: 1.5
- Carbohydrates: 16
- Fiber: 1
- Protein: 2
Keywords: peanut butter, smores, cookie cups, easy dessert, 6-ingredient, marshmallow, chocolate, bake sale, kid-friendly, gluten-free option


