The scent of rich, fudgy brownies baking in the oven on a chilly October evening instantly puts me in a festive mood. But let’s be honest, it’s the decorations that steal the show this time of year! I still remember the first time I made these Halloween mummy brownies with candy eyes for a classroom party—kids went wild for them, and adults kept sneaking seconds. There’s just something about gooey chocolate, creamy white drizzles, and those goofy little candy eyes staring up at you that makes everyone smile. If you want a treat that’s spooky, adorable, and totally irresistible, this is it.
Halloween mummy brownies check all my boxes for a party snack: they look impressive, taste fantastic, and come together with barely any fuss (no fancy piping skills required!). Plus, there’s room for creativity—let your little monsters help with the “bandages” and candy eye placement. After baking these for years—sometimes with homemade brownies, sometimes with a trusty box mix—I can promise these never last long on a dessert table. Whether you’re hosting a Halloween bash, need a fun classroom treat, or just want to make your family giggle, these mummy brownies are your ticket to spooky-season success. And don’t worry, I’ll walk you through every single step (and share some tricks for perfect results) so you can bake with confidence.
Why You’ll Love This Recipe
After testing dozens of Halloween treats over the years, I always come back to these Halloween mummy brownies. There’s something about them that just works—both for the baker and the lucky crowd who gets to eat them! Here’s why you’ll want to bookmark this recipe for every October:
- Quick & Easy: You can whip these up in under an hour, start to finish (even faster with a box mix!). No complicated steps or special equipment required.
- Simple Ingredients: No need to hunt down specialty items—most of what you need is already in your pantry. A box of brownie mix, some white chocolate, and candy eyes are the stars here.
- Perfect for Parties: These mummy brownies are a hit at Halloween parties, school events, potlucks, and even as a fun after-school snack. They’re portable, easy to eat, and always get a laugh.
- Crowd-Pleaser: I’ve never met a person (kid or grown-up) who didn’t smile when they saw these! They’re deliciously fudgy with just the right amount of spooky-cute charm.
- Unbelievably Delicious: Underneath the playful decorations, you’ve got seriously good brownies—moist, chocolatey, and oh-so-satisfying. The white chocolate drizzle adds a creamy, sweet contrast that’s just perfect.
What really sets these Halloween mummy brownies apart is how approachable they are. You don’t have to be a pastry chef to make them look fantastic. The “messier” the bandages, the better—they’re mummies, after all! My secret? I like to use a piping bag (or even a zip-top bag with the corner snipped off) for fast, zigzaggy drizzles. Even if you’re baking last minute, you’ll have a showstopper on your hands. And let’s talk about that first bite—the combination of rich brownie, creamy white chocolate, and the sweet crunch of candy eyes is pure Halloween magic. These brownies don’t just look the part; they taste like a celebration too.
What Ingredients You Will Need
This Halloween mummy brownies recipe uses basic ingredients to deliver maximum fun and flavor. I love that you can customize based on what you have on hand—homemade brownies or a boxed mix, semi-sweet or dark chocolate, and even allergy-friendly swaps. Here’s what you’ll need:
- For the Brownies:
- 1 box brownie mix (18-20 oz/510-567g) or homemade brownie batter (about 9×13-inch pan size)
- Eggs, oil, and water (as called for on your brownie mix or homemade recipe)
- Pinch of salt (optional, but I find it deepens the chocolate flavor)
- For the Mummy Decoration:
- 1 cup (170g) white chocolate chips or white candy melts (for the bandages)
- 1 teaspoon coconut oil or vegetable shortening (helps make the melted chocolate easier to drizzle)
- Candy eyes (store-bought, usually in the baking or cake decorating aisle)
Ingredient Tips:
- If you’re making brownies from scratch, I recommend using a recipe with melted chocolate for extra richness. But no judgment—box mixes work beautifully!
- For the white chocolate drizzle, I’ve had the best results with Ghirardelli white chips or Wilton candy melts. They melt smoothly and set up nicely.
- Candy eyes come in different sizes. I usually go for the medium ones (about 1/2-inch/1.25cm), but tiny or jumbo work too—just have fun with it.
- For a gluten-free version, use your favorite gluten-free brownie mix (like King Arthur or Bob’s Red Mill).
- Dairy-free? Swap in dairy-free chocolate chips and use coconut oil instead of butter in your brownies.
- If you can’t find candy eyes, you can make simple eyes with mini chocolate chips or dots of black decorating gel on white chocolate chips. It’s not as “googly” but still cute.
Most of these ingredients are pantry staples during baking season. Don’t be afraid to get creative—add-ins like chocolate chunks, chopped nuts, or a swirl of peanut butter can really make these brownies your own. Just keep in mind, the simpler the top, the easier it is to decorate.
Equipment Needed
Luckily, these Halloween mummy brownies don’t demand a chef’s kitchen. Most of this stuff is probably already at your fingertips. Here’s what I reach for every time:
- 9×13-inch (23x33cm) baking pan (metal or glass; parchment paper recommended for easy removal)
- Mixing bowls (one large for brownie batter, one small for melting chocolate)
- Whisk and/or spatula (for mixing and scraping)
- Measuring cups and spoons
- Piping bag or zip-top plastic bag (for drizzling the white chocolate “bandages”)
- Microwave-safe bowl (for melting white chocolate)
- Sharp knife or plastic bench scraper (to cut brownies cleanly)
If you don’t have a piping bag, no worries! I’ve used a sturdy sandwich bag with the corner snipped off—it works just as well. For the cleanest cuts, I wipe my knife with a damp paper towel between each slice. And if you’re using a metal pan, a light spritz of nonstick spray or a parchment sling makes brownie removal a breeze.
Don’t forget: white chocolate can scorch if overheated, so microwave in short bursts and stir thoroughly. I always keep a silicone spatula handy for easy, lump-free melting. Even budget-friendly tools will get the job done—no need for anything fancy.
Preparation Method
- Preheat and Prep: Preheat your oven to 350°F (175°C). Line a 9×13-inch (23x33cm) pan with parchment paper, leaving an overhang for easy lifting. Lightly grease the paper.
- Prepare the Brownie Batter: In a large mixing bowl, combine your brownie mix (or homemade batter) with eggs, oil, and water as directed. Stir until just combined—don’t overmix or the brownies can turn out tough. If using a homemade recipe, follow those exact instructions for mixing.
- Bake: Pour batter into the prepared pan and spread evenly. Bake according to package or recipe instructions, usually 22-28 minutes for a box mix. The top should be set, and a toothpick inserted near the center should come out with a few moist crumbs—watch closely to avoid dry brownies.
- Cool Completely: This is key! Let the brownies cool in the pan for at least 20 minutes, then lift them out using the parchment overhang. Move to a wire rack and cool completely (about 30 minutes). Warm brownies will melt the white chocolate drizzle, so patience pays off.
- Cut the Brownies: Using a sharp knife, slice brownies into rectangles or squares. I usually get 16 to 20 pieces from a 9×13-inch pan. Wipe the knife between cuts for neat edges.
- Melt the White Chocolate: In a microwave-safe bowl, combine 1 cup (170g) white chocolate chips and 1 teaspoon coconut oil. Microwave in 20-second bursts, stirring well after each, until smooth and pourable (about 1 minute total). Don’t overheat—white chocolate burns fast.
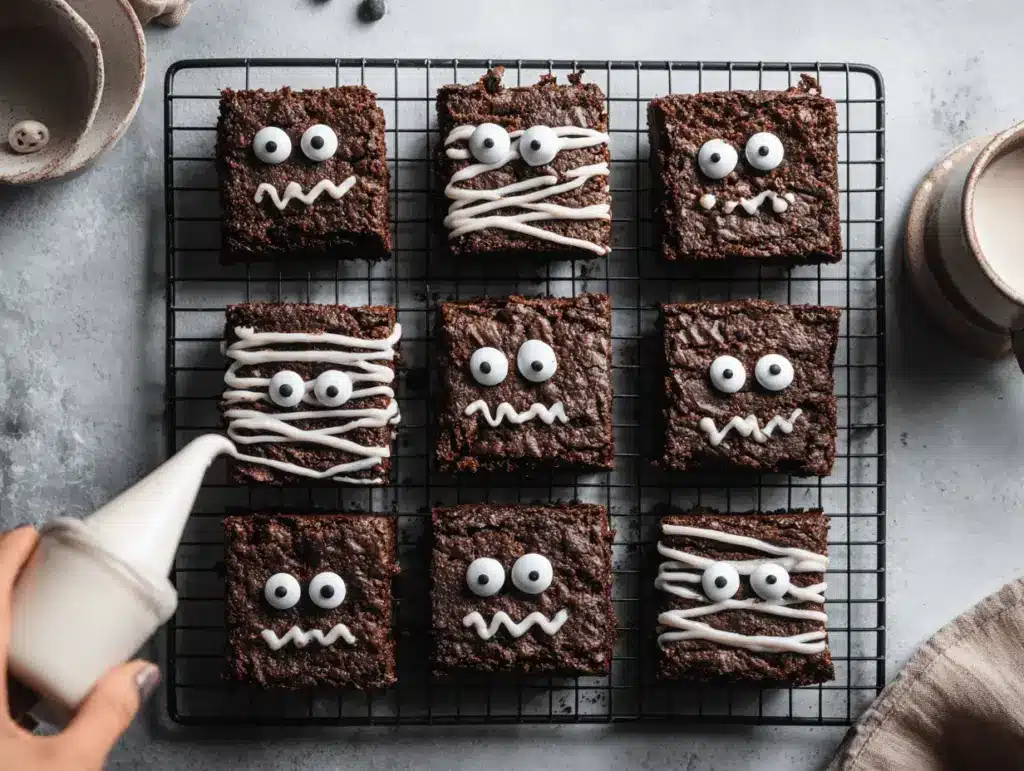
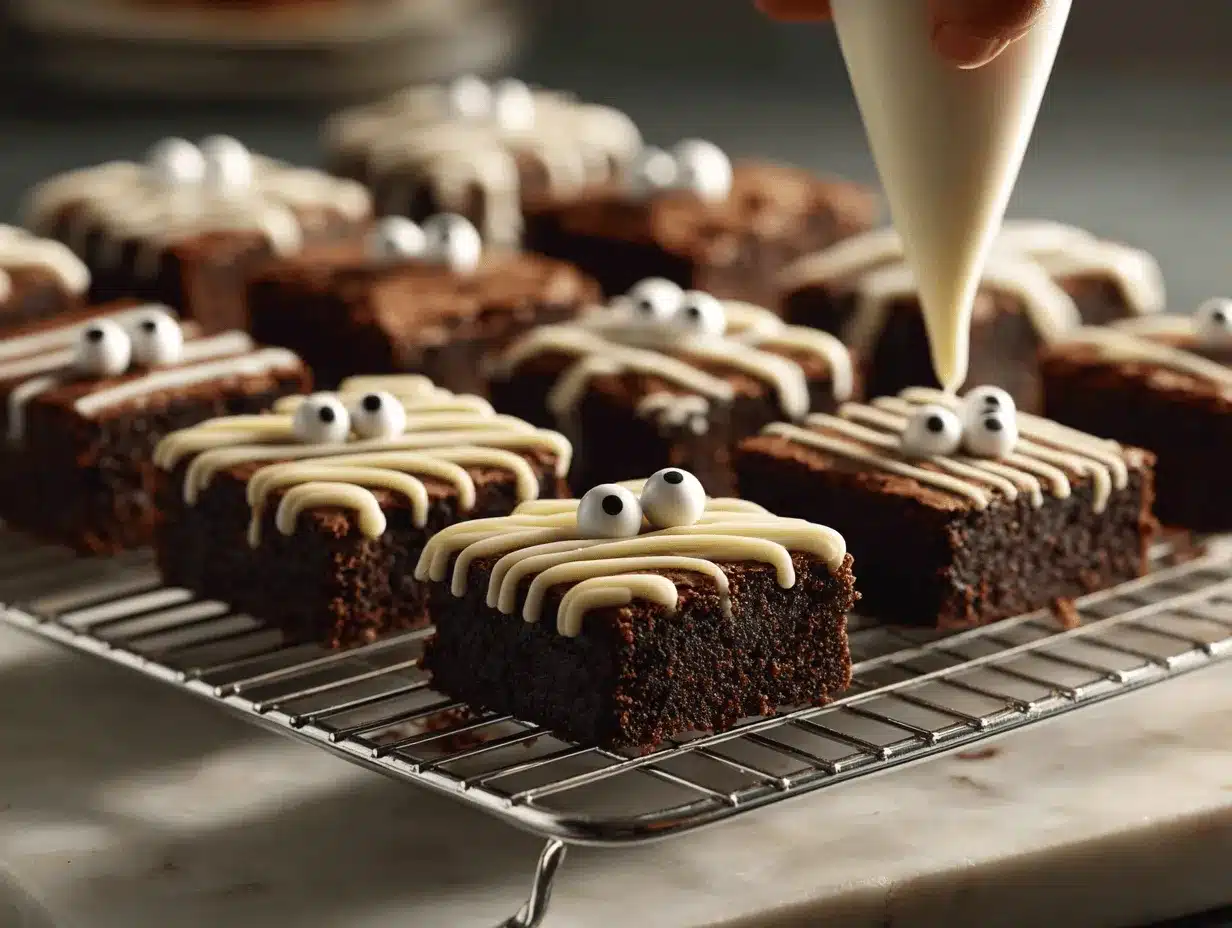
- Decorate the Mummy Bandages: Transfer melted white chocolate to a piping bag or zip-top bag (snip off a small corner). Drizzle back and forth over each brownie to create bandage-like stripes—crisscross, zigzag, let it be a little wild. The more imperfect, the better!
- Add Candy Eyes: While the chocolate is still soft, gently press two candy eyes onto each brownie. Get creative with placement—crooked or close together looks extra silly.
- Set and Serve: Let the chocolate set at room temperature (about 10 minutes) or pop the brownies in the fridge for 5 minutes if you’re in a hurry. Once set, transfer to a platter and watch them disappear!
Troubleshooting: If your white chocolate seizes or gets lumpy, add a tiny bit more coconut oil and stir well. If brownies stick to the pan, let them cool completely and use the parchment to lift them out. Remember, brownies look best when cut after they’re totally cool—warm brownies crumble!
Personal note: The first time I made these, I rushed the cooling step and ended up with a gooey (but delicious) mess. Trust me, a little patience gives the best results!
Cooking Tips & Techniques
After making Halloween mummy brownies year after year, I’ve learned a few tricks to get perfect results every time. Here’s what I wish I’d known from the start:
- Don’t Overbake: The secret to fudgy brownies is pulling them from the oven when a toothpick comes out with moist crumbs (not wet batter, not bone dry). They’ll set more as they cool.
- Line the Pan: Parchment paper is your best friend—brownies lift out easily and cut cleaner. I always leave a little overhang for easy removal.
- Use Good Chocolate: Whether you’re making brownies from scratch or a mix, using quality cocoa or chocolate chips makes a huge difference in flavor.
- Don’t Rush the Cooling: Decorating warm brownies leads to melty messes. Let them cool completely before cutting and drizzling.
- Easy Drizzling: If you don’t have a piping bag, a zip-top bag with the corner snipped off works perfectly. Just fill, twist, and squeeze gently for zigzag lines.
- Work Quickly with Candy Eyes: Press the eyes into the wet chocolate drizzle before it sets. If you wait too long, the eyes won’t stick.
- Clean Cuts: Wipe your knife between slices (I use a damp paper towel) for the neatest edges. A bench scraper works for straight lines, too.
- Batch Prep: If making for a big crowd, double the recipe and use two pans. Brownies can be decorated up to two days ahead.
And here’s a funny lesson learned: one year I melted the white chocolate too fast and it turned into a chalky lump. Now, I always microwave in short bursts and stir patiently. Slow and steady wins the (Halloween) race!
Variations & Adaptations
One of my favorite things about Halloween mummy brownies is how easy they are to customize. Here are a few of my tried-and-true twists:
- Gluten-Free: Swap in a gluten-free brownie mix (I like King Arthur or Bob’s Red Mill) and double-check that your candy eyes are gluten-free, too.
- Dairy-Free: Use dairy-free chocolate chips for both the brownies and the drizzle (Enjoy Life is a great brand), and replace butter with coconut oil if doing brownies from scratch.
- Peanut Butter Mummies: Swirl 1/2 cup (120g) creamy peanut butter into the brownie batter before baking. For the bandages, use a mix of white chocolate and peanut butter chips for a nutty twist.
- Halloween Flavors: Add a teaspoon of pumpkin pie spice to the brownie batter for a warm, seasonal vibe. Or, sprinkle crushed orange and black Halloween sprinkles on top for extra pizzazz.
- Mini Mummy Brownies: Bake the brownies in a mini muffin tin for bite-sized mummy treats. Just adjust the baking time to 12–15 minutes and decorate the same way.
I’ve even made these with a blondie base (vanilla brownies) for a caramel twist—just use your favorite blondie recipe instead of brownies. If you need a nut-free option, skip any nut add-ins and check your chocolate and decorations for allergens. Honestly, the fun is in making them your own!
Serving & Storage Suggestions
These Halloween mummy brownies are best served at room temperature, where the chocolate is fudgy and the drizzle is firm but creamy. Arrange them on a festive platter or cupcake liners for easy grabbing—especially great for parties or bake sales.
Serving Ideas:
- Pair with a mug of hot cocoa or spiced apple cider.
- Serve alongside other Halloween treats like caramel apples or popcorn balls for a dessert spread.
- Wrap individually in cellophane bags for a party favor or trick-or-treat giveaway.
Storage Tips:
- Store brownies in an airtight container at room temperature for up to 3 days.
- For longer storage, refrigerate for up to a week (let come to room temp before serving for best texture).
- Freeze undecorated brownies for up to 2 months. Thaw, then add the drizzle and eyes before serving.
- To keep brownies moist, place a slice of bread in the container—it really works!
The flavors actually deepen after a day, making them even more irresistible if you have leftovers (not that we usually do!).
Nutritional Information & Benefits
Halloween mummy brownies are definitely a treat, but you can feel good knowing exactly what’s in them—no mystery ingredients here! Here’s an approximate breakdown (per brownie, based on 16 servings):
- Calories: 220
- Fat: 10g
- Sugar: 22g
- Protein: 2g
Using real chocolate and white chocolate chips adds antioxidants and a little calcium. If you go with a gluten-free or dairy-free version, they’re friendly for more guests. Watch out for potential allergens: wheat, dairy, and soy (in some candy eyes). Moderation is key, but honestly, these just make Halloween a little more magical.
I love making these as a “sometimes” food—one or two brownies is just enough to satisfy my sweet tooth without going overboard. Plus, the joy they bring to a party is a wellness boost all its own!
Conclusion
If you’re looking for a Halloween dessert that’s as fun to make as it is to eat, these mummy brownies with candy eyes are the answer. They’re easy, festive, and totally customizable—perfect for busy families, last-minute party planners, or anyone who loves a good chocolate treat with a side of spooky charm.
I hope you try this recipe and put your own spin on it! Whether you use a classic box mix or grandma’s secret brownie recipe, the result will be a tray of grinning, googly-eyed mummies ready to delight your crew. Honestly, there’s nothing better than seeing those surprised smiles when you set these on the table.
If you make these Halloween mummy brownies, let me know in the comments—share your decorating tips, flavor twists, or stories of Halloween fun. Pin this recipe for later, and spread the spooky joy with friends and family. You’ve got this—happy baking and happy haunting!
FAQs About Halloween Mummy Brownies
Can I use homemade brownies instead of a box mix?
Absolutely! Any rich, fudgy brownie recipe will work for Halloween mummy brownies. Just bake in a 9×13-inch pan and cool completely before decorating.
How do I melt white chocolate without burning it?
Melt white chocolate chips with a bit of coconut oil in the microwave, using 20-second bursts and stirring each time. Stop heating as soon as it’s smooth—white chocolate scorches easily.
Can I make these mummy brownies ahead of time?
Yes! You can bake and decorate them up to 2 days in advance. Store in an airtight container at room temperature. The flavors actually get even better after a day.
What if I can’t find candy eyes?
No worries! You can make simple eyes using white chocolate chips dotted with black decorating gel or mini chocolate chips. They’re not as googly but still super cute.
How do I cut brownies cleanly for decorating?
Let brownies cool completely, then use a sharp knife wiped clean between cuts. Lining your pan with parchment paper helps lift them out for easy slicing.
Pin This Recipe!
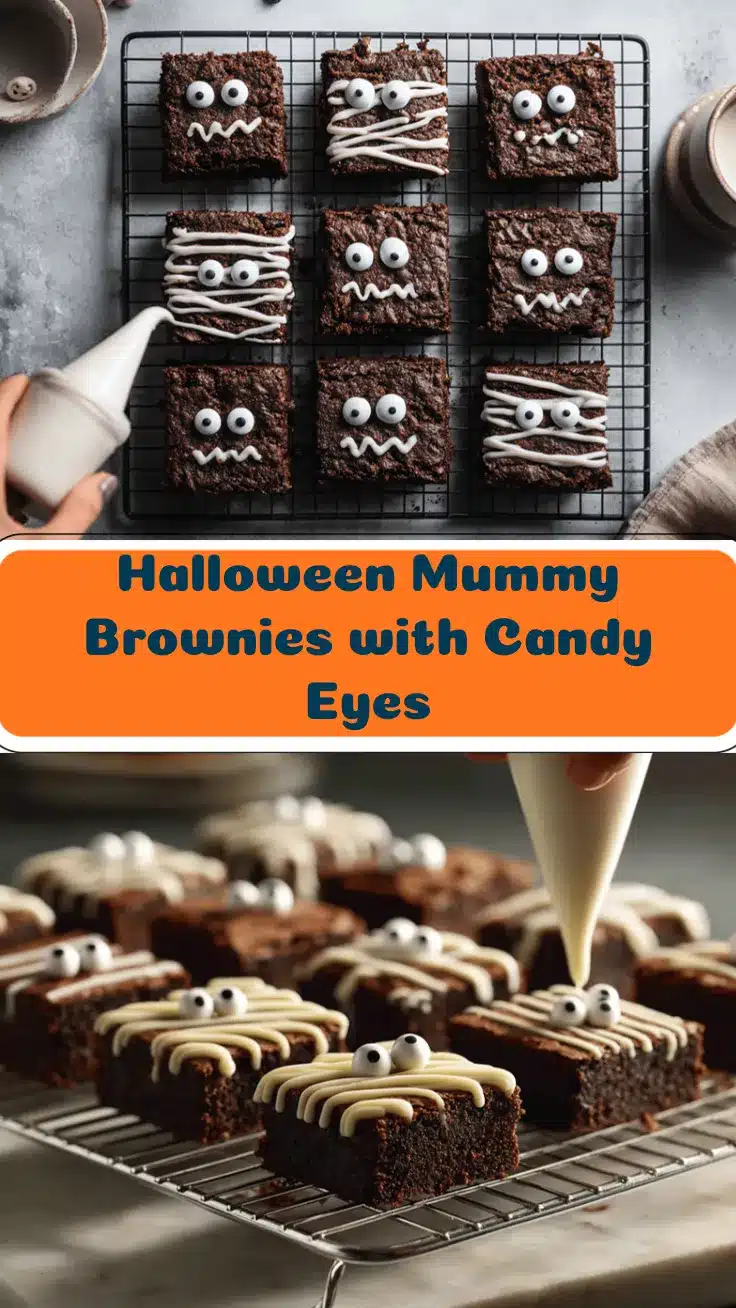
Halloween Mummy Brownies
These Halloween mummy brownies are a fun, spooky treat featuring fudgy brownies topped with white chocolate ‘bandages’ and candy eyes. Perfect for parties, classroom events, or a festive family dessert, they’re easy to make and always a crowd-pleaser.
- Prep Time: 15 minutes
- Cook Time: 25 minutes
- Total Time: 1 hour
- Yield: 16-20 brownies 1x
- Category: Dessert
- Cuisine: American
Ingredients
- 1 box brownie mix (18–20 oz) or homemade brownie batter (enough for a 9×13-inch pan)
- Eggs, oil, and water (as called for on your brownie mix or homemade recipe)
- Pinch of salt (optional)
- 1 cup white chocolate chips or white candy melts
- 1 teaspoon coconut oil or vegetable shortening
- Candy eyes (store-bought or homemade with white chocolate chips and black decorating gel)
Instructions
- Preheat your oven to 350°F (175°C). Line a 9×13-inch pan with parchment paper, leaving an overhang for easy lifting. Lightly grease the paper.
- In a large mixing bowl, prepare your brownie batter according to box or homemade recipe instructions. Stir until just combined.
- Pour the batter into the prepared pan and spread evenly. Bake according to package or recipe instructions, usually 22-28 minutes, until a toothpick inserted near the center comes out with a few moist crumbs.
- Let the brownies cool in the pan for at least 20 minutes, then lift out using the parchment overhang. Move to a wire rack and cool completely (about 30 minutes).
- Cut brownies into rectangles or squares (16-20 pieces). Wipe the knife between cuts for neat edges.
- In a microwave-safe bowl, combine white chocolate chips and coconut oil. Microwave in 20-second bursts, stirring after each, until smooth and pourable (about 1 minute total).
- Transfer melted white chocolate to a piping bag or zip-top bag with a small corner snipped off. Drizzle back and forth over each brownie to create bandage-like stripes.
- While the chocolate is still soft, gently press two candy eyes onto each brownie.
- Let the chocolate set at room temperature (about 10 minutes) or refrigerate for 5 minutes. Serve and enjoy!
Notes
For best results, let brownies cool completely before decorating. Use parchment paper for easy removal and clean cuts. If you don’t have candy eyes, use white chocolate chips with a dot of black gel or mini chocolate chips. For gluten-free or dairy-free adaptations, use appropriate brownie mixes and chocolate chips. Store in an airtight container at room temperature for up to 3 days.
Nutrition
- Serving Size: 1 brownie (1/16 of 9x13-inch pan)
- Calories: 220
- Sugar: 22
- Sodium: 120
- Fat: 10
- Saturated Fat: 5
- Carbohydrates: 32
- Fiber: 1
- Protein: 2
Keywords: Halloween, brownies, mummy brownies, spooky treats, party dessert, candy eyes, easy Halloween dessert, kid-friendly, chocolate, white chocolate drizzle