Introduction
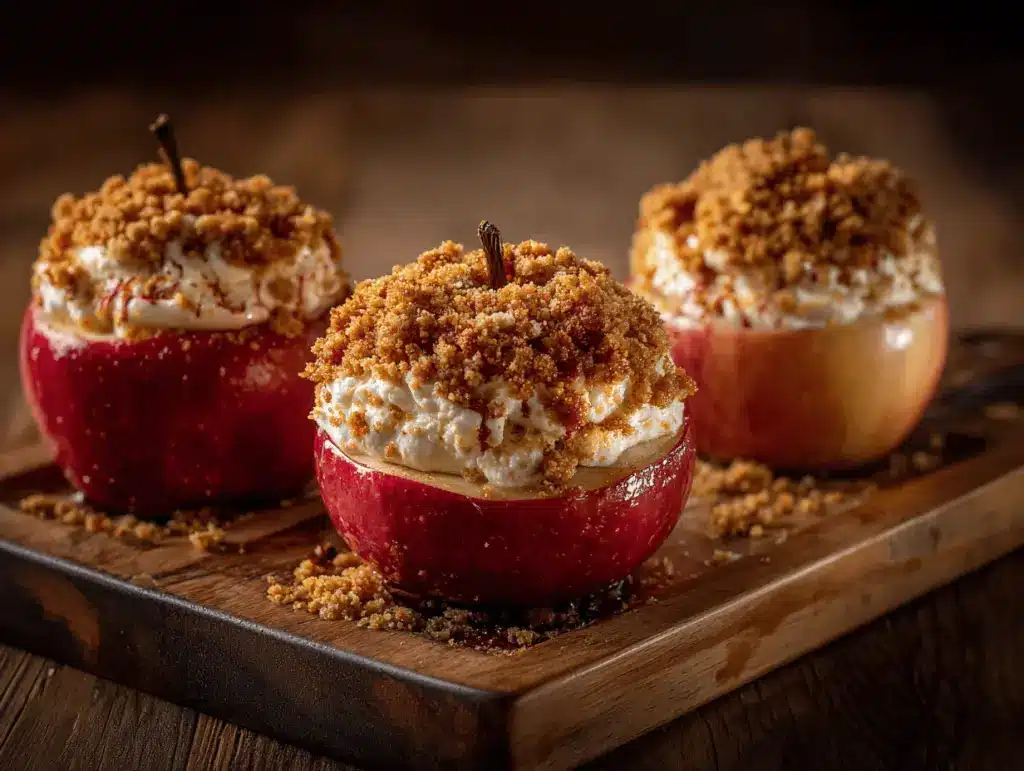
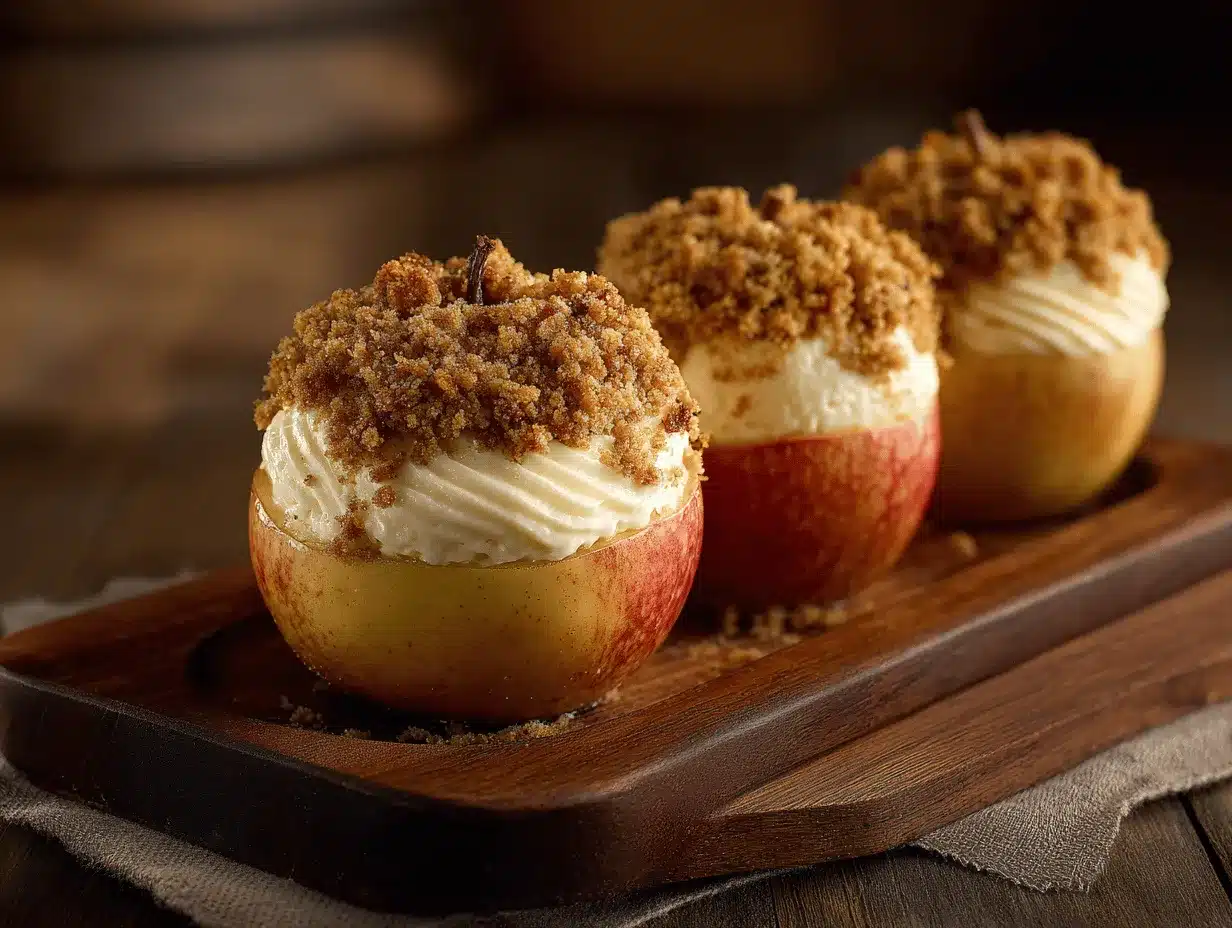
The first time I pulled a tray of cheesecake-stuffed baked apples from the oven, the whole house smelled like a cross between a cozy bakery and an apple orchard at harvest. You know that magical scent where cinnamon mingles with sweet, bubbling fruit and something creamy and rich is hiding underneath? That’s it. This cheesecake-stuffed baked apples recipe is my answer to chilly nights and last-minute dessert cravings—especially when you want something that feels both nostalgic and a little bit special.
I stumbled on the idea during one of those “what can I make with what I have?” moments. We’d gone apple picking, and I had a surplus of honeycrisps—plus half a block of cream cheese I wanted to use up. I’d made baked apples before, and of course, classic cheesecake, but never thought to combine them until I saw a photo of stuffed apples floating around Pinterest. Lightbulb moment! After a few test runs (and, let’s be honest, a couple of sticky messes), I finally landed on the perfect blend: tender roasted apples, tangy cheesecake filling, and a golden, crunchy graham cracker topping that’s just a little bit addictive.
This cheesecake-stuffed baked apples recipe isn’t just for fall, but it totally shines when apples are at their peak. It’s great for families (even my picky niece loves them), impressive enough for a dinner party, and honestly, it’s easier than making a full cheesecake. If you’ve ever wanted the comfort of baked apples and the decadence of cheesecake without all the fuss, this is the recipe for you. I’ve made these more times than I can count, tweaking the filling and the topping until it’s just right. Trust me—once you try them, you’ll want to make them every apple season!
Why You’ll Love This Recipe
I’ve shared this cheesecake-stuffed baked apples recipe with friends, family, and even a few skeptical neighbors—and everyone has raved about it. Here’s why these stuffed apples deserve a spot in your fall dessert lineup:
- Quick & Simple: You can have these beauties ready in under an hour. No water baths or springform pans required!
- Pantry-Friendly Ingredients: No need to run to a specialty store. Everything you need is probably already in your fridge or pantry.
- Perfect for Entertaining: These are such a showstopper for holiday gatherings, cozy dinners, or just treating yourself on a random Tuesday.
- Crowd-Pleaser: Kids love the sweet apple and crunchy topping, adults swoon over the creamy cheesecake center. There are never leftovers.
- The Ultimate Comfort Combo: Warm baked apples, tangy cheesecake, a buttery graham crunch—each bite is like a hug in dessert form.
What really sets this recipe apart (and I learned this after a few batches) is the way the apple stays tender but not mushy, and the cheesecake filling sets up just right—creamy, not runny. Blending the cream cheese with just a touch of lemon adds brightness, while the graham topping bakes up golden and crisp. It’s not just another baked apple recipe; it’s the one you’ll want to make again and again.
If you’re the kind of person who lights a fall candle the minute September hits, or if you’re always searching for that perfect, not-too-sweet treat, you’ll be obsessed. This dessert is about more than flavor—it’s about slowing down, savoring the season, and maybe making a new tradition. I promise, you’ll know exactly what I mean after your first bite.
What Ingredients You Will Need
This cheesecake-stuffed baked apples recipe uses wholesome, approachable ingredients—most of which you probably have on hand already. Here’s what you’ll need for that irresistible flavor and texture:
- For the Apples:
- 4 large apples (Honeycrisp, Fuji, or Gala work great—choose firm ones that hold their shape)
- 1 tablespoon lemon juice (prevents browning, adds brightness)
- For the Cheesecake Filling:
- 6 oz (170g) cream cheese, softened (full-fat for richness, but light works too)
- 1/4 cup (50g) granulated sugar
- 1 large egg yolk (helps set the filling)
- 1/2 teaspoon vanilla extract (I love Nielsen-Massey for pure vanilla flavor)
- 1 teaspoon lemon zest (a little zing goes a long way)
- 1/8 teaspoon salt (balances the sweetness)
- For the Crunchy Graham Topping:
- 1/2 cup (50g) graham cracker crumbs (about 4 whole crackers, crushed)
- 2 tablespoons (28g) unsalted butter, melted
- 2 tablespoons (25g) brown sugar (light or dark, your call)
- 1/2 teaspoon cinnamon (adds warmth—feel free to bump it up if you love spice)
- Pinch of salt
- Optional Finishes:
- Powdered sugar, for dusting
- Warm caramel sauce, for drizzling
Ingredient Tips:
Choose apples that are big enough to stuff but not so huge they won’t cook evenly. If you’re avoiding gluten, swap in gluten-free graham crackers. For a dairy-free version, use your favorite plant-based cream cheese and butter (I’ve tried Miyoko’s and it works well). Want to add some crunch? Sprinkle in a few chopped toasted pecans or walnuts with the topping.
When apples are in season, grab a mix of varieties for a more complex flavor. And don’t stress if you’re out of lemon zest—orange zest works nicely, too. Little tweaks like these make this cheesecake-stuffed baked apples recipe endlessly adaptable to your pantry and taste.
Equipment Needed
- Apple corer or paring knife: Makes hollowing out the apples a breeze. If you don’t have a corer, a sturdy spoon and a steady hand will do the trick (just go slow).
- Mixing bowls: One for the cheesecake filling, one for the topping. Any medium-sized bowl works.
- Hand mixer or sturdy whisk: For beating the cream cheese smooth. I’ve used both—if your cream cheese is soft enough, a whisk is plenty.
- Baking dish or pie plate: Snug enough to fit all your apples upright. An 8×8-inch (20x20cm) glass or ceramic dish works well. I’ve also used a cast iron skillet for extra rustic vibes.
- Measuring cups and spoons: For precision—especially with the cheesecake filling.
- Spoon or small spatula: For filling the apples.
If you’re missing any “fancy” gadgets, don’t stress. I’ve prepped these with just a paring knife and some patience. A melon baller can also help scoop out the apple core. When it comes to cleaning, soak sticky dishes in warm water with a splash of baking soda—makes clean-up so much easier!
Budget tip: Dollar store glass baking dishes work just as well as pricier options, and they look great for serving.
Preparation Method
- Preheat & Prep: Preheat your oven to 350°F (175°C). Lightly grease your baking dish with butter or nonstick spray. This helps prevent any sugary apple juices from sticking.
- Hollow the Apples: Wash and dry the apples. Using an apple corer (or a small sharp knife), carefully cut a wide opening at the top of each apple, about 1.5 inches (4cm) in diameter. Scoop out the core and some flesh, leaving about 1/2 inch (1.3cm) wall and base. Don’t go all the way through—you want a “bowl” for the filling. If the apples wobble, slice a tiny bit off the bottom to level them.
- Prevent Browning: Brush the insides and tops of the apples with lemon juice. This keeps them fresh and pops a little brightness into the flavor.
- Mix the Cheesecake Filling: In a medium bowl, beat the cream cheese with a hand mixer (or sturdy whisk) until smooth and creamy, about 1 minute. Add the granulated sugar, egg yolk, vanilla, lemon zest, and salt. Beat well until combined and there are no lumps—scrape down the sides as needed. The filling should be thick but spoonable.
- Fill the Apples: Spoon the cream cheese mixture into the hollowed apples, filling each about 3/4 full (the filling will puff slightly as it bakes). Don’t overfill—if you have extra, bake it in a ramekin alongside the apples as a little bonus treat.
- Make the Crunchy Graham Topping: In another bowl, mix the graham cracker crumbs, melted butter, brown sugar, cinnamon, and a pinch of salt. Stir until the mixture is clumpy and evenly moistened.
- Top the Apples: Sprinkle the graham mixture generously over each stuffed apple, pressing down gently to help it stick. You want a thick, crunchy cap on each one. If you love extra crunch, double the topping!
- Bake: Arrange apples upright in your prepared dish. Add a splash (2-3 tablespoons) of water to the bottom to keep things steamy and prevent burning. Bake for 30-35 minutes, or until the apples are tender (poke with a knife—should glide in easily) and the topping is golden brown. If your apples are extra large or firm, you may need up to 40 minutes.
- Cool & Serve: Let the apples cool for at least 10 minutes before serving. The cheesecake will set up a little as they cool, making them easier to eat. Dust with powdered sugar or drizzle with caramel sauce if you like extra flair.
Troubleshooting: If your apples are leaking, double-check that you didn’t scoop out the base. If the topping browns too quickly, tent with foil in the last 10 minutes. Apples too firm? Give them an extra 5 minutes and check again. I always keep an eye (and nose) on things after the 30-minute mark—your kitchen will smell amazing, so it’s hard to forget!
Efficiency Tip: Prep the cheesecake filling and topping while the apples are hollowing on the counter. This recipe is even more fun with a helper—one cores, one mixes, everyone eats.
Cooking Tips & Techniques
Over the years, I’ve picked up a few tricks to make these cheesecake-stuffed baked apples turn out just right, every time. Here’s what I’ve learned (sometimes the hard way!):
- Choose the Right Apples: Firm, tart-sweet apples (like Honeycrisp or Fuji) hold up best. Softer varieties tend to collapse or get mushy. If you do use softer apples, reduce the baking time by 5 minutes.
- Don’t Overfill: It’s tempting to cram in as much cheesecake filling as possible, but too much can bubble over and make a mess. Fill about 3/4 full—you’ll thank yourself later.
- Uniform Size Matters: Try to pick apples of similar size so they bake evenly. If you’ve got a couple of smaller ones, check those for doneness a few minutes early.
- Keep the Bottom Intact: When coring, don’t poke through the base. If you do, plug the hole with a bit of apple flesh or a chunk of graham cracker to help hold the filling in.
- Steam Is Your Friend: A splash of water in the baking dish helps keep the apples moist and prevents scorching on the bottom. Sometimes I’ll add a cinnamon stick to the water for extra aroma.
- Let Them Cool: The filling sets up as it cools, so don’t rush it. Hot filling can be runny—ten minutes of patience makes a big difference.
I once forgot to add water to the pan and ended up with caramelized, stuck-on apple bottoms—not fun to scrub off. And yes, I’ve overbaked them too, which makes the apples collapse and the cheesecake rubbery. Now, I always check at 30 minutes and go from there. These little tweaks are what make the difference between good and “where have these been all my life?” apples.
Variations & Adaptations
There’s something magical about a recipe that can flex to fit your cravings or dietary needs. Here’s how you can make this cheesecake-stuffed baked apples recipe your own:
- Gluten-Free Option: Use gluten-free graham crackers for the topping. I’ve had great results with Kinnikinnick or Schär brands—no one can tell the difference.
- Dairy-Free/Vegan: Swap in plant-based cream cheese (like Kite Hill or Miyoko’s), vegan butter, and a flax egg (1 tablespoon ground flaxseed + 2.5 tablespoons water) instead of the egg yolk. The texture is slightly different but still delicious.
- Flavor Twists: Add 1/4 cup mini chocolate chips or chopped pecans to the cheesecake filling for extra richness. Or, mix in a teaspoon of pumpkin pie spice for a fall-forward flavor. For a caramel apple vibe, drizzle with store-bought or homemade caramel sauce before serving.
- Cooking Methods: If you need to free up your oven, these can be cooked in a slow cooker on low for 2-3 hours. The texture is softer, but the flavor is awesome.
- Personal Favorite: I sometimes add a handful of fresh cranberries to the apples before stuffing—they burst in the oven and add the best tangy pop!
If you’re working around nut allergies, skip any nut toppings and use seeds instead. The recipe is super forgiving, so don’t be afraid to get creative—just keep an eye on baking time if you make bigger changes.
Serving & Storage Suggestions
These cheesecake-stuffed baked apples are best served warm, straight from the oven. That said, they’re also surprisingly good at room temperature or even chilled! For presentation, place each apple in a shallow bowl, dust with a bit of powdered sugar, and finish with a drizzle of caramel sauce or a dollop of whipped cream.
Pair them with hot apple cider, a scoop of vanilla ice cream, or a mug of cinnamon tea for the ultimate cozy dessert. If you’re serving a crowd, slice the apples in half to show off that creamy filling.
To store leftovers, cover and refrigerate for up to 3 days. The graham topping softens over time, but honestly, that’s not a bad thing—the flavors meld and the apples stay juicy. To reheat, pop them in a 300°F (150°C) oven for 10-15 minutes, or microwave in 30-second bursts until warmed through. I don’t recommend freezing—they tend to get watery and lose their texture. But really, leftovers are rare!
Nutritional Information & Benefits
Each cheesecake-stuffed baked apple comes in at roughly 280 calories, with about 4g protein, 12g fat, and 39g carbohydrates. (This is an estimate—actual values will vary based on apple size and specific brands used.)
Apples bring fiber, antioxidants, and vitamin C to the table, while the cream cheese offers a bit of protein and calcium. If you use low-fat or plant-based cream cheese, you can trim the fat content a bit. The recipe is naturally nut-free (unless you add nuts), and can be made gluten-free or vegan with the swaps above.
For me, these apples are a great way to satisfy a dessert craving with some real fruit and a dose of comfort. If you’re watching sugars, you can reduce the brown sugar in the topping or use a sugar substitute like Swerve—just keep an eye on browning.
Conclusion
If you’re searching for a dessert that’s simple to make, full of autumn flavor, and guaranteed to wow your friends and family—this cheesecake-stuffed baked apples recipe is it. You get all the comfort of classic baked apples, the creaminess of cheesecake, and that can’t-resist crunchy graham topping.
Feel free to customize—play with spices, swap the apples, or try a different topping. That’s the beauty of this recipe: it’s almost impossible to mess up, and every batch feels a little bit special. Honestly, these are the kind of desserts that make memories.
If you try this recipe, I’d love to hear how it went! Leave a comment, share your twists, or tag me on Pinterest. Let’s keep the cozy dessert vibes going—and happy baking!
Frequently Asked Questions
How do I prevent the apples from getting mushy?
Use firm apple varieties like Honeycrisp or Fuji, and don’t overbake—check for tenderness starting at 30 minutes. Softer apples need less time.
Can I make these cheesecake-stuffed baked apples ahead of time?
You can prep the apples and filling a day in advance, keep them in the fridge, and bake just before serving. Baked leftovers reheat well, but the topping is crunchiest on day one.
What if I don’t have graham crackers for the topping?
Try digestive biscuits, vanilla wafers, or even crushed gingersnaps for a spicy twist. Oats mixed with a little flour and butter also work in a pinch.
Is there a way to make this recipe nut-free?
Absolutely! The base recipe is nut-free. Just skip any optional nut toppings or fillings, and you’re all set.
Can I use a different fruit instead of apples?
Pears work beautifully—just choose firm, not-too-ripe ones. Adjust baking time as needed, since pears can soften faster than apples.
Pin This Recipe!
Cheesecake-Stuffed Baked Apples
Tender baked apples filled with creamy cheesecake and topped with a crunchy graham cracker crumble. This easy fall dessert is cozy, nostalgic, and sure to impress at any gathering.
- Prep Time: 20 minutes
- Cook Time: 35 minutes
- Total Time: 55 minutes
- Yield: 4 servings 1x
- Category: Dessert
- Cuisine: American
Ingredients
- 4 large apples (Honeycrisp, Fuji, or Gala)
- 1 tablespoon lemon juice
- 6 oz cream cheese, softened
- 1/4 cup granulated sugar
- 1 large egg yolk
- 1/2 teaspoon vanilla extract
- 1 teaspoon lemon zest
- 1/8 teaspoon salt
- 1/2 cup graham cracker crumbs (about 4 whole crackers, crushed)
- 2 tablespoons unsalted butter, melted
- 2 tablespoons brown sugar
- 1/2 teaspoon cinnamon
- Pinch of salt
- Powdered sugar, for dusting (optional)
- Warm caramel sauce, for drizzling (optional)
Instructions
- Preheat your oven to 350°F (175°C). Lightly grease a baking dish with butter or nonstick spray.
- Wash and dry the apples. Using an apple corer or small sharp knife, cut a wide opening at the top of each apple (about 1.5 inches in diameter). Scoop out the core and some flesh, leaving about 1/2 inch wall and base. If needed, slice a bit off the bottom to level.
- Brush the insides and tops of the apples with lemon juice to prevent browning.
- In a medium bowl, beat the cream cheese until smooth. Add granulated sugar, egg yolk, vanilla, lemon zest, and salt. Beat until well combined and smooth.
- Spoon the cheesecake filling into the hollowed apples, filling each about 3/4 full.
- In another bowl, mix graham cracker crumbs, melted butter, brown sugar, cinnamon, and a pinch of salt until clumpy and evenly moistened.
- Sprinkle the graham mixture generously over each stuffed apple, pressing gently to adhere.
- Arrange apples upright in the prepared dish. Add 2-3 tablespoons of water to the bottom of the dish.
- Bake for 30-35 minutes, or until apples are tender and topping is golden brown. If apples are large or firm, bake up to 40 minutes.
- Let apples cool for at least 10 minutes before serving. Dust with powdered sugar or drizzle with caramel sauce if desired.
Notes
Choose firm apples for best results. For gluten-free, use gluten-free graham crackers. For dairy-free, substitute plant-based cream cheese and butter. Add chopped nuts or mini chocolate chips for variation. Let apples cool before serving for best texture. Store leftovers covered in the fridge for up to 3 days.
Nutrition
- Serving Size: 1 stuffed apple
- Calories: 280
- Sugar: 29
- Sodium: 180
- Fat: 12
- Saturated Fat: 7
- Carbohydrates: 39
- Fiber: 4
- Protein: 4
Keywords: baked apples, cheesecake stuffed apples, fall dessert, easy dessert, apple dessert, graham cracker topping, stuffed apples, autumn recipe, holiday dessert


